Payable Setups
Setup the Manage Procurement Agent
Supplier Registration without Bank Details
Add the Bank Account to the Supplier
Invoice, Payment Approval Setups (Optional)
Bank, Branch and Bank Account Setups
Understanding
Payables Dashboard
Invoice Creation
Standard Invoice
Credit Memo Invoice
Credit Memo Invoice with Matching to Standard
Invoice
Debit Memo Invoice
Debit Memo Invoice with Matching to Standard
Invoice
PO (Purchase Order) Matched Invoices
Creating a Purchase Order for Apply to
Standard Invoice
Creating a Standard Invoice and Match the
Above Purchase Order
Creating One Invoice Matched to Multiple
Purchase Orders
Invoice Holds
Placing a Manual Hold on an Invoice
Releasing Invoices from a System Hold
Placing a Manual Hold on an Invoice Lines
Cancelling an Invoice
ACH
(Electronic) Payment Setups and Process Flow
ACH Payment
Setups
1.BI
Publisher Desktop
2.Payment Setups
a.Payment Templates
b.Payment Formats
c.Payment Document (For Electronic payments
this setup is Optional)
d.Payment Process Profile (PPP)
e.Payment Process Request Template
(Optional)
ACH (Electronic) Payment Process Flow
1.Create
Invoice and Pay in Full
2.Manual
Payment
Create
invoice and submit the Manual Payment
3.Run
the Payment Process Request (PPR)
Create
Invoice
Void
the Payment (Cancel the Existing payment)
Create
the PPR for New Invoices and Void Payments
4.Accounting
Post
the Invoice to General Ledger
Post
the Payment to General Ledger
Check
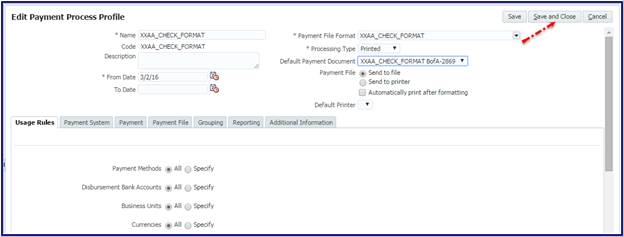
Payment Setups and Process Flow
Check Payment Setups
1.Payment Setups
a.Payment Templates
b.Payment Formats
c.Payment Document (For Electronic
payments this setup is Optional)
d.Payment Process Profile (PPP)
e.Payment Process Request Template
(Optional)
Check Payment Process Flow
1.Create Invoice and Pay in Full
2.Manual Payment
Create invoice and run the Manual Payment
3.Run
the Payment Process Request (PPR)
Create Invoice
Void the Payment (Cancel the Existing
payment)
Create the PPR for New Invoices and Void
Payments
4.Accounting
Post the Invoice to General Ledger
Setup
the Manage Procurement Agent
Procurement
agents are typically users with procurement roles, such as:
Buyer
Catalog
Administrator
Category
Manager
Procurement
Contract Administrator
Procurement
Manager
Supplier
Administrator
Supplier
Manager
Supplier
Qualification
They
have procurement job responsibilities in the buying organization, such as
creating purchase agreements, purchase orders, and related procurement
functions. You must set up these users as procurement agents for them to manage
procurement documents and perform other procurement actions.
You
use the Manage Procurement Agents task to create and maintain a procurement
agent's access to procurement functionality for a business unit. You can find
the task in the Purchase Agreements and Purchase Orders work areas.
You
can implement document security for individual document types, such as purchase
orders, purchase agreements, and requisitions. You can also control a
procurement agent's access to manage activities for suppliers, negotiations,
catalog content, and business intelligence spend data.
The
configuration assigns an access level to documents owned by other procurement
agents for each procurement business unit.
Note: An
agent can perform all actions on his own documents as long as he has
procurement BU access.
None:
The agent has no access to documents owned by other agents.
View: Permits
the agent to search and view other agents' documents.
Modify:
Permits the agent to view, modify, delete, and withdraw other agents'
documents.
Full:
Permits the agent full control of other agents' documents. This includes the
view, modify, delete, withdraw, freeze, hold, close, cancel, and finally close
actions.
The
buyer agent is granted access to the Manage Supplier functionality in the
Manage Procurement Agent page
-
Login with an username with access to Functional Setup Manager
-
Select Functional Setup Manager (FSM) face
-
In All Tasks Tab, search for "Manage
Procurement Agent"
-
Click on Manage Procurement Agent task
-
Click on the Agent Name to Edit the Agent
-
Under Action, grantee the "Manage Suppliers" privilege to the agent
By
default, the suppliers for which the agent is granted access is based on the
business unit setups. And Supplier Sites are assigned to certain business units
in the site assignments.
All
of these setups work together to determine which suppliers and supplier sites the
buyer agent can manage or view.
If you have France setup as a Business Unit and Italy setup as a Business Unit you may control the access via the Business Unit setup for the buyer agent, or otherwise you may control the access at the individual Supplier Site setups.
Supplier Creation and Maintenance
After login to instance, click on Home Icon.

https://drive.google.com/file/d/1kmoZp1GbG2jymB3eEeJpsicdJOr5BMDX/
Please click on the below link
for more details:
AP – Oracle Fusion Payable and
Payments (ACH, Check) Setups and Process Training Manualhttps://drive.google.com/file/d/1kmoZp1GbG2jymB3eEeJpsicdJOr5BMDX/
Please
Like and Share our FaceBook page to get more details on Oracle Applications
https://www.facebook.com/pages/Oracle-Applications/712588392100243