Adjustments
Adjustments let you create positive / negative adjustments to your invoices/debit-memos/ credit memos/deposits/guarantees/chargebacks.
Required setups:
- Define a Receivable Activity for ‘Adjustment’
- Define Approval Limits for the user.
Define a Receivable Activity for ‘Adjustment’:
Setup à Receipts à Receivable Activities
Define Approval Limits for the user.
Setupà Transactions à Approval Limits
Adjustment can be adjusted at Line / Tax / Freight/ Late charges level.
Adjustment can be created at Transaction / Receipt level
We can create manual / automatic adjustments.
Adjustment will be created as a separate transaction
Create a Transaction:
We could see the amount at both Line and Freight totaled at 2,200 USD
To adjust: Query the desired Transaction and go to Actions à Adjust
Select the Activity Name as ‘Adjustment’ and select type as ‘Line/ Tax/Freight/Charges’ and enter the amount within your approval limits and save it.
To create Accounting for the Adjustment, place the cursor on the respective Adjustment row and go to à Tools à Create Accounting
P.S : In case if you select the type as ‘Invoice’, then only option you have is to make the total Transaction balance to zero.
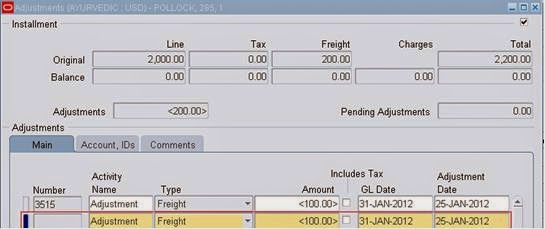
Details of the above Transaction:
Original Balance: Line à 2000 and Freight à 200 àtotaling à 2200
Created Adjustment at Freight level: 2000(line) + 100(freight) à 2100.
Now we will create a receipt of 2000 USD and adjust 100 USD at Receipt level.
In the above screenshot we could see the Amount applied is 2000 USD and the Balance due as 100 USD. Now we adjust the balance due of 100 USD via adjustment. Click on Adjustments 

In the above screenshot we could also see the earlier adjustment created against the transaction. Enter the required details and save it.
As soon as we save it, the Adjustment will be saved and number will be created.
To create Accounting for the Adjustment, place the cursor on the respective Adjustment row and go to à Tools à Create Accounting
Original Balance is: 2200 USD – Receipts 2000 USD – Adjustments 200 USD = 0 USD
Creating Automatic Adjustments
Control à Adjustments à Create Auto Adjustments
Pass the required parameters and create Adjustments to a bunch of Transactions.
Receipt Write-Off
Receipt write-offs are used to adjust small amounts which are remaining as under payments / over payments.
Receipt Write off can be created manually / automatically.
These can be created within user limits. If the user doesn’t have the limits, write-offs cannot be created.
Required setups:
- Define a Receivable Activity for ‘Adjustment’.
- Define Approval Limits for the user.
- At System Options, define the Receipt Write-Off limit per Receipt.
Define a Receivable Activity for ‘Receipt Write-Off’:
Setup à Receipts à Receivable Activities
Define Approval Limits for the user.
Setupà Transactions à Approval Limits
At System Options, define the Receipt Write-Off limit per Receipt.
Setup à System à System Options
Primarily we defined the user limits and now we defined the write off limit levels for each receipt at Operating Unit level.
Create a Transaction:
The total balance of the transaction is 1100 USD.
Now create a receipt for 1095 USD. We received 1095 USD from customer and we want to write –off 5 USD.
In the above screenshot we can see the ‘Amount Applied’ is 1095 USD and the ‘Balance Due’ is 5 USD.
To write-off 5USD, we need to change ‘Amount Applied’ to 1100 USD and add one more line and select ‘Apply to’ as Receipt Write-Off and enter ‘Amount Applied’ as -5 USD and save it.
Do Accounting for the Receipt. Tools à Create Accounting
Write –Off is Loss here and it is debited (Nominal Account Principle)
Original Transaction Balance: 1100 USD.
Applied Receipt amount: 1095 USD + Write-off 5USD
Hence the respective Transaction Balance is zero.
Automatic Write-off:
Control à Write-off Receipts
Automatic write-off Receipts can be created only for Over Payments. As the criteria is ‘Un-Applied’ amount.
Pass the required parameters and create write-off receipts for a bunch of receipts.


 Get Flower Effect
9 comments:
Very well explained with screenshot and text. Really like your post.
Very good explaination
Good explanation!! thanks for the post
Well explained. Good Work !
Thanks you so much.
Clear explanation. Thanks
Very good Explanation
Excellent
Screenshot and content is very neat and understandable. Once clarification here is System Option level setup value based on Foreign or Functional value
Thanks
Post a Comment