
1. Depot Repair: Business Flow
1.1 Request to Repair business process

2. Implementation Training Deck
2.1 Set up Sequence with Responsibility, Navigation and
dependencies
This
section describes the setup forms and gives references that help you understand
the underlying dependencies. The implementation section consists of the
following topics:
- Confirming Setups of Oracle Applications
- Setting Up Depot Repair
Complete the following steps shown in the
table below:
|
Required
|
Step
Title
|
|
Yes
|
Set
up System Administrator
|
|
Yes
|
Define
Key Flexfields
|
|
Yes
|
Define
Calendar, Currency, and Set of Books
|
|
Yes
|
Set
up Payables
|
|
Yes
|
Set
up Receivables
|
|
Yes
|
Set
up Organizations
|
|
Yes
|
Define
Locations
|
|
Yes
|
Set
up Employees
|
|
Yes
|
Set
up Inventory
|
|
Optional
|
Set
up Bills of Material
|
|
Optional
|
Set
up Work in Process
|
|
Yes
|
Setup
Order Management
|
|
Yes
|
Set
up TeleService
|
|
Yes
|
Set
up Charges
|
|
Yes
|
Set
up Tasks
|
|
Yes
|
Set
up Knowledge Base
|
|
Optional
|
Set
up Notes
|
|
Yes
|
Set
up Install Base
|
|
Yes
|
Set
up Depot Repair
|
2.2 Depot Repair Setups
Follow the guidelines in this table for
setting up Oracle Service Contracts:
|
Step
Title
|
|
Set
up Charges for Depot Repair
|
|
Set
up Repair Types
|
|
Set
up Depot Repair Service Request Type
|
|
Set
up Depot Repair Reason Codes
|
|
Set
up Customer Profiles
|
|
Set
up Diagnostic Codes in Depot Repair
|
|
Set
up Service Codes in Depot Repair
|
|
Define
Depot Repair Lookup Codes
|
|
Set
up Depot Repair Profile Options
|
|
Set
up Message Action Codes
|
|
Manage
Users
|
2.2.1 Set up Charges for Depot Repair
To use the Charges functionality in any
service-related process of Oracle Applications, items have to be set up in
Inventory as Material, Labor or Expenses item.
Setting up Charges involves the following steps:-
- Define Billing Type Codes
- Map Billing Type Codes to
Billing Categories
- Define Service activities
and Billing Types
- Define Service Business
Processes
- Define Install Base
Transaction sub-types
- Set up Time and Material
Labor Schedules
To
define Billing Type Codes
Ø
Navigator
> Service Request > Setup > Charges > Customer Support Lookups
Ø
Query
Look Type MTL_SERVICE_BILLABLE_FLAG
Ø
Add
the new Billing Code Types and save

After
the Billing Type Codes are created they have to be attached to Billing
Categories.
To
associate Billing Type Codes to Billing Categories
Ø
Navigator
> Service Request > Setup > Charges > Billing Type Attributes
Ø
Add
the Billing Type from the dropdown and the corresponding Billing Category and
save.

To define Service Activities and Billing
Types
Ø Navigator > Service Request > Setup > Charges > Service
Activities and Billing Types
Ø Add a new service activity (a business operation) and classify it as an
Order or Return
Ø Check the Depot Repair Quantity Update and OM Interface checkboxes
Ø The No Charge checkbox can be checked if the customer is not to be
charged for the Service Activity
Ø Associate a Billing Type to the new service activity by adding the
Billing Type from the drop down
Ø Add the relevant operating unit, Order type and Line type

2.2.1.4 Define
Service Business Processes
To define Service Business Process
Ø Navigator > Service Request > Setup > Charges > Service
Business Process
Ø Enter name and description for the Business process (which is a
collection of Service Activities)
Ø Enter the effective dates, choose the Service Activities associated with
this Business Process and save.

To define Install Base Transaction
sub-types
Ø Navigator > Service Request > Setup > Charges > Install Base
Transaction Types
Ø In the Transaction Sub Types area check the Service checkbox and select
the service activity for which an Install Base Transaction sub-type has to be
created
Ø If the Activity being set up is of type Return, then select Reference
Reqd check box in the Source Info region. If there is a change of ownership of
the part, then select the Change Owner check box and select Internal from the
Change Owner to drop-down. To make an update of status of the item in the
customer’s installed base, select a new status using the Status LOV. Selecting
the Return Reqd check box would mean that the Return By date field in Charges
would have to be filled by the Depot Repair Agent.
Ø If the service activity is of type Order used to ship replacement parts
or repaired items to customers, then check the Reference Reqd checkbox. This
would mean that agents would have to enter the instance number of the item
being replaced/ returned. To record change of ownership, the Change Owner
checkbox has to be checked. Select External from the Change Owner to dropdown.
If the status of the item in the customer’s installed base has to be updated,
then select a new status using the Status LOV.
Ø In the Source Transaction Type region, use the Application Name LOV to
enter Oracle Order Management. This permits Oracle Depot Repair users to use
this subtype.
Ø Select a valid source transaction type from the Transaction Name LOV and
check the Update IB checkbox to permit Order Management to update the installed
base when an item is shipped or received. Select the Default check box if this
subtype is to be set as default for Oracle Order Management.
Ø Enter any other applications that are to be permitted to use this
subtype and save

To set up Time and Material Labor Schedules
Ø Navigator > Service Request > Setup > Charges > T&M
Labor Schedule
Ø Select the Business Process for which the labor schedule is to be
entered
Ø Enter the times/schedules and the pricing. Select the days for which the
schedule is applicable
Ø Save and click on Validate Setup

2.2.2 Set up Repair Types
Oracle Depot Repair supports the following Repair
Types:
·
Advance Exchange - The depot sends a replacement item
to the customer before receiving the damaged item for core credit.
·
Exchange - The depot sends a replacement item to the
customer after a broken item is received from the customer for core credit.
·
Loaner - The depot sends a loaner item to the
customer.
·
Loaner, Repair and Return - Same as Repair and
Return with an item loaned to the customer before receiving the broken item, so
as to bridge the gap while the damaged item is being repaired.
·
Repair and Return - A broken item is repaired by the
depot, and then returned to the customer.
·
Replacement - The depot sends a new replacement item to
the customer without having to receive a damaged item from the customer.
·
Standard - The depot agent is uncertain about a
customer need, and is unable to take a decision before further inspection of
the damaged item. RMAs and Sales Orders are created manually. The depot agent
has the option to carry out all functions in a manual mode.
·
Refurbishment - A Repair Order and its associated Service
Request is created in the Spares Management of Oracle Field Service as a result
of a demand for refurbishment or replenishment. The Repair Order has a Repair
Type of Refurbishment, and has two transaction lines, Move In and Move Out. The
Move In line tracks the shipment of the defective item from Spares Management,
and its reception into the depot. The Move Out line processes the shipment of
the repaired item back to Spares Management.
To Set Up Repair Types
Ø Navigator > Depot Repair > Set up > Repair Types
Ø Enter the Repair Type and a short description of the repair type
Ø To associate a business process to the repair type, select from the
Business Process LOV. The combination of Repair Type Ref and Business Process
identifies the applicable Transaction Billing Types
Ø The Repair Mode determines whether Oracle WIP or the Task Manager module
of Oracle Common Application Components is used for Repair Job management
Ø The Repair Type Ref identifies the type of application logic that
applies to the Repair Type and has all the seeded values in the LOV. Select the
relevant value.
Ø Choose the Price list (Optional) to associate with a Repair type and
enter Start date and End date.
Ø The Billing types and the corresponding Service Activity Code have to be
selected. For Material and Expense more than one Billing Type and Service
Activity Code can be selected.
Ø Check the box Automatically enter and book RMA. When a Repair Order is
created with this check box selected, an RMA (Return) line is entered and
booked automatically.

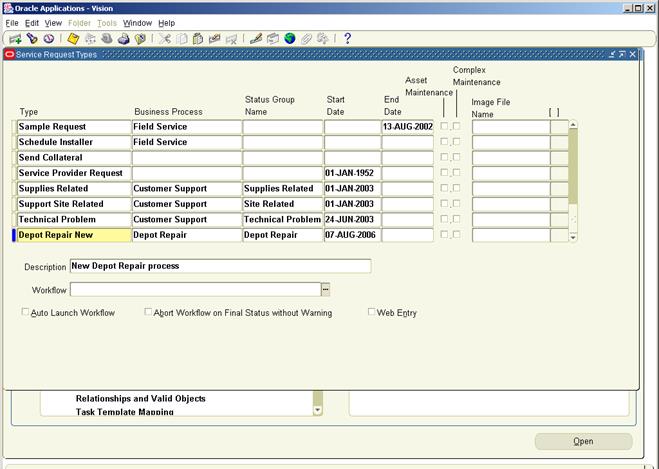
2.2.3 Set up Depot Repair Service
Request Type
At least one
service request should be defined for use in Depot Repair. During the
definition stage, a Service Request Type should be linked to a Business
Process. So while creating a Service Request Type for Depot Repair it has to be
associated with the applicable Business Process.
To Set Up Service Request Types
Ø Navigator > Service Request > Setup > Service Requests >
Request Types
Ø To create a new Service Request Type click on New in the toolbar.
Ø In the new blank row enter the name of the Depot Repair Service Request
Type in the Type field
Ø Select the Business Process to which the new Service Request Type is to
be associated. In this case select Depot Repair.
Ø Select Depot Repair in the Status Group name field
Ø Enter Start date and End date in the date fields
Ø In the Description field key in a short description of the Service
Request Type
Ø Select the relevant work flow (by default select the Generic Workflow)
and save
2.2.4 Set up Depot Repair Reason
Codes
For each different reason behind the return of an
item there are Reason Codes defined. There are 11 seeded Reason Codes that are
provided and additional Reason Codes which are organization specific can be set
up by accessing the “Application Object Library: Reason Lookups” window.
To Set Up Service Request Types
Ø Navigator > Depot Repair > Set up > Reason
Ø In the Code field enter the unique code that is to be assigned to the
new Reason
Ø Enter the meaning of the code in the Meaning field
Ø Enter the description of the code in the Description field
Ø Tag is an optional field which is not used by Depot Repair
Ø Enter the effectivity dates in the From and To fields
Ø Check the Enabled checkbox to use the Reason Code for Depot Repair and
save

2.2.5 Set up Customer Profiles
Customer Profiles define the extent of customer
information that a service representative/agent can access. Customer Profiles
provide agents with customer information in a graphical/visual format. Besides
making it possible to create summaries of key customer information called
profile checks, Customer Profiles also has the feature to drill down to
detailed information. Profile Checks can summarize information by customer, by
account, or by customer contact.
Setting up Customer Profiles involves the following
steps:-
- Define Profile Ratings
- Define Profile Check
Categories
- Define Profile Check
Variables
- Define Drilldowns
- Define Profile Checks
- Define Profile Groups
- Define Dashboard Groups
- Associate Profiles with
Modules and Responsibilities
- Run Customer Profile Engine
Defining
Profile Ratings involves the setting up of rating labels (the wording and
colors) to be used with Profile Checks and Categories (to which they are to be
associated). The labels describe the range of values of Profile Checks. The
three seeded values of Profile Ratings are High, Medium and Low.
To
set up Profile Ratings
Ø
Navigator
> Service Request > Set up > Customer Care Lookups
Ø
Query
for CSC_PROF_RATINGS in the Type field in the Customer Care Lookups screen. The
three pre-seeded ratings can be seen
Ø
To
create a new rating click New on the toolbar to insert a new row
Ø
Enter
a name for the new rating in the Code field
Ø
Enter
a short meaning in the Meaning field. Agents will be able to view this in the
Dashboard or Customer Profile window
Ø
Enter
a description of the Code in the Description field (Optional)
Ø
Enter
effectivity dates in the From and To fields
Ø
Check
the Enabled checkbox and save

The
newly created Ratings become labels when colors are associated to them.
To
associate colors to Ratings
Ø
Navigator
> Service Request > Set up > Customer Management > Customer
Profiles
Ø
Click
on the Preferences Tab in the Customer Profile Setup screen
Ø
Select
the Rating (for which color has to be associated) from the list of values in
the Rating Labels section
Ø
Select
a colour from the choices in the Colour field and save

Categories
are used to group Profile Checks and are useful in organizing Profile Checks
used for similar purposes.
To
define Profile Check Categories
Ø
Navigator
> Service Request > Set up > Customer Management > Customer
Profiles
Ø
Go
to the Preferences tab in the Customer Profile Setup screen
Ø
In
the Categories area add a new row by clicking on New in the toolbar
Ø
Enter
the category name in the Category field
Ø
Enter
a short description of the new category in the Meaning field
Ø
Enter
a detailed description in the Description field (optional) and save

This
involves entering SQL queries that can retrieve and summarize customer data.
The SQL statements can contain only two bind variables given below:-
·
:party_id
– to be used if SQL statement refers to a party
·
:cust_account_id
– to be used if SQL statement refers to a customer account
The
same variable can be used in multiple Profile Checks
To
define Profile Check Variables
Ø
Navigator
> Service Request > Set up > Customer Management > Customer
Profiles
Ø
Go
to the Profile Variables tab on the Customer Profile set up screen
Ø
Click
New on the toolbar
Ø
Enter
name of the new Profile Variable in the New field
Ø
Enter
a unique name in the Code field
Ø
Selecting
Customer, Account or Contact in the Level field would determine the appropriate
view where the information is to appear
Ø
Enter
the activity dates in the box titled Active
Ø
Enter
a description of the Profile Variable in the Description field (Optional)
Ø
Enter
the SQL statement in the following fields:-
·
Select
(mandatory field).
·
Currency
(optional field).
·
From
(mandatory field).
·
Where
(mandatory field).
·
Other
(optional, used for including clauses such as Group By)
Ø
Validate
the SQL statement by clicking on the Validate button and save

Drill-down
windows can be defined at two levels. The first level lists the items
summarized by the profile check. The second-level drill-down window is the application
window which displays the details of an individual record. An agent displays an
item in the application window by double clicking on one of the fields in the
summary list.
To
define Drilldowns
Ø
Navigator
> Service Request > Set up > Customer Management > Customer
Profiles
Ø
Go
to the Drilldown tab
Ø
Select
the Profile Variable for which drilldowns have to be defined from the Variable
field
Ø
Select
the application module for the second level drilldown from the Drilldown Module
list of values
Ø
Select
one of the tables in the Tables and Views area. The columns available for the
table are displayed in the Columns region
Ø
Check
the Show checkbox for the columns to be displayed in the first level drilldown
Ø
The
name entered in the Display name field against each column would be what the
agent sees in the first level drilldown
Ø
In
the first level drilldown, select a column which has to be used for the second
level drilldown
Ø
Select
the ID radio button for the column that has to be used for drilldown and save
Ø
Click
Build button to generate the SQL for the drilldown. (Optional)

To
enable Application Windows for drilldown
Ø
Navigator
> Service Request > Set up > Customer Management > Customer
Profiles
Ø
Go
to the Drilldown tab and click the New Button. The Task Setup: Object Types
form launches
Ø
Enter
a name for the Drilldown Module Object type in the Name field
Ø
Enter
a description in the Description field
Ø
Enter
a value in the Object Code field, a value that begins with CSC_, for example
CSC_PROF_CSDREPLN
Ø
Enter
the Function Name in the corresponding field in the Launch Details tab
Ø
Enter
the parameters
Ø
Select
application name Depot Repair in the Application field and save
Ø
Entries
in the Usage tab are optional

Prerequisites
Profile
variables, ratings, and rating labels must already be defined.
To
define Profile Checks
Ø
Navigator
> Service Request > Set up > Customer Management > Customer
Profiles
Ø
Go
to the Profile Checks tab
Ø
Enter
a name for the Profile Check in the Name field. The Code field defaults to the
name entered. Either this can be retained or a new unique code can be entered
in the Code field
Ø
Select
a level for the Profile Check from the list of values. This is based on the
information that is summarized by the Profile Check.
Ø
Enter
a description for the Profile Check in the Description field
Ø
Enter
the activity dates in the Active region
Ø
Choose
the type of Profile Check desired from the Type list of values. The choices
here are Variable or Boolean (Yes or No) and define the settings for the type
of Profile Check selected
Ø
In
the Ratings region define value ranges and the corresponding labels. For each
range enter a lower and upper number, with no overlap with other ranges. Select
the appropriate label and save
Ø
Oracle
Teleservice has several predefined Profile Checks

Profile Checks previously defined have to be
grouped for display in the Customer Profile window. Associating Profile Groups with application modules and responsibilities
enables providing different groups of agents with different customer views in
the Profile window.
Prerequisites
Profile Checks must be defined before Profile
Groups are created
To set up Profile Groups
Ø
Navigator
> Service Request > Set up > Customer Management > Customer
Profiles
Ø
Go
to the Profile Groups tab
Ø
Enter
a name for the Profile Group in the Name field. The Code field gets populated
with the name entered
Ø
Enter
the description of the Profile Group in the Description field
Ø
Select
the customer type from the Customer Type list of values
Ø
Enter
the date range of activity in the Active region
Ø
Select
the relevant Profile Check from the Profile Checks column and add them to the
Group Checks column
Ø
Check
the Display on Threshold checkbox only if the Profile Check has been set up
with a threshold and save

Defining Dashboard groups helps in enabling varied
Dashboard tab views for agents based on the application module and
responsibility. It creates different views for customers, individual accounts,
and for customer contacts.
Prerequisites
Profile checks and categories must be defined prior
to defining dashboard groups
To define Dashboard Groups
Ø
Navigator
> Service Request > Set up > Customer Management > Customer
Profiles
Ø
Go
to the Dashboard Groups tab in the Customer Profile setup window
Ø
Enter
a name for the Dashboard Group in the Group field. The Code field defaults
whatever that has been entered in the Group field
Ø
Enter
a description in the Description field
Ø
Select
the customer type from the Customer Type dropdown list
Ø
Select
the level at which the information is to be displayed – Customer, Account or
Contact. The selection made here restricts the Profile Checks that can be
selected for the group
Ø
Set
the dates of activity in the Active region
Ø
Select
the categories to be displayed by adding them to the Dashboard Categories
column using the arrow buttons. The order in which they should be displayed in
the Dashboard can be decided by moving them up or down using the arrow buttons
Ø
Save
changes made
Ø
Select
the Dashboard Category from the Category field list of values in the Checks
region
Ø
Move
the Profile Checks to be included from the Profile Checks column to the Group
Checks column. The order of display can be altered by using the Up and Down
arrow buttons
Ø
Profile
Checks defined with thresholds can be restricted by checking the Display on
threshold checkbox
Ø
Save
changes made

The Profile Groups and Dashboard Groups have to be
associated to application module, customer type, and responsibility.
Prerequisites
Profile groups and dashboard groups should be
created prior to associating Profiles to modules.
To associate Profiles with Modules and
Responsibilities
Ø
Navigator
> Service Request > Set up > Customer Management > Customer
Profiles
Ø
Go
to the Preferences tab in the Customer Profile setup screen
Ø
In
the Module Groups region choose a Module from the list values. Only modules
which use Profile window and Dashboard tabs can be enabled
Ø
For
Dashboard Groups available in Oracle Teleservice, Contact Center should be
selected
Ø
For
Customer Profile Groups available in Oracle Teleservice and Depot Repair, the
Override Customer Criticality window in Oracle TeleService, the Service Request
window of Oracle TeleService or the Repair Order window in Oracle Depot Repair
should be selected
Ø
Access
(to customer information) can be restricted to agents by selecting the
responsibility in the Responsibility list of values. More than one
responsibility can be mapped by creating multiple records
Ø
Select
a Profile Group and/or a Dashboard Group to be associated with the
module/responsibility and save

2.2.5.9 Run
Customer Profile Engine
The Customer Profile Engine, a concurrent program
has to be run after completing the Customer Profile setup to generate the
appropriate profile values.
The Customer Profile Engine, when executed,
performs the following operations in the sequence below:
Ø Evaluates the results of all the effective profile variables
Ø Evaluates the results of all effective profile checks based on the
profile variables
Ø Evaluates the results for all the customers, accounts, and contacts
The Customer Profile Engine must be run to:
Ø Retrieve profile values for new customers
Ø Retrieve the latest profile values for all customers
Ø Reflect changes made to the profile setup
Ø Retrieve values for new profiles
The Customer Profile Engine can be run in two ways:
Ø As a concurrent program
Ø When agents click the Refresh button available in the Profile section or
the Dashboard tab of the Contact Center or the E-Business Center in Oracle
TeleSales. This manual method fetches the latest data for the displayed
customer
The parameters for running Customer Profile Engine
are:
Ø Party Name
Ø Group Name
2.2.6 Set up Diagnostic Codes in Depot Repair
Diagnostic Codes are used in Oracle Depot Repair
while processing a Repair order. A Diagnostic Code is associated with a repair
problem while a Service Code is associated with a potential resolution to the
problem. A complete set up of Diagnostic Codes involves procedures in Oracle
Knowledge Management module as well. The steps involved in Oracle Depot Repair
are given below.
To Set Up Diagnostic Codes
Ø Navigator > Setup > Diagnostic Codes
Ø Enter the Diagnostic Code, Name and Description of the code
Ø Enter the start dates and end dates of the Code in the Active from and
Active to fields
Ø Each Diagnostic Code has to be associated with a domain – an Item or
Category. The domain to which the Diagnostic Code is being associated has to be
selected and depending on whether it is an Item or Category, the corresponding
item code or category name is to be selected in the respective fields

2.2.7 Set up Service Codes in
Depot Repair
Service Codes are used to associate potential
resolutions to repair problems and can be used with or without Diagnostic
Codes. A complete set up of Diagnostic Codes involves procedures in Oracle
Knowledge Management module as well. In Oracle Depot Repair, when you create a
Service Code, you can associate it with one or more items, one or more item
categories, one or more reference bills, one or more alternate bills, one or
more reference routings, one or more alternate routings and one or more task
template groups.
To Set Up Service Codes in Oracle Depot Repair
Ø Navigator > Setup > Service Codes
Ø Enter the Service Code, Name and Description of the code
Ø Enter the start dates and end dates of the Code in the Active from and
Active to fields
Ø If the Service Code is to be associated to a Domain
Ø Click on the Domain Tab
Ø Enter the Domain – Item or Category to which the new Service Code is to
be associated
Ø Depending on whether an Item or Category is selected, the corresponding
item code or category name is to be selected in the respective fields
Ø Repeat for as many categories or items that the Service Code has to be
associated to
Ø Alternately if the Service Code is to be associated to a Bill or Routing
Ø Click on the Bills and Routings tab
Ø Select the organization from the List of Values
Ø To associate the Service Code to a Bill, select from the list of values
in the Bill Reference fields. Select Alternate bill if required from the
corresponding field
Ø To associate a Service Code to a Routing, select from the list of values
in the Routing Reference fields. Select Alternate Routing if required from the
corresponding field
Ø Repeat for as many Bills or Routings that the Service Code has to be
associated to
Ø If the Service Code is to be associated to one or more task template
groups
Ø Click the Task Template Groups tab
Ø Select the Task Template Group from the list of values and save. The
Description field is automatically populated

2.2.8 Define Depot Repair Lookup
Codes
Lookup codes for Oracle
Depot Repair are defined from the Application Developer responsibility. Each
Lookup Code has a Meaning, Description and effectivity dates
Ø Navigator > Application > Lookups > Application Object Library
Ø Query for an existing Lookup Type under which the new Lookup Code has to
be defined. (The list of pre-seeded Lookup Types is given in the table below)
Ø Click New on the toolbar to insert a new row for the new Lookup Code.
Ø Enter the Code, Meaning, Description and effectivity dates
Ø Check the Enabled checkbox and save

List of pre-seeded Lookup Types in Oracle Depot
Repair
|
Lookup Type
|
Description
|
|
CSD_APPROVAL_STATUS
|
Repair Approval Status (Approved, Rejected)
|
|
CSD_ESTIMATE_STATUS
|
Estimate Status (Accepted, Bid, Closed,
Draft, Hold, Rejected)
|
|
CSD_EST_BILLING_TYPE
|
Estimate Billing Type (Expense, Labor,
Material)
|
|
CSD_EVENT
|
Repair Event (Customer Approved, Charges
Recorded, Repair Diagnosed, Repair Job Completed)
|
|
CSD_PRODUCT_ACTION_CODE
|
Product Transaction Action Code for
Repair Orders (Customer Item, Exchange, Loaner, Replacement, Defective,
Usable)
|
|
CSD_PROD_ACTION_TYPE
|
Depot Repair Order Product Transaction
Action Types (Return, Ship, Move In, Move Out)
|
|
CSD_PRODUCT_TXN_STATUS
|
Product Transaction Status (Booked,
Entered, Received etc.)
|
|
CSD_REASON
|
Reason for current status of repair
process (Customer Approves the Estimate, Estimate Approved, Repair On Hold)
|
|
CSD_REJECT_REASON
|
Estimate Reject Reasons (Customer Reject,
Machine Unavailable, Resource shortage)
|
|
CSD_REPAIR_MODE
|
Repair Mode for the depot repair
processes (WIP, Tasks, None, All)
|
|
CSD_REPAIR_STATUS
|
Repair Status (Closed, Open, On Hold)
|
|
CSD_REPAIR_TYPES
|
Depot Repair Types (Advance Exchange,
Walk-In with Return and Repair etc.)
|
|
CSD_RO_TXN_STATUS
|
Repair Order Transaction Status (OM
Booked, OM Received, OM Released etc.)
|
|
CSD_UNIT_OF_MEASURE
|
Lead Time Unit of Measure (Hour, Week,
Day)
|
|
CSD_WIP_JOB_STATUS
|
Repair Job Status (Released, Unreleased)
|
2.2.9 Set up Depot Repair Profile
Options
Depot Repair Profile Options are defined from the
System Administrator responsibility. A detailed list of Oracle Depot Repair
Profile Options are given in Section 2.4 Depot Repair Profile Options
To define Depot Repair Profile Options (from System
Administrator)
Ø Navigator > Profile > System
Ø Search for the Profile Option by entering the name of the Profile Option
in the Profile field and click the Find button. (The list of Depot Repair
Profile Options is given in a table below)
Ø Make necessary changes to the values to define/change Profile Options at
four levels - Site, Application, Responsibility, and User.

2.2.10 Set up Message Action
Codes
Message action codes help in specifying the action
that the recipient of the message should take. They are useful in organizations
where workflow based messaging is in use.
To setup Message Action Code
Ø Navigator > Setup > Service Request > Action Request
Ø Enter a Message Action code in the Code field
Ø Enter the brief description of the code in the Meaning field
Ø Enter a full description of the code in the Description field
Ø Enter the effectivity dates
Ø Check the enabled checkbox and save

2.3 Integration Points and data flow


2.4 Depot Repair Profile Options
List
of Depot Repair Profile Options
|
Profile Name
|
Default Value (at Site Level)
|
Possible Values
|
Description
|
|
CSD: Add to Order Num
Within Repair Order
Default
|
No
|
Yes or No
|
When the new item transaction is created, the Add
to Order Number is derived based on this profile and CSD: Add to Order Num
Within Service Request Default.
|
|
CSD: Add to Order Num
Within Service Request
Default
|
No
|
Yes or No
|
When the new item transaction is created, the Add
to Order Number is derived based on this profile and CSD: Add to Order Num
Within Repair Order Default. This profile takes the precedence over CSD: Add
to Order Num Within Repair Order Default. Setting this profile will cause it
to use the order number of the Service Request.
|
|
CSD: Allow Charge Override for Actuals
|
No
|
Yes or No
|
Determines whether to allow overriding of the
Charge field for Actuals lines.
|
|
CSD: Allow Charge Override for Estimates
|
No
|
Yes or No
|
Determines whether to allow overriding of the
Estimated Charge field for Estimate lines.
|
|
CSD: Allow Creating WIP Job Without RMA
|
No
|
Yes or No
|
Determines whether the creation of a WIP Job
without an RMA is allowed.
|
|
CSD: Allow Price Override for Logistics Lines
|
No
|
Yes or No
|
Determines whether to allow overriding of the
Price field in the Logistics Tab. Cannot be updated by a User, only by
Sysadmin. If not set, the value is taken as No.
|
|
CSD: Close SR When All
Repair orders are Closed
|
None
|
Yes or No
|
When set to Yes, automatically closes the Service
Request when the last Repair Order is closed.
|
|
CSD: Currency Conversion Type
|
None
|
Daily conversion types available in
GL (gl_daily_
conversion_types)
|
Conversion type to use when converting a cost to
the currency of an estimate charge line.
|
|
CSD: Customer Approval
Required
|
Yes
|
Yes or No
|
Determines whether customer approval of the
estimate is required for creating a Repair Job.
|
|
CSD: Debug Level
|
0
|
1 to 10
|
Determines the Debug level for Depot Repair
transactions.
|
|
CSD: Default Category Set for Diagnostic Codes
and Service Codes
|
Inv.Items
|
<Category Set>
|
Determines the default Category Set for setting
up Diagnostic Code and Service Code domains.
|
|
CSD: Default Country Code (Phone)
|
None
|
< free text >
|
Specifies the Default Country Code for phone
number fields.
|
|
CSD: Default Job Name
Prefix
|
No
|
<Any user entered value is allowed>
|
Specifies the Default Job Name Prefix used while
submitting a Repair Job for creation. This profile is applicable only when
the profile CSD: Use CSD as Job Name Prefix is set to No.
|
|
CSD: Default Labor Item for Estimate Line From
Tasks
|
None
|
Eligible labor items from Inventory
|
Labor item to use when auto-creating estimate
labor lines from tasks.
|
|
CSD: Default Pick Release Rule for Sales
Orders
|
None
|
Standard, etc.
|
Determines default Pick Release Rule for Repair
Order related sales orders.
|
|
CSD: Default Price List
|
None
|
< Price List >
|
Sets the default price list for the Depot Repair
application.
|
|
CSD: Default Repair Job
Status
|
None
|
Released or
Unreleased
|
Determines the default Repair Job status.
|
|
CSD: Default Repair Type
|
Standard
|
<Repair Types>
|
Determines default Repair Type for new Repair
Orders.
|
|
CSD: Default Return Reason Code for RMAs
|
Damaged Product
|
Damaged Product, etc.
|
Determines default Return Reason Code for item
transaction: RMAs.
|
|
CSD: Default Program Created Service Request
Severity
|
None
|
<List of Incident
Severities>
|
When creating Service Requests from RMA lines via
concurrent manager, this severity will be used for the Service Request.
|
|
CSD: Default Program Created Service Request
Status
|
None
|
<List of Incident Statuses>
|
1. When creating new Service Requests for
internal order refurbishments, this status will be used for the Service
Request.
2. When creating Service Requests from RMA lines
via concurrent manager, this status will be used for the Service Request.
|
|
CSD: Default Program Created Service Request Type
|
None
|
<List of Service Request Types for Depot
Repair>
|
When creating Service Requests from RMA lines via
concurrent manager, this type will be used for the Service Request.
|
|
CSD: Default Program Created Service Request
Urgency
|
None
|
<List of Incident Urgencies>
|
1. When creating new Service Requests for
internal order refurbishments, this urgency will be used for the Service
Request.
2. When creating Service Requests from RMA lines
via concurrent manager, this urgency will be used for the Service Request.
|
|
CSD: Default Program Created Service Request Work
Summary
|
None
|
< free text >
|
When creating Service Requests from RMA lines via
concurrent manager, this work summary will be used for the Service Request.
|
|
CSD: Default SR Severity for Internal RO
|
None
|
<Service Request Severity>
|
When creating new Service Requests for internal
order refurbishments, this severity will be used for the Service Request.
List of values displays all active Service Request severities.
|
|
CSD: Default SR Type for Internal RO
|
None
|
<Service Request
Types>
|
When creating new Service Requests for internal
order refurbishments, this type will be used for the Service Request. List of
values displays all active Service Request types.
|
|
CSD: Default WIP MRP Net Qty to Zero
|
None
|
Yes or No
|
Determines if the net quantity for a WIP job
should be defaulted to zero.If it is set to null or No, then the net quantity
will be set to job quantity.
|
|
CSD: Directory for Depot
Repair Log Files
|
None
|
No predefined set of values. The value is
specified at the time of implementation.
|
Determines directory for Depot Repair log files.
This is a mandatory profile option.
|
|
CSD: Enable Costing
|
Yes
|
Yes or No
|
Enables/disables cost fields and buttons for
estimates.
|
|
CSD: Enable Estimates
|
Yes
|
Yes or No
|
This determines whether the Repair Estimate tab
will be enabled or disabled.
|
|
CSD: Enable Knowledge
Management
|
None
|
Yes or No
|
If the user sets this option to No, the
applicable Knowledge Management area in the Diagnostics tab will be grayed
out. If this profile option is not set, Knowledge Management will be enabled.
|
|
CSD: Number of Days to
Rollback Currency Conversion
|
300
|
<Integer value>
|
Number of Days to rollback currency conversion
when converting a cost from GL currency to currency of estimate charge line.
|
|
CSD: Printer Name
|
None
|
<Printer Name>
|
Determines printer for printing repair estimate
report.
|
|
CSD: Printer Required
|
None
|
Yes or No
|
Determines whether a printer is required.
|
|
CSD: Repair Mode for Depot Repair Orders
|
Work In Process
|
Work In Process, Task, None/ Not
Applicable, All
|
Determines Repair Mode for Depot Repair Processes
- site level.
|
|
CSD: Repair Type Internal Repair Order
|
None
|
List of values displays all Repair Types where
Repair Type Ref is Refurbishment and Internal Order flag is checked.
|
List of values will display at least one value,
as Oracle Depot Repair seeds one Refurbishment Repair Type. Customer can add
more Repair Types with Refurbishment set for the Repair Type Ref and Internal
Order flag checked, for example, one each for Task and WIP mode. A value for
this profile is required to create internal Repair Orders from Spares
Management.
|
|
CSD: Require Item For Service Request
|
Yes
|
Yes or No
|
Makes the item and related fields required/not
required in the Service Request header.
|
|
CSD: Use CSD as Job Name Prefix
|
No
|
Yes or No
|
If set to Yes, CSD is used as the Job Name Prefix
while submitting a Repair Job and the prefix value cannot be updated in the
Submit Repair Jobs window. If set to No, the Job Name Prefix defaults to the
value specified for the profile CSD: Default Job Name Prefix and the prefix
value can be updated in the Submit Repair Jobs window.
|
|
CSD: Use Tasks from Knowledge Management
Solutions
|
Yes
|
Yes or No
|
When set to Yes, auto-creates estimate lines from
tasks that are linked to applicable solutions (even if they are not linked
via a service code), when you click Add Lines from Diagnostics in the Repair
Estimate tab.
|
Please
note that there are other profile options which do not under Oracle Depot
Repair, but still may provide certain application functionality.


1 comment:
It is very helpful blog on Oracle Service depot repair understanding.
Post a Comment