
Introduction
Usage
of Credit Card for any purchases has become common. End Customers use credit
cards to make their payment for any purchases made. Client implementing Oracle
EBS now has the facility to integrate Oracle EBS modules like iPayments,
iReceivables, iProcurement etc with Credit Card payment functionality. Oracle
EBS is now compatible to support either Gateway or Processor model of Credit
Card Payment integration.
Scope
of the Document:
This
document gives the basic mandatory setups that are to be done in Oracle
Payments and Account Receivables module for credit card payment integration
with iReceivables module.
Non
Scope of the Document:
Credit
Card payments shall also be setup and integrated for use in other EBS modules
like Advanced Collections, iProcurement etc. The setups for integration with
those modules are not shown in this document.
Setup Overview
The first part of the document will
walk through all the setup stages required in Cash Management (CE), Receivables
(AR), and Payments (IBY) in detail.
Setup
Detail Flow

A Brief intro to
the steps:
1. Pre-Requisite
mandatory Receivables setups
2. Oracle Payments
Setups
3. Profile Options
setups
4. Test Customer
setups
5. Testing Snapshots
PRE-REQUISITE
MANDATORY RECEIVABLES SETUPS:-
1. Bank and Bank
account creation:
Create Internal Bank
The
first step in the bank account creation is the bank definition. This form
allows you to search for existing banks, view and update them or create new
banks.
Note: Internal
banks are also known as 'Remittance Banks'
Create
Bank Information:
Navigation: Receivables Manager
à Setup à Receipts à Banks
1. Navigate to the
Manage Banks and Branches window, select the Banks tab, and select the Create
button.
2. Select one of the
two radio buttons in the Bank Options region. When creating a new bank, you can
either create a new bank or add bank details to an existing party defined in
your Trading Community.
3. Enter a country
name or select a country from the list of values. This is a mandatory field.
4. Enter the Bank
Name. This is a mandatory field.
5. (Optional) Enter an
Alternative Bank name, Short Bank Name, Bank Number, Description, Taxpayer ID,
Tax Registration Number, Inactive Date.
6. Select Finish to
save your bank or select Save and Next to enter Bank Address information.
Bank
Information Region

Click on Create button


Create
Bank Address:
You
can maintain several addresses for the bank in case, for example, when the bank
has different mailing and physical locations. One of the addresses has to be
marked as a primary or identifying.
1. Navigate to the
Create Bank Address window and select the Create button.
2. Enter a country, or
select one from the list of values.
3. Enter the remaining
country specific address details.
4. Select Apply to
save the address.
5. Select Finish to
complete the bank creation or select Save and Next to enter Bank Contact
Information.
· Address: The
mailing address for the bank.
· Country: The name
of the country where the bank is located.
· Identifying: In
many countries a fiscal code is the principal means of identifying and querying
suppliers. The fiscal code is unique across all entities and appears on all
official documentation.
Update: Select this button to change any
information as needed


Create Bank Contact Information:
1. Navigate
to the Create Bank Contact window and select the Create button.
2. Enter
Contact Information. You need only enter a first or last (Family) name, a
Registry ID, and Start Date.
3. Optionally
enter Email, Phone, and Address information for the contact.
4. Select
Apply to save the contact.
5. Select
Finish to complete the bank creation.
Name: Name of your contact person.
·
Phone: Direct number to your bank contact.
·
Email: Email address for your contact at the bank.
·
Address: The mailing address for your contact.
Update: Select this button to change any information as needed.


Create Bank Branch: Create Bank Branch
Information
Navigation
:
Receivables Manager à Setup à Receipts à Banks
Navigate to the Manage Banks and Branches
window, then select the Bank Branches tab. Bank branch creation is the next
step after the bank creation. This page allows you to search for existing bank
branches, view and update them or create new bank branches. You may conduct a
Simple Search by filling in information in one of the following fields, and
then clicking the search icon: Branch Name, Branch Number, EDI Location,
Alternate Branch Name, Country, or Bank Name.
1. Navigate to the Manage Banks and
Branches window, select the Bank Branches tab, and select the Create button.
2. Enter the Country and Bank Name for
which you are creating the branch or select from the list of values and select
the Continue button.
3. Select one of the two radio buttons in
the Branch Options region to indicate if you are creating a new branch or
adding branch details to an existing party defined in your Trading Community.
4. Enter the Branch Name (required).
5. Optionally, enter the remaining branch
information, such as Alternate Branch Name, Branch Number, BIC, Bank Code
6. Select a Branch Type. The options are:
ABA: American Bankers Association
CHIPS: Clearing House Interbank Payment
System
SWIFT: Society for Worldwide Interbank Financial
Telecommunication
OTHERS
7. Optionally, enter the remaining branch
information, such as Alternate Branch Name, Branch Number, BIC, Bank Code
8. Select Finish to save your branch or
select Save and Next to enter Branch Address and/or Branch Contact information.
Entering Branch Address Details, and
supplying Contact Information are the same processes as described when entering
this information for banks.
Branch Name: The name of the bank branch.
Alternate Branch Name: You can enter an
alternate name for your bank branch. This is particularly useful if you do
business in Japan, which allows you to enter both Kanji and Kana values for
your bank branch name.
The system does not use the value. It is
for your reference only.
Branch Number(Also Known as ‘Transit
Routing Number’): The bank branch number. Payables used this information to
identify the bank branch in payment formats that use electronic payment
methods, in creating positive pay files, and when printing the MICR line on
checks.
Note: For banks based in the United
States, enter the American Banking Association ninedigit transit routing
number in this field. Also, if you use the National Automated Clearing House
Association (NACHA) electronic payment format, then include the bank branch
number on both internal and supplier banks. The combination of Branch Number,
Bank Account Number, and Country must be unique within a bank.
BIC:The Bank Identification Code (BIC)
(formerly called SWIFT Code) is entered at bank branch level. BIC consists of
either 8 or 11 characters. The BIC consists of the following elements:
4 characters for the bank code
2 characters for the country code (ISO31661)
2 characters for the location code
3 characters for the branch code (optional)
The length of the BIC will be validated at
entry time. If the bank branch is used for SEPA payments, BIC is mandatory.
EDI Location: The Electronic Data
Interchange (EDI) location code for this bank.
EFT Number: Your enterprise's EFT
(electronic funds transfer) user number. This number is used to identify your
company on any EFT transmissions with the bank.
Disable the 'CE: Disable Bank Validations' profile option to
enter the branch number.
R12
Bank Branch Validation USA, CANADA : Profile Option 'CE: Disable Bank Validations', Bank Branch Information: Error: Check Digit
Validation for Routing Transit Number has failed (Doc ID 1287647.1)
Issue 1: In R12, the mandatory feature of
bank account validation is causing issues for customers. A means is needed to
be able to "turn-off” the validations.
Impact of: profile option 'CE: Disable
Bank Validations' Yes or No.
Issue 2: Validation Rule Error -
"Routing Transit Number" does not accept any number of digits in
"Create Bank Branch : Bank Branch Information"
Validation rule error - "Routing
Transit Number" would not accept any number of digits in "Create Bank
Branch : Bank Branch Information" setup. When 10+ digits were entered,
received error that less than 10 digits is required; however, the field does not
accept less than 10 digits either in the field either.
Issue 3: Error: The Check Digit validation
for Routing Transit Number has failed. Please Enter a Correct value for the
Rounting Transait Number.
Create Bank Branch Information


Create Bank Branch Address


Create Bank Branch Contact


Note: PARTY_ID/PARTY_NUMBER are unique for
bank and branch
Also, when checking the data be mindful of
the PARTY_USAGE_CODE 'Bank' or 'Bank Branch' When you create the Bank Account
the Cash Management (CE) tables are used:
CE_BANK_ACCOUNTS
CE_BANK_ACCT_USES_ALL
CE_GL_ACCOUNTS_CCID
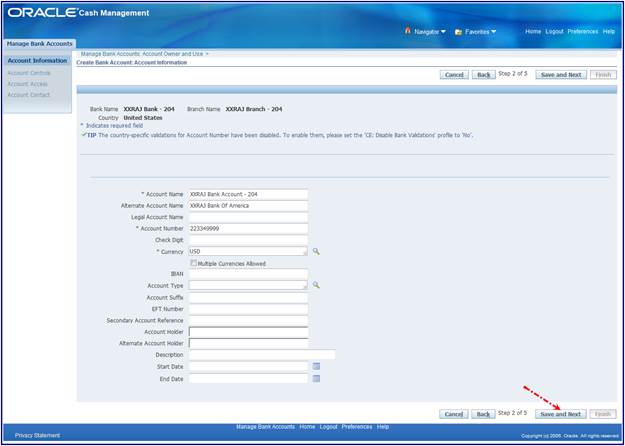
Create Bank Account
Once you are done with the bank branch
creation, you can proceed to the bank account setup. This page allows you to
search for existing bank accounts, view and update them or create new bank
account.
Select the bank branch to which your bank
account belongs and proceed to the bank account setup. In the first step you
will have to select the owner of the bank account; the legal entity that opened
this account at the bank. In the following steps you will be able to define
which organizations within your company will be able to use this bank account:
1. Navigate to the Manage Bank Accounts
window and select Create.
2. Enter the Country, Bank Name and Branch
Name for which you are creating this account and select Continue.


Assign Account Owner and Use
3. Enter the Bank Account Owner; the legal
entity that owns the account.
4. Select the types of functions that this
bank account is going to be used for: Payables, Payroll, Receivables, or
Treasury or all. If the Treasury option is disabled, you have not linked this
bank branch to the counterparty in Treasury.

5. Assign Account Information.
Enter information in the Account
Information tab. For details of the fields, see Bank Account Window reference.
Account Name: The name you use to refer to
the bank account. You may want to use a name that indicates the usage of the
bank account.
Alternate Account Name: The alternate name
for your bank account. You can enter an alternate name for your bank account.
This is particularly useful if you do business in Japan, which allows you to
enter both Kanji and Kana values for your bank account name. The system does
not use the value you enter here unless you enable the Sort by Alternate Fields
Payables option. If you enable that option, then Payables uses the alternate
name when it sorts reports by bank account name.
Short Account Name: This may be an alpha or
a numeric reference.
Account Number: The bank account identification
number. The combination of Bank Account Number, Bank Branch Number, Account
Use, and Currency must be unique for each bank. Refer to your country specific
documentation on validation that the system performs on the bank account number
for specific countries.
Check Digit: The value used to validate the
authenticity of your bank account number according to country specific bank
account validation requirements. This value is provided by your financial
institution.
Currency: Currency for a bank account. The
default value is your ledger currency.
Multiple Currencies Allowed: If you do not
enable the Use Multiple Currencies Payables option, then Payables does not
allow you to change this value. If you select your ledger currency as your bank
currency, then you can enable the Use Multiple Currencies Payables option and
use this bank account to pay foreign currency invoices. If you select a
different currency than your ledger currency in this field when you define
Payables Payment Documents, then you will only be able to select payment
formats that you define in that currency. Also, you will only be able to pay
invoices that you enter in this foreign currency.
IBAN (International Bank Account Number):
The IBAN is an international standard that uniquely identifies the account
number of a bank's customer. It is used in eurozone countries to help ensure
errorfree crossborder payments. The IBAN is validated upon entry. If you
provide the IBAN on your supplier's bank account, then we recommend that you
also provide the BIC for that supplier's bank branch.
Account Type: Bank account type. The seeded
values are SAVING, CHECKING and OTHER.You can define additional bank account
types in the Oracle Cash Management Lookups window. For example, you could add
Controlled Disbursement for your internal bank account. Checking would be used
for a supplier or customer bank account.
Account Suffix: An identifier for your
bank.
EFT Number: Your enterprise's EFT
(electronic funds transfer) user number. This number is used to identify your
company on any EFT transmissions with the bank.
Secondary Account Reference: Additional
account reference. For your reference only.
Account Holder: Name of the person or
organization within your organization who is responsible for this account
(optional).
Description: Description of the Bank
Account. For your reference only.
Alternate Account Holder: The alternate
name for your bank account holder. If you are using this internal bank account
to process NACHAformatted electronic payments, then enter the name of the tax
reporting entity that will be referenced by the payment files, exactly as it
appears in the Reporting Entity window. If you do not use this bank account for
NACHAformatted payments, then this value is not used by the system and is for
your reference only.
Start Date: Enter the start date if you
want to limit the time during which this supplier site uses this bank account
as the primary bank account for receiving electronic payments in the bank
account currency.
End Date: Enter the end date if you want to
limit the time during which this supplier site uses this bank account as the
primary bank account for receiving electronic payments in the bank account
currency.
Account Controls Window References
General Controls Region
Cash: Enter the cash account number. If the
cash account number is in 5 segmental format, such as Company DepartmentAccountSubAccountProduct.
enter the number as 0100011100000000.
Cash Clearing: Enter the cash clearing
account number. If the cash clearing account number is in 5 segmental format,
such as CompanyDepartmentAccountSubAccountProduct. enter the number as 0100011100000000.
Bank Charges: Enter the bank charges
account number. If the bank charges account number is in 5 segmental format,
such as CompanyDepartmentAccountSubAccountProduct. enter the number as 0100011100000000.
Bank Errors: Enter the bank errors account
number. If the bank errors account number is in 5 segmental format, such as
CompanyDepartmentAccountSubAccountProduct. enter the number as 0100011100000000.
Foreign Exchange Charges: Enter the foreign
exchange charges account number. If the foreign exchange charges account number
is in 5 segmental format, such as CompanyDepartmentAccount SubAccountProduct.
enter the number as 0100011100000000.
Agency Location Code: If your enterprise is
a United States federal agency, then you might need to enter an Agency Location
Code. This code is assigned by the United States Department of the Treasury to
identify the source of financial transactions.
Netting Account: Select Yes or No. When
netting receipts, both receipts must be in the same currency.
Cash Management Controls Region
Minimum Target Balance: You can define a
minimum target balance for bank accounts. The target balances help you
determine the minimum balance for bank accounts that you include in your cash
position.
Maximum Target Balance: You can define a
maximum target balance for bank accounts. The target balances help you
determine the maximum balance for bank accounts that you include in your cash
position.
Minimum Payment Amount: You can opt to pay
the minimum payment available.
Minimum Receipt Amount: This is the minimum
amount in this currency that must be specified when you create automatic
receipts with this payment method.
Rounding Factor: Select the method the
factor in amounts are displayed.
Rounding Rule: Select the rounding rule.
The options are Round Up, Round Down, or Nearest. Cash Flow Display Order: Cash
receipts minus cash disbursements from a given operation or asset for a given
period.
Payables Controls Region
Multiple Currency Payments: Enable this
option if you want to use this bank account to pay invoices entered in multiple
currencies. You can select this option only if the Use Multiple Currencies
Payables option is enabled and if the bank account is in your ledger currency.
Allow Zero Payments: Enable this option to
allow zeroamount payments from this bank account.
Pooled Account: If you use Automatic
Offsets and you want to associate multiple companies with this bank account,
then enable this option. When you enable the Automatic Offsets Payables option,
Payables creates one offsetting liability distribution for each invoice
distribution. If you then pay the invoice from a pooled bank account, then
which Payables accounts for the invoice payment, Payables creates one
corresponding cash accounting entry for each liability distribution. In
addition, Payables builds the cash account based on the Cash Account defined
for the bank account, and on the account segments of the liability lines. If
you do not use a pooled account, then when Payables accounts for the payment,
it creates a single accounting entry for the Cash Account, and uses the Cash
Account that is defined for the bank account without modifying any account
segments.
Maximum Outlay: The largest currency outlay
that you allow for a payment batch for this bank account. If the total outlay
of a payment batch exceeds the maximum outlay for the payment batch, then
Payables displays a warning, but allows you to continue processing the payment
batch. The Maximum Outlay for a bank account defaults from the Payables Options
window. When you initiate a payment batch using the bank account, Payables uses
the bank account's Maximum Outlay as a default. You can override this default.
Minimum Payment: The lowest payment amount
that you allow in a payment batch. Maximum Payment: The largest payment amount
that you allow in a payment batch.
Receipt Controls Region
Multiple Currency Receipts: Check this
check box to define the bank account as a multiple currency bank account. A
multiple currency bank account is an account that accepts payments in more than
one currency.
Reconciliation Controls Region
Payables Matching Order: Select Transaction
or Batch.
Float Handling: Select Error or Ignore.
Receivables Matching Order: Select
Transaction or Batch.
Foreign Currency Bank Region
Exchange Rate Type: AutoReconciliation
selects the exchange rates for the transaction currency using the Exchange Rate
Type that you specify. You can choose any Exchange Rate Type.
Exchange Rate Date: AutoReconciliation
selects the exchange rates for the transaction currency using the date source
you specify. You can choose any of the following exchange rate dates:
Bank Statement GL Date: The accounting date
used to clear the statement. Bank Statement Date: The closing date of the
statement.
Statement Line Date: The date the
transaction cleared the bank. Transaction Creation Date: The date the
transaction was created.
Transaction Creation GL Date: The
accounting date used to create the transaction. Transaction Exchange Rate Date:
The date associated with the exchange rate that was used to create the
transaction.
Open Interface Controls Region
Use Reconciliation Open Interfaces: Enable
the checkbox if you use this feature.
Open Interface Matching Criteria: This
parameter specifies the matching criteria for open interface transactions. The
default is Transaction Number. If you want to reconcile bank statement lines to
Treasury settlements, then select the Date and Amount option.
Float Status: Status of open interface
transactions that are available for clearing and reconciliation. If you
reconcile only Treasury settlements in the Reconciliation Open Interface, then
enter the Reconciled status code.
Clear Status: Status of open interface
transactions that have cleared or reconciled. If you reconcile only Treasury
settlements in the Reconciliation Open Interface, then enter the Available
status code.
Manual Reconciliation Tolerances Region
Tolerance Amount: You enter reconciliation
tolerances as an amount.
Tolerance Percentage: You enter
reconciliation tolerances as a percentage.

Assign Account Access
Enter information in the Account Access
tab. In this step you will define for which organizations and in which
functional areas such as Payables, Payroll,
Receivables, or Treasury, or all, that this bank account can be used. For
example, you can let Operating Unit # 1 use this bank account in Payables and
Receivables, but limit
Operating Unit # 2 to use this bank account
only in Payables. If you choose a particular functional area for you bank
account, you will be taken to the page where you may be required to enter
certain bank account attributes that are unique for this particular functional
area. It is also important to note that if you grant Operating Unit # 1 access
to this bank account in Payables and Receivables, then all users who have been
granted access to Operating Unit #1 will be able to use this bank account in Payables
and Receivables (provided that the functional access has been granted to these
uses as well).


Assign Account Contact
Enter information in the Account Contact
tab.


2. Creation of Receipt
Class and Receipt Method:
Navigation: Receivables Manager
à Setup à Receipts à Receipt Classes

Receivables uses receipt methods to account
for your receipt entries and applications. Receipt methods also determine a
customer's remittance bank information.
Note: You define receipt methods in the
Receipt Classes window.
You can assign multiple remittance banks to
each receipt method, but only one bank account can be the primary account for
each currency. For each remittance bank branch account assigned to a receipt
method, you must define all of your receipt accounts. You can then assign your
receipt methods to your receipt sources to use with your AutoLockbox and
manually entered receipts.
If you remit receipts in several currencies
for a single receipt method, then you must enter at least one remittance
bank per currency. At least one of these
remittance banks must be primary.
The receipt class you assign to each of
your receipt methods determines the processing steps that Receivables requires
for receipts that you create using this receipt method. These steps include
whether to require confirmation, remittance, and bank clearance for receipts
that you create with a specific receipt class. See: Receipt Classes.
Receivables requires that you specify a
receipt method when you create your automatic receipts through the Receipt
Batches window. You also assign receipt methods to invoices when you manually
enter them in the Transactions window. If an invoice will be automatically paid
by credit card, direct debit, or bills receivable, then you must assign an
automatic receipt method to the invoice.
Note: Enable automatic correction of funds
transfer errors by mapping error codes to corrective actions, for each
automatic receipt method. See: Enabling Automatic Funds Transfer Error
Corrections.
You can assign all receipt methods to
transactions in the Transactions window, except for bills receivable remittance
receipt methods. You enter bills receivable remittance receipt methods in the
Remittances window.
This example will demonstrate setting up
for creation method automatic and payment method credit card
1. Navigate to the Receipt Classes window.
2. Enter a unique Name for your Receipt
Class.
3. If you are creating a Notes Receivable
receipt class, check the Notes Receivable box. You cannot change this attribute
after you assign a receipt method and then save this receipt class. See: Notes
Receivable, Oracle Receivables User Guide.
4. Creation Method.
If you choose Automatic, you
can create receipts with this receipt class using the Automatic Receipt
program.
See: Creating Automatic Receipts, Oracle
Receivables User Guide. In addition, for these receipts, Oracle Payments is
responsible for the funds capture process. See: Enabling the Funds Capture
Process.
5. To require automatic receipts assigned
to this receipt class to be confirmed before they can be remitted, check the
Require Confirmation box. Check this box to confirm automatic receipts using
this receipt class in the Confirm Automatic Receipts window. (This will not be
used in this example) If you are defining a receipt class for use with ACH bank
account transfers, then you should not check this box.
6. Choose a Remittance Method. The
remittance method determines the accounts that Receivables uses for automatic
receipts that you create using the receipt method assigned to this receipt
class. Choose one of the following methods:
Standard: Use the remittance account
for automatic receipts or for standard bills receivable assigned to a receipt
method with this receipt class.
Note: If the creation method is Automatic,
then you cannot select No Remittance as the Remittance Method.
To require receipts created using a receipt
method assigned to this receipt class to be reconciled before posting them to
your cash account in the general ledger, choose one of the following Clearance
Methods:
1. Directly: Choose this method
if you do not expect the receipts to be remitted to the bank and subsequently
cleared. These receipts will be assumed to be cleared at the time of receipt
entry and will require no further processing. Choosing this method is the same
as setting Require Bank Clearance to No in previous releases of Receivables.
By Automatic Clearing: Choose this
method to clear receipts using the Automatic Clearing program. See: Automatic
Clearing for Receipts, Oracle Receivables User Guide. (Receipts using this
method can also be cleared in Oracle Cash Management.)
By Matching: Choose this method if
you want to clear your receipts manually in Oracle Cash Management.
2. Enter the receipt method to assign to
this receipt class. See: Receipt Methods.
1. Enter a unique Name for your receipt
method, then enter how you want this receipt method to be printed on your
statements in the Printed Name field. The default Printed Name is the receipt
method name.
Note: Oracle Receivables lets you create a
receipt method only if there is no transaction type, adjustment, or receivable
activity with the same name.
2. Enter the range of Effective Dates for
this receipt method. The default start date is the current date, but you can
change it. If you do not enter an end date, this receipt method will be active
indefinitely.
3. To assign the same transaction number to
the debit memo generated when you create a debit memo reversal, check the Debit
Memo Inherit Receipt Numbers box. Do not check this box if you want Receivables
to generate unique debit memo numbers automatically. See: Reversing Receipts,
Oracle Receivables User Guide.
4. If the receipt class associated with
this receipt method has a Manual or AP/AR Netting creation method, then skip to
the last step.
5. To ensure that the receipt number is
always the same as the transaction number to which it is applied, check the
Receipts Inherit Transaction Numbers box. This option helps you track Automatic
Receipts. Do not check this box if you want Receivables to generate document
numbers for Automatic Receipts assigned to this receipt class and receipt
method.
6. If the receipt class associated with
this receipt method has an Automatic creation method, enter a Number of
Receipts Rule (see Number of Receipts Rules above).
7. Enter a Receipt Maturity Date Rule.
Receivables uses this rule to pay invoices that have different due dates with a
single receipt using this receipt method. Enter Earliest if you want the
receipt maturity date to be the earliest due date of all of the invoices that
your receipt covers. Enter Latest if you want the maturity date to be the
latest due date of all of the invoices that your receipt covers.
8. Enter the Automatic Print Program for
transmissions using this receipt method. Receivables provides one standard
receipt print program to format the output of your payment selection and
creation programs when you physically create the receipt document. If you need
a different receipt print program format, you must copy this standard receipt
print program, and modify it accordingly.
9. Specify a number of Lead Days. Lead days
indicate the number of days before the invoice due date that an invoice can be
selected for application by the Automatic Receipts program using this receipt
method.
10.
Select a funds capture payment method. A funds capture payment method is a
payment medium by which your customer chooses to remit payment to you. Oracle
Payments predefines funds capture payment methods, but you can define your own.
See: Setting Up Funds Capture Payment Methods,
Oracle Payments Implementation Guide.
Select Credit Card for transactions to be
paid by credit card.
Select Bank Account Transfer for
transactions to be paid by ACH (Automated Clearing House) transfer.
For transactions to be paid by direct
debit, create a new receipt method or use an existing receipt method, and
assign or define a new EFTspecific payment method.
11.
Select Funds Transfer Error Handling to enable the automatic correction of
funds transfer errors. See: Enabling Automatic Funds Transfer Error
Corrections.
12.
Save your work. To assign a remittance bank to this receipt method, see:
Assigning Remittance Banks.

Assign Bank Accounts (Also known as
'remittance bank')
1. Choose Bank Accounts.
2. Enter general Remittance Bank
information, such as Bank, Branch, Account Name, and range of Effective Dates.
You can only select active banks and bank branches.
3. If the creation method of the receipt
class is Automatic, enter a Minimum Receipt Amount. This is the minimum amount
in this currency that must be specified when you create automatic receipts with
this receipt method.
Note: You can also define a minimum receipt
amount at the customer profile level. Receivables uses the larger of the two minimum
receipt amounts when creating automatic receipts.
4. If the remittance method for this
receipt class is either Factoring or Standard and Factoring, specify the number
of Risk Elimination Days for receipts created with this receipt class
(optional). When you factor receipts, Receivables creates a short term debt to
account for your risk in case of customer default. When you run the Automatic
Clearing program to clear or risk eliminate these receipts, the debt is cleared
y days after each receipt's maturity date, where y is the number of risk
elimination days that you enter here.
5. If the remittance method is not No
Remittance, enter the number of Clearing Days for receipts created with this
receipt class (optional). Remitted receipts are cleared x days after their
maturity date, where x is the number of clearing days that you enter here.
Factored receipts are cleared immediately on the remittance date.
6. To be able to override this bank during
the remittance process, check the Override Bank box.
7. If you do not want this to be the
primary remittance bank account in this currency for this receipt method,
uncheck the Primary check box. You can only assign one primary remittance
account per currency to your receipt method. Receivables ensures that at least
one remittance account per currency is primary.
8. In the GL Accounts tabbed region, enter
GL Account information for this remittance bank.
Note: Cash Account, Receipt Confirmation
Account and Remittance Account cannot be updated once the record has been
saved. Therefore if incorrect data is entered it will require a new receipt
method.
9. In the Unearned Discounts and Earned
Discounts fields, select an unearned discount activity type and an earned
discount activity type from the lists of values.
10.
If using Oracle Trade Management, then in the Claim Investigations field,
select a claim investigation activity type.

Ensure the Receipt Method Name mentioned in
the receipt class is linked correctly in Payee Routing Rules.

11.
If the creation method of the associated receipt class is Automatic, open the
Formatting Programs tabbed region, then enter formatting program information.
To run a printing program when you
format remittance batches for receipts remitted to you using this receipt
method, enter a Remittance Print program. When you factor your remittances,
Receivables notifies your print program so that it functions accordingly. You
can use this program to create and send remittance advice to customers to whom
you assign this receipt method.
To run a factoring print program
when you format your batches of remitted receipts for this receipt method,
enter a Factoring Print program. When you factor your remittances, Receivables
notifies your factoring print program so that it behaves accordingly. You
cannot enter a factoring transmission program for this receipt method if your
bank branch account's factoring creation medium is magnetic medium.

Oracle
Payments Minimum/Dummy Setup For Credit Card/Purchase Card Funds Capture
Processing (Doc ID 553614.1)
Oracle
Payments Minimum/Dummy Setup For Direct Debit Funds Capture Processing (Doc ID
471418.1)
Note: This document is for customers NOT using
real time bank account processing by integrating with a backend
payment system. Setups in the document can be used to process dummy
authorization and settlement requests in order to successfully create and remit
bank account receipts.
11i
Oracle iPayment is replaced with a brand new product called Oracle Payments in
Release 12. This new product has extended functionality for funds capture
(inbound payments) and funds disbursement (outbound payments) processing. In
Release 12, both Oracle Receivables and Payables have dependency on Oracle
Payments implementation. For funds capture processing, minimum implementation
of Oracle Payments is mandatory even if realtime payment processing
functionality is not used. If real time payment processing functionality
is used, extensive setups as outlined in Oracle Payments implementation guide
are needed. This note will document the setup's needed in Oracle Payments for
merchants implementing Receivables (funds capture) without using real time
payment processing. If these setups are not performed, receipt and remittance
batches will fail with error "INVALID_PAYEE: Invalid payee
identifier".
Existing
11i customer had the ability to configure receipt class/method in such a way
that realtime payment processsing can be turned off. This was done by setting
payment type and merchant_ref to null. In Release 12, merchant_ref was
obsoleted and replaced with Payment Method, created in Oracle Payments. This
payment method is mandatory and for merchants upgrading from 11i, it will
default to 'Bank Account Transfer'. Therefore merchants upgrading to Release 12
will need to perform following dummy setups in Payments to successfully process
receipt and remittance batches.
II.
Create Payment System
a. From
Oracle Payments Setup dashboard, click on Go To Task icon for Payment
System--> Payment System.

b.
Click on Create button and enter following details to create new payment
system.

Code
= dps (or any other code)
Name = Dummy Payment System (or name of your choice)
Processing Model = Processor
Bank: Optional, can be set to remittance bank used in receipt class
Supported Capabilities : Check Bank Account Transfer under Fund Capture
Name = Dummy Payment System (or name of your choice)
Processing Model = Processor
Bank: Optional, can be set to remittance bank used in receipt class
Supported Capabilities : Check Bank Account Transfer under Fund Capture
Format
: Electronic Bank Remittances Format
Transmission
Protocol : Select File_Dump with protocol
name = Local File System Directory
Funds
Capture Processing: Bank Account Lead Days = number of days desired
Click on Save and Add Accounts.

Payment
System Accounts:
Click
on Add a row and enter details

Name:
XXRAJ CC Account
Save

Create
Funds Capture Process Profile
a.
From Oracle Payments Setup dashboard, click on Go To Task icon for Funds
Capture Setup--> Funds Capture Process Profiles

b. In
Funds Capture Process Profiles (FCPP) page, select the payment system created
in step II (imprtant) and click on Create button. Enter following detais for
FCPP.

Code
: XXRAJ DPS
Name
: XXRAJ_FCPP
Processing
Type: Bank Account
Settlement:
Outbound
Format =
Electronic Bank Remittances Format
Transmission
Protocol = Local File System Directory
Settlement
Grouping:
First
Party Organization
No
First
Party Legal Entity
Yes
Internal
Bank Account
Yes
Settlement
Currency
Yes
Settlement
Date
No
Payment
System Accounts:
Tranmission
Configuration Settlement = Select protocol name Local File Directory
Check
Enabled
Click
Apply to save


This
completes creation of funds capture process profile. Next step is to associate
FCPP with payee to be used when creating settlements.
Create
Payee
a. Go
back to payments setup screen and click on Tasks for Payee to create a new
payee with following details


Code:
XXRAJ_DPS
Name:
XXRAJ_Payee
Payment
System Accounts:
Click
on add another row and select Payment system and account created in step II
above.
Assign
operating unit of your choice. Note: Assignment of operating unit will decide
whether or not this payee will be used.
Supported
Processing Types:
Check
Bank Account Transfer
Default
Payment Systems:
For
Bank Account Transfer, goto funds capture proccess profile and attach FCPP
created in step III. Once FCPP is selected, payment system account will also be
populated automatically

Save the payee setup. This completes basic
payee creation. However, if your business requires using multiple payment
system with different settlement file formats (for example country specific
formats), then you need to setup multiple payment systems and FCPP and setup
routing rules to route authorizations and settlements to proper payment system.
The following details creation of routing rules for the payee.
Click on + to expand routing rules and
create a new routing rule using the following steps.
Rule Name
= XXRAJ Credit Card
Payment Method
= Credit Card
Criterion
= Receipt Method
Operator
= Equal To
Value
= Receipt method used for creating remittances
Payment System Account
=
Account created in step II
Funds Capture Process Profile
= FCPP created in step III
Rule Name
= XXRAJ BAT
Payment Method
= Bank Account Transfer
Criterion
= AR Receipt Method
Operator
= Equal To
Value
= Receipt method used for creating remittances
Payment System Account
=
Account created in step II
Funds Capture Process Profile
= FCPP created in step III

Click Apply to save.
3. Create and
Assign Document Sequence:
Navigation: System Administrator à Application à Sequential Numbering à Define

Name: XXRAJ Credit Card

Assigning the Document Sequence with the
receipt class
Navigation: System Administrator à Application à Sequential Numbering à Assign


4. Customer setups:
Identified
customers are to be assigned/linked with the following:-
a. Receipt Method
b. Credit Card
c. Bank
Navigation: Receivables Manager à Customers à Customers

Query for the customer


Customer Account Details à Payment Details
Assign Payment
Method (optional)
To assign receipt methods:
1. Navigate to the Payment Details
subtab of the Account Overview page.
2. Click Add Receipt Method.
3. Search and select an appropriate
receipt method.
4. Specify the start and end dates
for the method.
5. Select Primary, if this receipt
method is the primary one for this customer account
Note: You define receipt methods in
the Receipt Classes window.


Create Credit Card
(optional)
To assign credit cards:
You can assign a credit card either
by adding a predefined credit card or by creating a new credit card.
To add a credit
card
1. On the Payment Details subtab of
the Account Overview page, click Add.
2. Search and select an appropriate
credit card.
To create a credit
card
1. On the Payment Details subtab of
the Account Overview page, click Create.
2. Enter credit card details such as
number, expiration date, and statement billing address.
Note: You can also create a billing
address.
For testing purpose, Oracle provided test
credit card numbers. The available credit card numbers for testing shall be
found from the Metalink Note: 395462.1
Card Provider
Name
|
Credit Card
Number
|
American
Express
|
378282246310005
|

Create bank CC Account


5. System Options
Setups:
Navigation: Receivables
Manager à Setup à System à System Options


PROFILE
OPTION SETTINGS:-
The following profile options are to be
setup at the given levels.
Profile Option
Name
|
Level
|
Value
|
Comments and
Usage
|
ICX: Oracle
Payment Server URL
|
Site
|
Required to
establish successful internal secured HTTP/https connection. Both values are
supposed to be same and are not supposed to be modified.
|
|
IBY: ECAPP URL
|
Site
|
CREDIT
CARD INTEGRATION INFORMATION:-
Integration between
Oracle Payments and any third party happens via the following which is usually
taken care by a DBA Team:-
1. Transmission
Servlet Base URL which points to the secured connection URL of the third party
system
2. A Servlet file
which has other connection details
3. Oracle Payments
seeded API looks for a properties file called Zone.properties for the location
of the servlet file
4. The servlet file
ideally resides in $IAS_ORACLE_HOME/Apache/Jserv/etc.
5. The Zone.properties
file will be edited to link the Servlet and the Payment System created.
CREDIT
CARD TESTING:-
Create AR invoice :

Enter the source and Bill To customer
details and click on Select Instrument


Enter the Line Details:


Query the invoice in iReceivables


Click on the link

Select the credit card information and
click on Pay


View Payment

Query for the Receipt
Receipt# 1

Status of the receipt is confirmed

Navigation: - Receivables Manager à Receipts à Remittances

Click on Auto Create

Enter Receipt Number and select checkboxes
Create and Approve


Remittance batch number created

View Requests


2 comments:
Do you know why does it not automatically authorize at the time of 'Pay Invoice', it simply creating receipt with dummy PSON and only 'Automatic Remittance' is submitting the card for authorization? we are facing same issue and some setup seem missing.
We have a requirement in R12.1.3. Is it possible to Reverse an Credit Card Authorisation and Re-authorise it using Any API in Offline Mode/ batch Mode. The Credit Card Company has come up with a new Policy to6 penalise the Companies if we exceed the Authorisation days limit for Example if we have a Order which is paid through Credit card , the Authorisation is for say 7 days, if we donot fulfill the order due to some delay which will cross 7 days then there will be penalty for the excess days until the order is fulfilled and payment is settled.
Post a Comment