
EXECUTIVE OVERVIEW
Generating payment checks from
the E-Business Suite has traditionally required either a third party or
considerable customization of the delivered check print reports. The check
print format is very specific to each banking organization, requiring specific
fonts and pixel-perfect layout. The existing E-Business Suite reports generate
flat text output and do not support these features. Oracle XML Publisher now
offers an integrated, cost-effective method to generate the check output
directly from the E-Business Suite.
INTRODUCTION
Check printing from the
E-Business Suite has historically required a third-party solution that can
either query the necessary data and format the output or accept the existing
flat text output generated by the provided check print programs. To then
generate the checks, the format components had to be placed with pixel-perfect
precision onto the page using the necessary MICR font to format the bank
routing number and bank account of the payee. Alternatively customers could
take the existing check print program and customize it to format the output
correctly. These solutions are costly in terms of their implementation, their
ongoing maintenance and their complexity. This all adds to the total cost of
ownership for the E-Business Suite.
Oracle XML Publisher offers
integrated functionality that allows customers to design their own check format
using familiar desktop tools that can then be applied to a check print data
source, whether that is the seeded Oracle Report or a custom solution. This
format is easily maintainable and can include all the necessary components
required in the final output to be printed onto blank check stock.
Taking this approach reduces the complexity of the systems
surrounding the check generation and thereby reducing the total cost of
ownership of the E-Business Suite.
Pre-requisites:
Download
BI Publisher Template Builder for Word version 10.1.3.4.1 from
download.oracle.com
Basic
requirements to start creating checks are to have an RTF file (Template) and an
XML file (data definition).
There are 2 ways
that you can have an RTF file:
o Create your own, or
o (Recommended) Download standard oracle Template
Nav : Payables Manager > Setup > Payment > Payment Administrator > Formats > XML Publisher Format Templates
o Create your own, or
o (Recommended) Download standard oracle Template
Nav : Payables Manager > Setup > Payment > Payment Administrator > Formats > XML Publisher Format Templates
Query
and download the RTF file
‘Standard Check Format’ IBYDC_STD1.rtf or
Standard Check Format (Stub After Payment) IBYDC_STD1A.rtf
‘Standard Check Format’ IBYDC_STD1.rtf or
Standard Check Format (Stub After Payment) IBYDC_STD1A.rtf
àGo to Metalink and Check Oracle Note 457539.1. This note says that the Package IBY_FD_EXTRACT_EXT_PUB controls the XML extract used in check printing. The supplied version can be found in $IBY_TOP/patch/115/sql/ibyfdxeb.pls
àBetter way is to follow the instructions in Doc ID: 465389.1 R12 Create Or Modify A Payment Format Using XML Builder. This note explains the same steps that I have defined below
MICR
Fonts.
This is another important requirement which you will run into later on. So I
have decided to address it right away because you may end up spending a lot
more time if you start thinking about it later. One of the easiest way is to
buy the MICR font from a third party like IDAutomation (http://www.idautomation.com/) and use
MICRW1B.ttf. Typical cost is around $750.00 per user license – you may need to
purchase only one license. You may also download their Demo version which is
good for testing.
The good news is that Oracle also provides a MICR font which is available if you have downloaded the BI Template Builder. Some banks reject this font, but so far I did not have any problem with the bank that we used.
Download and install BI Publisher ver 10.1.3.4.1
Font File Location: C:\Program Files\Oracle\BI Publisher\BI Publisher Desktop\Template Builder for Word\fonts\ MICR____.TTF
In order to use this file in the RTF template, copy the font file MICR____.TTF to C:\WINDOWS\Fonts
At this stage, you
may or may not have designed the Check template. But you can still use
IBYDC_STD1.rtf downloaded earlier.
Following steps are needed to create a check in AP from scratch. These steps may also be used to create the initial payment to get the XML file.
Following steps are needed to create a check in AP from scratch. These steps may also be used to create the initial payment to get the XML file.
Step
1: Create XML Template
Navigation : Payables Manager à Setup à Payment à Payment Administrator à Formats à XML Publisher Format Templates
Navigation : Payables Manager à Setup à Payment à Payment Administrator à Formats à XML Publisher Format Templates

Click
'Create Template'
Enter below details
Name
|
: XX_APPS88_CHECK
|
Code
|
: XX_APPS88_CHECK
|
Application
|
: Payments
|
Type
|
: RTF
|
Data Definition
|
: Oracle Payments Funds Disbursement Payment Instruction
Extract 1.0
|
Default File Language
|
: English
|
Default File Territory
|
: UNITED STATES
|
Upload your RTF File

Step
2: Create Payment Format
Navigation : Payables Manager > Setup > Payment > Payment Administrator > Formats > Formats
Navigation : Payables Manager > Setup > Payment > Payment Administrator > Formats > Formats

Select
Type = Disbursement Payment Instruction

Click
on Create
Enter below details
Enter below details
Name
|
: XX_APPS88_CHECK
|
Code
|
: XX_APPS88_CHECK
|
Data Extract
|
: Oracle Payments Funds Disbursement Payment Instruction
Extract 1.0
|
XML Publisher Extract
|
: XX_APPS88_CHECK (XML Template name created in Step 1)
|

Step 3: Create
Payment Document
Navigation : Payables Manager > Setup > Payment > Bank Accounts
Navigation : Payables Manager > Setup > Payment > Bank Accounts
Account name
|
: BofA-204
|
Query
up your Bank Name. It is assumed that your Bank has already been setup in AP.
Select the Bank Account and click on Manage Payment Documents.
Click on Create
Select the Bank Account and click on Manage Payment Documents.
Click on Create

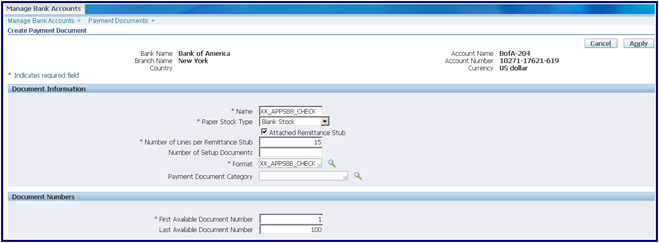
Enter:
Name
|
: XX_APPS88_CHECK
|
Paper Stock Type
|
: Blank Stock or Prenumbered Stock
|
Attached
Remittance Stub
|
: Yes
|
If you have remittance stub, check the box for Attached Remittance Stub
Important: If you check the
above box, a new field called ‘Number of Lines per Remittance Stub’ will show
up. This is number that you will have to find out by trial and error once you
start testing your template. Initially, set it to a lower number, say 15.
Format
: XX_APPS88_CHECK (Enter Format defined in step
2)
First Available Document Number:
Last Available Document Number
Enter any other information that you may need.
Click Apply
First Available Document Number:
Last Available Document Number
Enter any other information that you may need.
Click Apply
Step 4: Create
Payment Profile
Navigation : Payables Manager > Setup > Payment > Payment Administrator > Payment Process Profiles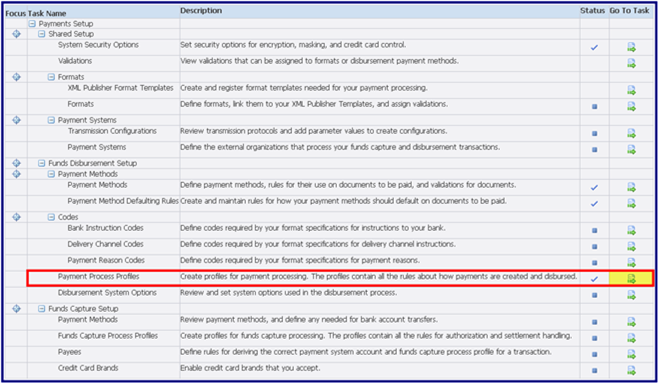
Navigation : Payables Manager > Setup > Payment > Payment Administrator > Payment Process Profiles
Click
on Create
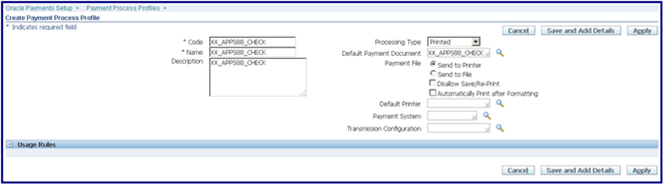
Enter
Enter
Code
|
XX_APPS88_CHECK
|
Name
|
XX_APPS88_CHECK
|
Payment Instruction Format
|
XX_APPS88_CHECK (As defined in Step 2)
|
Processing Type
|
Printed
|
Payment Completion Point
|
When the Payment Instruction is Formatted
|
Default Payment Document
|
Document created in Step 3
|
Payment File
|
Send to Printer
|
Check the box ‘Automatically Print After Formatting’ (Note: You may choose not to check this box initially – it will help in testing)
Default Printer: Valid oracle printer name
Click Apply
Now you are all set
to create checks. All you have to do is create an Invoice, or select any
existing validated invoice for a vendor.
There
is one more thing that you must check before creating the payment.
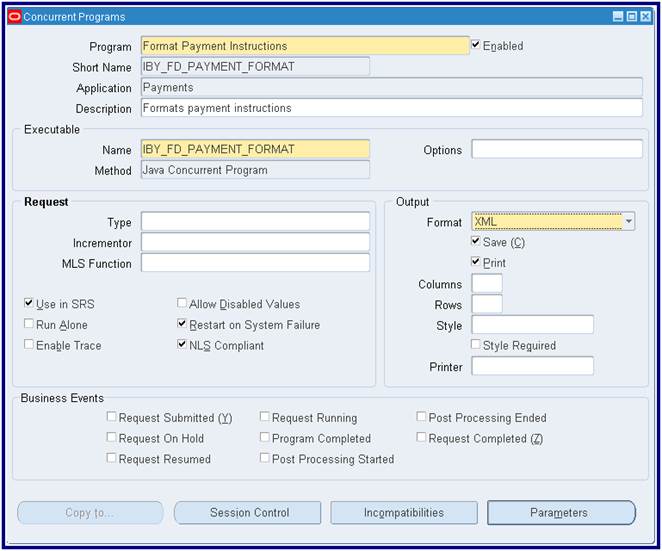
Verify Concurrent Program
Go to Application Developer or Sys Admin responsibility and bring up the concurrent program Format payment Instructions
Navigation : Concurrent > Program > Define > F11 > Format Payment Instructions > Ctrl-F11
(Short Name: IBY_FD_PAYMENT_FORMAT)
Set Output Format to XML: Use this option to first generate your XML (Data Definition) file
Set Output to PDF : This will create your check in PDF format once your check template is ready. Also, Set Style to PDF Publisher in this case
There
is one more way to get the XML, In the formats change xml publisher name to
“Extract Identity”
Navigation : Payables Manager > Setup > Payment > Payment
Administrator > Formats > Formats
Query with format name(XX_APPS88_CHECK) and change the XML Publisher Template value to “Extract Identity”.
Query with format name(XX_APPS88_CHECK) and change the XML Publisher Template value to “Extract Identity”.

How
to Submit a Request to create Payments
Submission process for AP Checks/Payments has also changed in R12. Most of the options are now available in HTML screens. The good news is that you can create templates (Not XML templates - these are different) so that you do not have to enter the same information every time you submit a request.
Submission process for AP Checks/Payments has also changed in R12. Most of the options are now available in HTML screens. The good news is that you can create templates (Not XML templates - these are different) so that you do not have to enter the same information every time you submit a request.

Submit
Request:
Navigation : Payables Manager > Payment Manager > Submit Single Payment Process Request
Following parameters are minimum required - you can enter others as necessary:
Navigation : Payables Manager > Payment Manager > Submit Single Payment Process Request
Following parameters are minimum required - you can enter others as necessary:
Payment Process Request name (Mandatory)
|
: Provide any useful Name
|
Use Template
|
: Leave Blank
|
Payee
|
: Vendor Name
|
Payment Method
|
: Check (Or any other name that has been setup is payment
method)
|

Click
on Payment Attributes Tab:
Payment Date
|
: Defaulted to today's date
|
Disbursement Bank Account
|
: BofA-204 (Enter your Bank Account Name associated with this
payment)
|
Payment Document
|
: XX_APPS88_CHECK (Enter payment document name created in Step
3 above)
|
Payment Process Profile
|
: XX_APPS88_CHECK (This value will get filled automatically
with the profile defined above in step 4)
|
Payment Exchange Rate Type
|
: Enter valid excahnge rate type (Ex: Corporate, Spot)
|

These
parameters are sufficient to create a payment. Click on Submit in order to
process. However, I do recommend following steps also in the begining.
Click on Processing Tabs:
Check following boxes
- Stop Process
for Review After Scheduled Payment Selection. This step
will stop after building the payments so that you can review the payments
selected, and cancel any of them, if necessary
- Stop Process
for Review After Creation of Proposed Payments
Click on Submit. Click on Home. Click on Monitor Requests.


How
to Create Template for Request Submission
Note: All of the fields in this process are the same as in 'Submit Single
Request'. Enter any fields that you repeat for request submission. In the above
example, usually leave the Payee field blank if you want to run for separate
vendors every time. Once the template has been created and saved, you may enter
the template name in the field 'Use Template' in the example above.
There are several other options which I haven't explored yet. I will add more once I get to try them out.
There are several other options which I haven't explored yet. I will add more once I get to try them out.
Navigation : Payables Manager > Payment Manager >
Create Template
Name
: XX_APPS88_CHECK
Scheduled
Payment Selection Criteria:
The
Scheduled Payment Selection Criteria tab allows you to specify invoice
selection criteria for the “AutoSelect” process to use when it selects eligible
invoices/memos for the batch, such as

The
Payment Attributes tab allows you to specify how the batch will be paid,
including:
•
what Payment Date you want to see on the payments (required)
•
which internal bank account you want to pay from (optional)
•
which set of Payment Documents you want to use (optional)
•
which Payment Process Profile you want to use (will default if Payment
Documents are specified)
•
which Payment Exchange Rate Type you want to use (required)
•
other items related to financial methods of paying this batch

The
Processing tab allows you to specify features you want to use during the PPR process,
and how they should work:
• Maximize Credits
|
: Check this if you want the system to apply any available memos
up to the point where the payment for the supplier will be zero (and you have
done setups to allow for zero payments)
|
• Stop Process for Review After Scheduled Payment Selection
|
: Check this if you want to stop the PPR process after the
initial batch of eligible invoices/memos has been selected so you can review
the batch and modify the batch, if needed
|
• Calculate Payment Withholding and Interest During the
Scheduled Payment Selection
|
: Check this if interest and/or WH tax was not previously
calculated (at the time of invoice validation). If checked, the system will
calculate it during the Build process
|
• Stop Process for Review After Creation of Proposed Payments
|
: Check this if you want to stop the PPR process after the
proposed payments have been created so you can review the proposed payments,
and modify the payments, if needed
|
• Create Payment Instructions
|
: Select whether you want the system to automatically kick off
the Create Payment Instructions program automatically, or if you would prefer
to kick off the program manually from the SRS form
|

The
Validation Failure Results tab allows you to specify what should happen if a
Document (an invoice/memo) or a Payment fails a pre-defined (or user-defined)
Validation:
•
If a DOCUMENT fails a validation, the system should:
•
Reject only those document(s) that failed, and proceed with the rest
•
Reject all of the supplier’s documents even if only one of their documents
fails validation
•
Reject all documents selected for the PPR if ANY document in the batch fails
validation
•
Stop the process for a review of the failed document(s)
•
If a PAYMENT fails validation, the system should:
•
Reject only those payment(s) that failed, and proceed with the rest
•
Reject all of the supplier’s payments even if only one of their payments fails
validation
•
Reject all payments selected for the PPR if ANY payment in the batch fails
validation
•
Stop the process for a review of the failed payment(s)

PPR
- Payment Process Profile
PPR Process:
DOCUMENT SELECTION ("AUTOSELECT")
|
(Code: AP_AUTOSELECT_PKG): The Selection process is handled by
Payables (AP), the calling product.
|
When a PPR is submitted, a record is created in
AP_INV_SELECTION_CRITERIA_ALL with a checkrun_name, which is the same as the
PPR Name.
|
Selection: Invoices are then selected based
on Due Date, Discount Date, Pay Group, and other criteria
provided by the user while completing the PPR header.
|
The table AP_SELECTED_INVOICES_ALL is populated with selected
invoices.
|
The table AP_UNSELECTED_INVOICES_ALL is populated with the
invoices that were not selected.
|
Locking:After selecting the documents, the
invoices are locked to prevent other check runs from selecting the same
invoices.
|
AP_PAYMENT_SCHEDULES_ALL.checkrun_id is populated on the
selected documents (invoices).
|
Review:If the PPR has been setup to Stop
Process for Review After Schedule Payment Selection (option
available on the header of the PPR), the process stops for user review after
the initial selection of payables documents has been completed. The status of
the PPR is set to "Invoices Pending Review". After the user
reviews and/or modifies the selected documents, and clicks on the Submit button,
AP calls the IBYBUILD program.
|
If the Stop Process for Review After Schedule Payment
Selection parameter was not enabled, then at the end of invoice
selection, the Build program is submitted automatically.
|
If no invoices met the selection criteria, the PPR is canceled
automatically and the status of the PPR is set to "Canceled - No
Invoices Selected"
|
BUILD PAYMENTS
|
(Code: IBY_DISBURSE_SUBMIT_PUB_PKG): The Build Payments process
is handled by Oracle Payments (IBY).
|
The Build Payments program first creates a record in
IBY_PAY_SERVICE_REQUESTS with call_app_pay_service_req_code = checkrun_name.
|
The Build Payments program goes on to populate the
IBY_DOCS_PAYABLE_ALL table with the proposed payments.
|
The link to the payment service request table is through the
PAYMENT_SERVICE_REQUEST_ID.
|
Internal Bank Account / Payment Process Profile Assignment(Code:
IBY_ASSIGN_PUB): If the PPR has a default internal bank account and Payment
Process Profile (PPP) assigned to it on the header of the PPR, the values are
assigned to all of the selected documents in the PPR.
|
If a default internal bank account and PPP were not provided by
the user on the header of the PPR, Oracle Payments attempts to default the
values. If it cannot find a default value for all of the selected documents,
the PPR status is set to "INFORMATION REQUIRED". The user display shows
it as "Information Required - Pending Action". The user will need
to use the Information Required window to provide the missing internal bank
account(s) and PPP(s) for each selected document.
|
Document Validation (Code:
IBY_VALIDATIONSETS_PUB): During this step, Oracle Payments validates all the
documents (selected invoices & memos) using Pre-Defined and User-Defined
Validations assigned to Payment Methods assigned to the selected documents.
Afterward, the program validates all the documents again, using the
Pre-Defined and User-Defined Validations assigned to Payment Formats
associated with the PPPs specified on the PPR.
|
If all the documents pass validation, all the documents are set
to a status of VALIDATED in the tables and the request status is displayed as
"Documents Validated".
|
If there any document validation failures, Oracle Payments uses
the parameter setting for "Documents" on the Validation Failure
Results tab on the PPR header (the DOCUMENT_REJECTION_LEVEL_CODE) to
determine the next action.
|
REQUEST: Reject all documents in this PPR
|
DOCUMENT: Reject only the document in error
|
PAYEE: Reject all the documents related to the supplier
|
NONE: Stop the PPR for review
|
Create Payments
|
(Code: IBY_PAYGROUP_PUB): The validated documents are then
grouped into "proposed" payments based on the grouping rules - both
User-Defined and hard-coded. It then numbers the proposed payments with an
internal identifier (not "the" check number) and validates the
payments.
|
Records are inserted into IBY_PAYMENTS_ALL that holds the payment
information for the selected documents (invoices). The Build Payments program
then updates the IBY_DOCS_PAYABLE_ALL table with the payment_id and
formatting_payment_id values of the payment associated with each document.
|
If there any payment validation failures, Oracle Payments uses
the parameter setting for "Payments" on the Validation Failure
Results tab on the PPR header (the PAYMENT_REJECTION_LEVEL_CODE) to determine
the next action.
|
§ REQUEST: Reject all documents in this PPR
|
§ DOCUMENT: Reject only the document in error
|
§ PAYEE: Reject all the documents related to the supplier
|
§ NONE: Stop the PPR for review
|
If the PPR setup Stop Process for Review After Creation of
Proposed Payments is enabled on the Process tab of the PPR header, the
displayed PPR status is set to "Pending Proposed Payment Review".
This status prevents further processing until user takes action.
|
If this option to stop for a review is not enabled, the
displayed status of the PPR is set to "Payments Created". In this
status, payment instructions can be created for the PPR.
|
FORMAT PAYMENTS
|
(Codes: IBY_PAYINTSR_PUB, IBY_CHECKNUMBER_PUB): The Format
Payments process is handled by Oracle Payments (IBY).
|
When a PPR is submitted, the program checks the setting for the
Create Payment Instructions parameter on the Process tab of the PPR header to
determine if the associated payment instruction(s) (PI) should be created
automatically after the payments are created (the
CREATE_PMT_INSTRUCTIONS_FLAG = Y), or if the program is to wait for a manual
kick-off of the Format Payment Instructions program through the Standard
Request Submission form (SRS) (the CREATE_PMT_INSTRUCTIONS_FLAG = N).
|
If the PPR is set up to automatically submit instruction(s), the
payment_service_request_id will be populated in IBY_PAYMENT_INSTRUCTIONS_ALL
because the instruction will be specific to the PPR. In this case, the
instruction(s) can be linked to the PPR using PAYMENT_SERVICE_REQUEST_ID.
|
If the PPR is set up for the user to submit the instruction
program manually on the SRS form, then when the instruction(s) is submitted,
the instruction(s) is linked to the PPR through the payments selected by the
instruction(s). The link in this case will be through the
payment_instruction_id in IBY_PAYMENTS_ALL.
|
Sort and number the payments (paper checks and possibly,
electronic payments)
|
Create XML extracted message
|
Pass the extract to Oracle XML Publisher (also known as "BI
Publisher")
|
XML Publisher applies the formatted template to the payments
|
XML Publisher formats and stores the output
|
Oracle Payments then updates the status of the Payment
Instruction(s) and the PPR. If successful, the displayed status of the PPR is
"Formatted", and the status of the Payment Instruction(s) will be
"Formatted" for electronic payments and "Formatted - Ready for
Printing" for check payments
|
Print checks:
|
Users can load stationery into the printer and print checks at
this stage by clicking on the Take Action icon for the related Payment
Instruction on the Search PPRs window.
|
Determine if the checks printed OK, and if so, click on the Take
Action icon again to be taken to the "Record Print Status" window,
and click on the Record Print Status button. If there were problems with the
printing process (paper jams, skipped checks, etc.) -- especially if you are
using pre-numbered check stock -- use the Reprint button to reprint the batch
and record any spoiled (ruined) and/or skipped check numbers.
|
Transmit electronic payments:
|
Electronic payments can be transmitted at this point.
|
CONFIRM PAYMENTS
|
(Code: AP_PMT_CALLOUT_PKG): The Selection process is handled by
Payables (AP).
|
In order to confirm the printing of paper checks, the user needs
to use the Record Print Status window to confirm which pre-numbered paper
stock printed OK, and which (if any) were skipped or were damaged beyond
repair ("spoiled").
|
Oracle Payments calls ap_pmt_callout_pkg.payment_completed to
confirm the payments. During this step, the program does the following:
|
Assigns sequence values for Document Sequencing (Vouchering).
|
Creates data in the AP_CHECKS_ALL table with the appropriate
data from the IBY tables.
|
Inserts data into the AP_INVOICE_PAYMENTS_ALL table for the
corresponding checks.
|
The documents (invoices) are updated in the
AP_PAYMENT_SCHEDULES_ALL table to indicate in the Invoices Workbench the
payment details and status.
|
The documents not paid in this PPR are released by setting the
checkrun_id on the Payment Schedules to NULL.
|
The AP_INVOICES_ALL table is updated to show the payment status
in the Invoices Workbench for those documents that were paid by the PPR.
|
Data for this PPR is deleted from the AP_SELECTED_INVOICES_ALL
table.
|
Data for this PPR is deleted from the AP_UNSELECTED_INVOICES_ALL
table.
|
"Completing" Electronic Payments: Electronic
payments are not "confirmed" in the same way that paper documents
are handled. The system will automatically mark electronic payments as
"completed" based on the setting you chose for the "Completion
Point" field on the header of the associated Payment Process Profile
(PPP):
|
"Built" = the payments will be marked as
"complete" when the Build process completes
|
"Payment Instruction is Created" = the payments will
be marked as "complete" when the PI is created
|
Payment Instruction is Formatted" = the payments will be
marked as "complete" when the PI has successfully completed the
Formatting process
|
"Payment Instruction is Transmitted" = the payments
will be marked as "complete" when they are transmitted"
|
PPR Status:
NEW:A1:A58
|
This status indicates that the PPR has been successfully
submitted for processing, and the AutoSelect program is digesting the
criteria provided by the user on the header of the PPR in preparation of the
automatic selection the invoices and memos related to that criteria.
|
SELECTING INVOICES:
|
This status indicates that the AutoSelect program is selecting
the eligible invoices/memos for the payment batch based on Due Date,
Discount Date, Pay Group, and other criteria provided by the user on the
header of the PPR.
|
CANCELLED - NO INVOICES SELECTED:
|
If no invoices or memos met the selection criteria provided by
the user on the header of the PPR, the PPR is automatically terminated and
the status changes to this status.
|
"MISSING..." STATUSES:
|
Other statuses may appear at this point in the process if the
user failed to included required information on the PPR header, such as
"Missing Exchange Rates", etc.
|
INVOICES SELECTED:
|
After selecting the documents (invoices/memos), they are locked
to prevent other checkruns from selecting the same documents.
|
INVOICES PENDING REVIEW:
|
This status will only appear if you selected the Stop
Process for Review After Scheduled Payment Selection option on
the Processing tab of the PPR header. This status means that
the PPR process has stopped, and is waiting for you to review the invoices
and memos that were selected for payment (and make any changes to the batch,
as needed). Click on the Take Action icon to be taken to
the Review Selected Scheduled Payments window.
|
CALCULATING SPECIAL AMOUNTS:
|
This status will only appear if you selected the Calculate
Payment Withholding and Interest During the Scheduled Payment Selection option
on the Processing tab of the PPR header. This status means
that interest and withholding tax are being calculated and applied, as
necessary, to the invoices and memos selected for this payment batch.
|
ASSEMBLING/ASSEMBLED PAYMENTS:
|
An "interim" status, it appears after the calculation
for interest and withholding has been completed, and the Build Payments
program is starting. It may appear again later after the user provides any
required bank account and PPP information for the invoices/memos
("documents") selected.
|
INFORMATION REQUIRED - PENDING ACTION:
|
This status appears if you did not provide a default Internal
(Disbursement) Bank Account and/or PPP on the header of the PPR. In that
case, you need to click on theTake Action icon to be taken to a
form where you can decide which internal bank account and PPP should be used
for each invoice and memo selected for payment.
|
PENDING PROPOSED PAYMENT REVIEW:
|
This status will only appear if you selected the Stop
Process for Review After Creation of Proposed Payments option on
the Processing tab of the PPR header. In this case, the
system is waiting for you to review (and modify, if needed) the proposed
payments for this batch. Click on the Take Action icon to be
taken to the Review Proposed Payments window.
|
FORMATTING:
|
This status indicates that the proposed payments have been
turned into payment instruction files. At this point, you will want to click
on the Show link to view the new associated payment
instruction file(s). Each payment instruction file with have their own PI Reference
Number. If you have both electronic and paper ("check")
payments involved in this payment batch, you will see a payment instruction
file for each type of payment method.
|
PAYMENT INSTRUCTION STATUSES:
|
An "electronic" type of payment instruction file will
usually be marked as FORMATTED at this stage, which means
the PI has been created, (and based on your setups) may also have been
transmitted, and even marked as "Complete".
|
A "check" type of payment instruction file will (based
on your setups) usually be marked as FORMATTED - READY FOR PRINTING,
which means the payment instruction file was created, and is waiting to be
sent to your printer. Click on the Take Action icon to send
the file to the printer.
|
Afterward, the Status will change to SUBMITTED
FOR PRINTING. Click on the Take Action icon again to
"confirm" the payments (Record Print Status). This is also
where the user will have an opportunity to "Reprint" the payment
instruction file, if there were problems during the first printing process.
Once the payment instruction file has been printed, an internal Payment
Reference Number is assigned to the payment, along with a Paper
Document (Check) Number.
|
Once the user clicks on the Record Print Status button
(and confirms it), the payment instruction file's Status changes
again, this time toPRINTED.
|
CONFIRMED PAYMENT:
|
Once the payment instructions have been transmitted/printed and
confirmed, the Status of the PPR changes to this status to
indicate a successfully completed payment batch (PPR).
|
TERMINATED:
|
If the user terminates a PPR anytime prior to confirmation of
the payments (using the Terminate icon), the status will
change to "Terminated", and the PPR is permanently closed.
|
PPR Reports:
Payment Process Request Status Report: The
Payment Process Request Status Report is a report that you can run that
displays proposed payment information. You can request the report to run automatically
after proposed payments have been created and validated or run the report by
standard report submission. The report provides parameters, such as the
Payment Process Request name/identifier and runs if the Payment Process
Request status is "Payments Created".
|
Payment Instruction Register: Once
a payment instruction has been formatted, payments within that payment
instruction can be reviewed in report format. The Payment Instruction
Register can be run at any time after payment instruction creation. The
report lists the various statuses of payments within the payment
instructions, such as Formatted or Transmitted.
|
Separate Remittance Advice:The
Separate Remittance Advice is a report sent to a payee that lists the
documents payable paid as part of each payment. You can specify the format
for the remittance advice document and the delivery method.
|
Positive Pay: A
positive pay file is a security measure in the form of a document that the
deploying company sends to its payment system or bank to inform it of
payments made by check. When you print checks, then you can electronically
transmit a list of payments to the bank or payment system that indicates the
checks you printed, so the bank or payment system knows what checks to pay.
This list prevents the payment system or bank from paying fraudulent checks,
since such checks are not listed on the positive pay file.
|
R12 Oracle Payments offers two versions of the Positive Pay
report:
|
the Positive Pay File program, and
|
the Positive Pay File with Additional Parameters program.These
programs replace the R11i report called the Positive Pay Report.
|
Submitting
PPR with Submit Single Format Payment Process Request
Search
with payment details
Navigation : Payable Manager à Payments à Entry à Query with below details
Operating Unit
|
: Vision Operations
|
Bank Account
|
: BofA-204
|
Payment Method
|
: Check
|
Status
|
: Negotiable
|

Or
Click
on the find button and enter the values and click on find


Void
the payments
Click
on Actions à Check the Void à Ok

Then
submit the PPR

Payment
Process Request Name : XX_APPS88_CHECK_PPR_004
Template
: XX_APPS88_CHECK (Use the above created
template to populate the values)
Click
on Submit.

Query
with PPR and then click on go

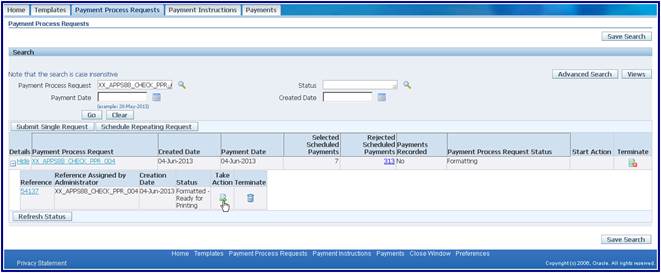


Click
on the “Record Print Status” button and click on “Continue” (Record Print
Status : Screen shot is missing )


Submitting
the PPR with Create Printed Payment Instructions
Navigation : Payable Manager à Payments à Entry àClick on find
Operating Unit
|
: Vision Operations
|
Bank Account
|
: BofA-204
|
Payment Method
|
: Check
|
Status
|
: Negotiable
|


Void
the payments
Click
on Actions à Check the Void à Ok

Then
submit the PPR

Payment
Process Request Name : XX_APPS88_CHECK_PPR_005
Template
: XX_APPS88_CHECK (Use the above created template
to populate the values)
Click
on Submit.


Payment Process Profile
|
: XX_APPS88_CHECK
|
Payment Currency
|
: USD
|
Internal Bank Account
|
: BofA-204
|
Payment Document
|
: XX_APPS88_CHECK (it will populate by default)
|
Select Payments from Source Product
|
: Payables
|
Select Payments from Payment Process Request
|
: XX_APPS88_CHECK_PPR_005(Above created PPR)
|
Select Payments from Legal Entity
|
:Vision Operations
|
Select Payments from Organization Type
|
: Operating Unit
|
Select Payments from Organization
|
: Vision Operations
|
Print Now
|
: No
|


6 comments:
amazing post thankyou so much !
Wow. That's very detailed and well put together. Well done and thanks for the post.
Hi, I am receiving the below error while processing the payment at the time of "Format Payment Instructions"... Please HELP!!! I'm new to this and not able to get a resolution...:-(
This request finished with an error and produced the following completion message: Internal Error to Payment Server: \tmp\xdoIPiwbAekKZ072618_0308233020.fo (The system cannot find the path specified) The processing began on 26-JUL-2018 15:08:07 and ended on 26-JUL-2018 15:08:23. You may find more information on the cause of the error in the request log or the concurrent manager log.
Please check with your DBA, It is temporary file path issue.
This is a lovely interpretation of Oracle Check Printing Using XML Publisher in Oracle Applications Release 12. However, it is confusing how your Net Amount total is 89,192.81, and the check amount is $223,740.90.
What brought me to your site was that I was looking for how to change the payment extract to include a missing address for checks. Can you help with modifying the payment extract?
How to encrypt final PPP file before sending to Bank ?
Post a Comment