
Overview
Brief the module overview including oracle standard flow and its applicability in EBS suite. Overview should be in details mentioning the all functionality provided by oracle and its shared entities as well as its integration with other modules.Entering Transactions:
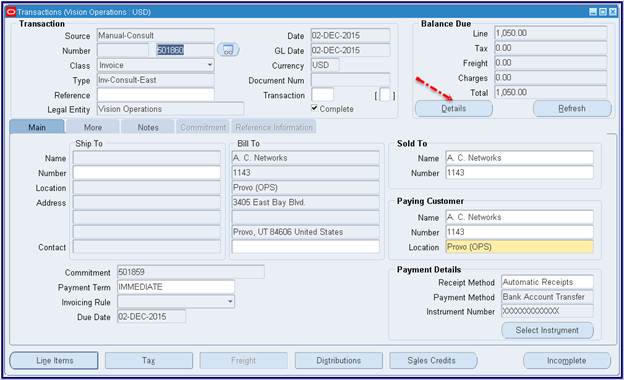
Use the Transaction window to enter your invoices, debit memos, credit memos, and commitments. You can also query and update your transactions in this window and review your transactions in the Transactions Summary window.
The procedure for entering invoice is shown below.
Enter Invoice or Debit Memo:
Use the Transaction window to enter your invoices, debit memos, credit memos, and commitments. You can also query and update your transactions in this window and review your transactions and chargeback in the Transactions Summary window. When you enter an invoice, Receivables uses the A/C Code defined in the Transaction Type or Auto Accounting rules to determine the default General ledger accounts. You can enter transactions one at a time or in a group called a batch. Your system administrator determines whether you can delete a transaction. However you can override these accounts which are by default populated through this account generator.
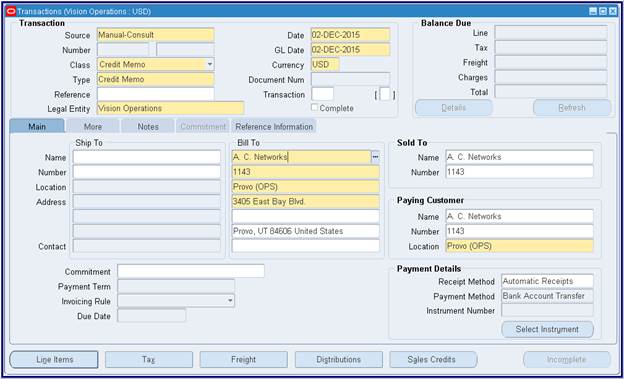
Navigation : Transaction (N) ->Transactions

Step# 1: Transaction Batch Sources
Batch sources control the standard transaction type assigned to a transaction and determine whether Receivables automatically numbers your transactions and transaction batches. Active transaction batch sources appear as list of values choices in the Transactions, Transactions Summary, and Credit Transactions windows, and for bills receivable in the Bills Receivable and Bills Receivable Transaction Batches windows.
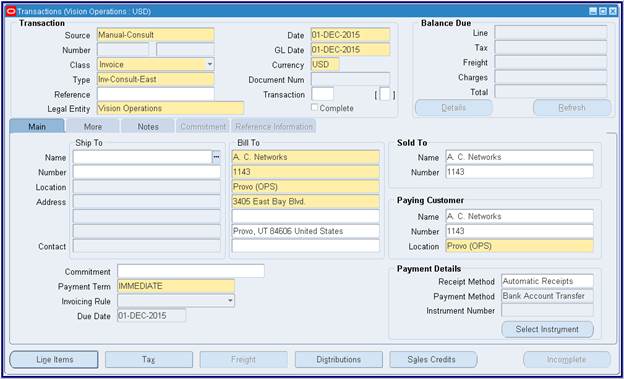
Step# 2: If your batch source does not specify Automatic Invoice Numbering, enter a transaction Number. Otherwise, Receivables assigns a number when you save. If you are adding transactions to a batch, the transaction number must be unique within this batch.
Step# 3: Enter the Date and Currency of this transaction. The default date is either the batch date or, if there is no batch information, the current date. The default currency is either the currency entered at the batch level or your functional currency, but you can change it to any currency defined in the system. If the currency is different from your functional currency, and you have not defined daily conversion rates, enter exchange rate information.
Step# 4: Choose a class of Invoice or Debit Memo
Step# 5: Choose a transaction Type with a class of Invoice or Debit Memo
Step# 6: Select Customer "Bill to Site" name and location for this transaction from list of value.
Step# 7: Enter the payment Terms for this transaction. Receivable calculates the Due Date based on the payment terms and date of this transaction
Receivables use the following hierarchy to determine the default payment terms, stopping when one is found:
· Customer Bill-To site level
· Customer address level
· Customer level
· Transaction Type
Step# 8: Enter any special instruction or comments (Optional)
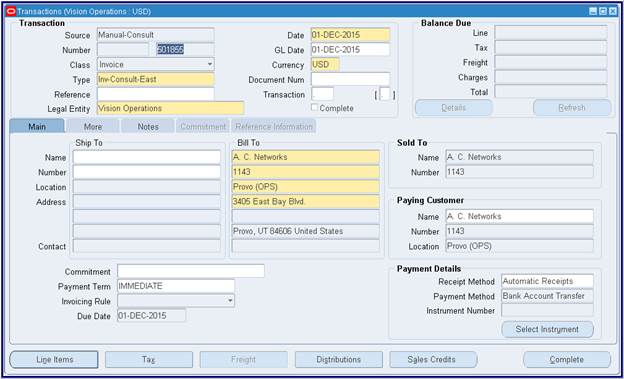
Step# 9: If you are using manual sequence numbering, open the More tabbed region, then enter a unique Document Number. Otherwise, Receivables assigns a document number when you save.
Step# 10: Open the Remit To tabbed region, and then enter the Remit To Address for this transaction. The default is the remit-to address assigned to the country, state, and postal code combination for this customer's address.
Step# 12: To enter Freight information for this transaction, choose Freight
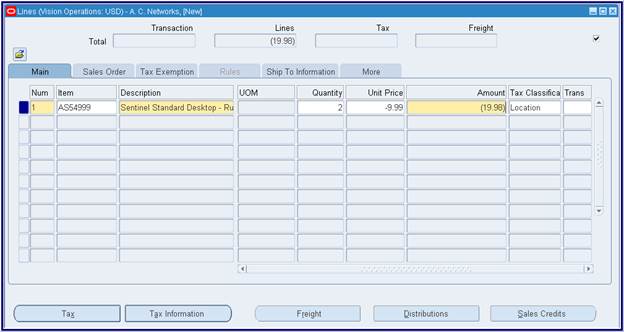
Step# 13: To enter the goods or services to bill to this customer, choose Line Items, and then enter the Item, Quantity, and Unit Price for each item. Receivables automatically calculates the total Amount for each line
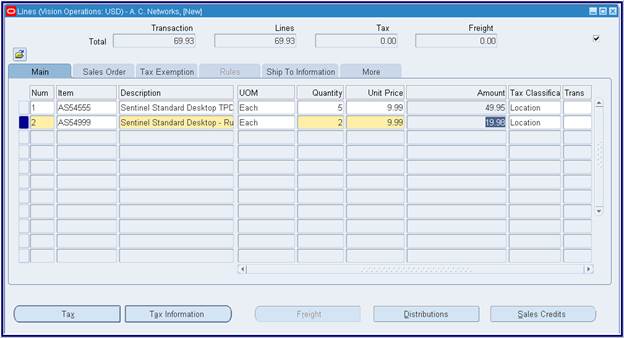
Step# 14: Select the tax code form list of value mentioned in the field tax classification.
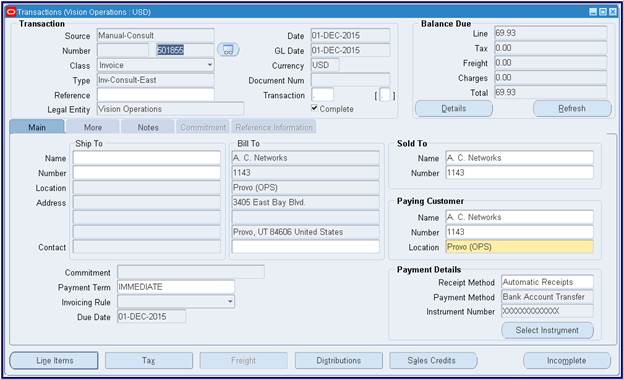
Step# 15: Accounting Entries
Once the transaction in completed the invoice can be sent to the customer for collection. The system will generate the following accounting entries. For example you have invoiced the customer for Rs 69.93/- for one-year period.
-->Receivable Dr 69.93
-->Revenue Cr 49.95
-->Revenue Cr 19.98
To review or update accounting information, choose "Distributions".
Step# 16: Save your work. If you are ready to complete this transaction then press "Complete" button to change the transaction status to "Complete" and make it available for inquiry, receipt application and other uses.
Entering Credit Memo
Stand-alone credit notes can be issued to the customer for recording returns, write off or any other business reason. The procedure is as explained below.
Use the Transaction window to enter credit memos. You can also query and update your transactions in this window and review your transactions.
Navigation : Transaction (N) ->Transaction
Navigate to the Transactions window.
Step# 1: Enter the Date and Currency of this transaction.
Step# 2: Enter the transaction batch Source for this transaction. The default is the source you entered at the batch level. If there is no batch information, you must enter a source. The transaction batch source specifies automatic or manual batch and invoice numbering and the standard transaction type.
Step# 3: Choose a transaction Type with a class of Credit Memo (optional).
Step# 4: Choose Bill to Customer Site of the relevant customer.
Step# 5: Press the "Line Items" button
Step# 6: Enter line items; always enter the amount with negative sign.
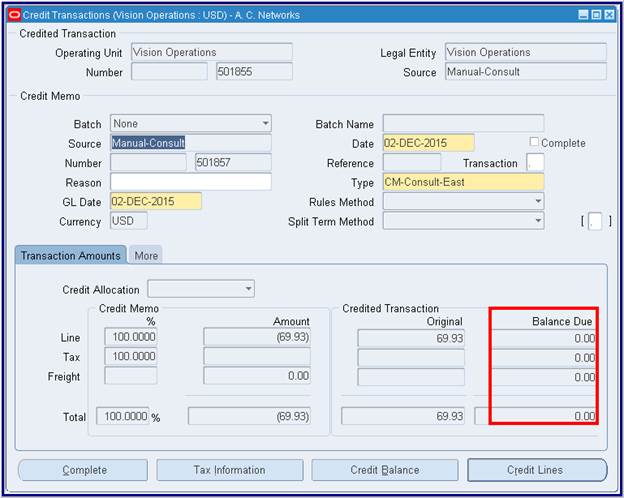
Enter the Credit Memo by Using the Credit Transactions Window
To speed up the data entry process use the Credit Transactions window to enter, update, and review credit memos against specific invoices. You create credit memos to reduce the balance due for a transaction. When you credit a transaction, Receivables creates the appropriate accounting entries.
Navigation : Transaction (N) -> Credit Transaction
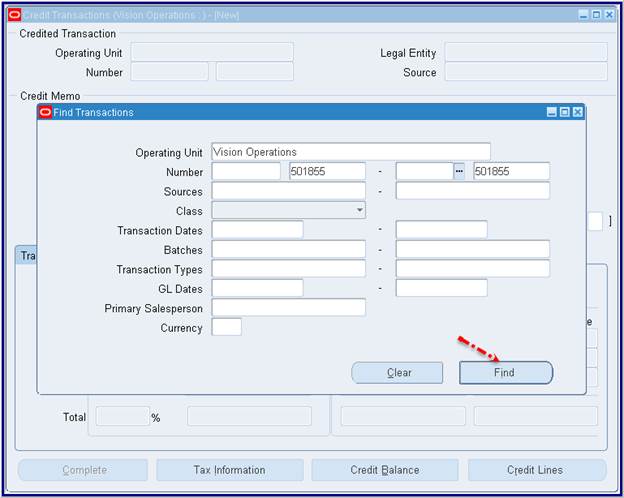

Note:Receivable lets you credit an entire invoice or specific invoice lines.
To create a Credit Memo against a transaction the following steps need to be followed.
Step# 1: Navigate to the Transactions Summary or Credit Transactions window.
Receivables > Credit Transaction or Transaction Summary Window
Step# 2: If you are in the Transactions Summary window, query the transaction to credit, then choose Credit.
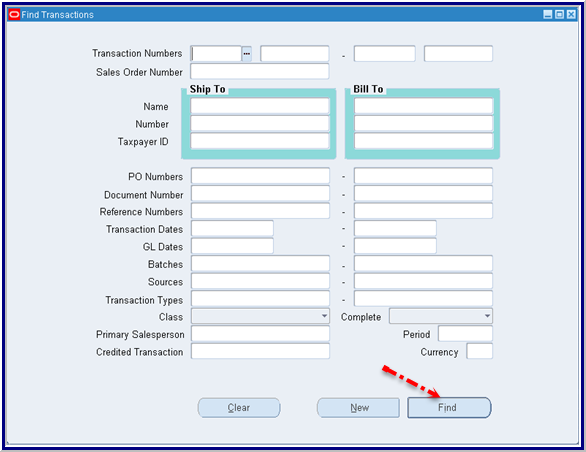
Step# 3: If you chose Credit Transactions from the Navigator, enter the 'Transaction Number" to credit in the Find Transactions window. If you do not know the transaction number, enter selection criteria such as Class, Transaction Date, and Currency to limit your search.
Step# 4: Enter the Date of this credit memo. Receivables prints this date on your credit memo.
Step# 5: Enter a transaction Type for this credit memo.
Step# 6: Enter the GL Date for this credit memo. This date must be in an open or future enterable accounting period and must be equal to or later than the GL date of the Original transaction.
Step# 7: Enter the Currency for this credit memo.
Step# 8: If you are not using Automatic Sequence Numbering, open the More tabbed region, then enter a unique Document Number for this credit memo.

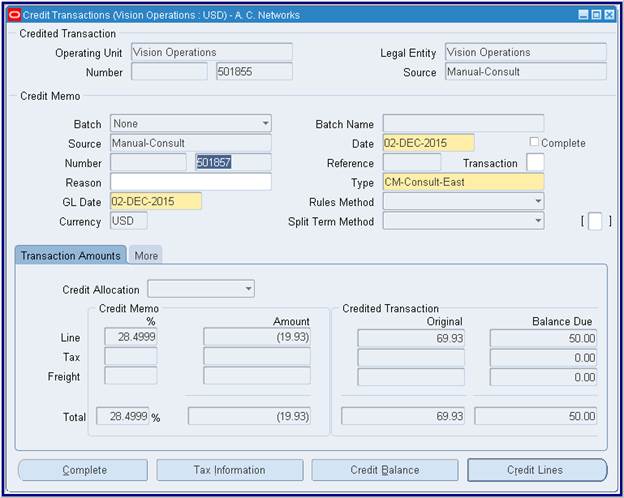
Step# 9: To credit only part of the balance due for this transaction, enter the percentage or Amount of Line, Tax, or Freight charges to credit. To credit a specific portion of the charges, enter a negative number in the Amount field (for example, enter -50 to decrease the balance due by 50 dollars). If you enter a percentage, Receivables calculates the amount, and vice versa.
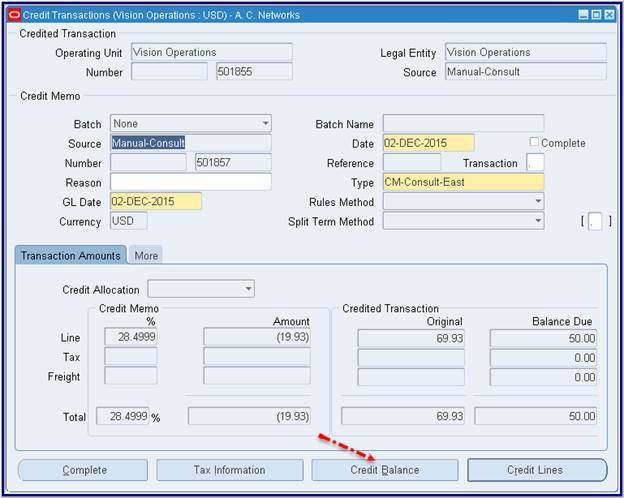
Step# 10: To credit the entire balance due for this transaction, choose Credit Balance. Receivable reduces the Balance Due for this transaction to zero for each type of charges.
Step# 11: Choose Credit Lines.
Step# 12: Select the transaction line to credit from the list of values and enter "Amount".
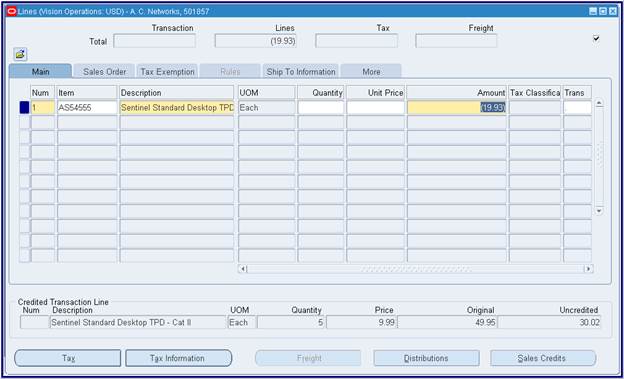
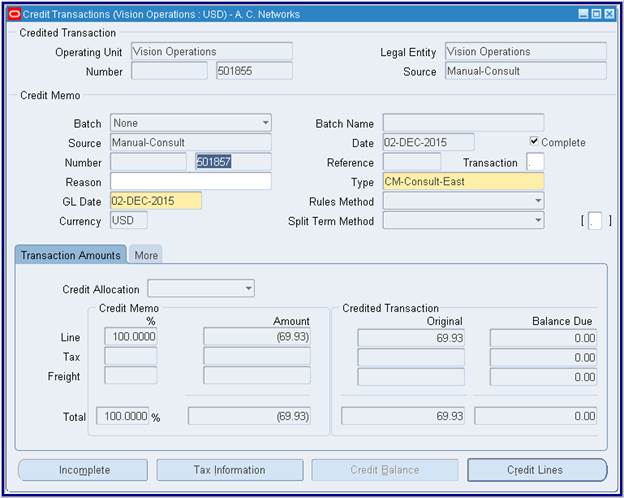
Step# 13: Save your work. Receivable creates all the accounting reversal entries and reverses the amount of sales revenue.
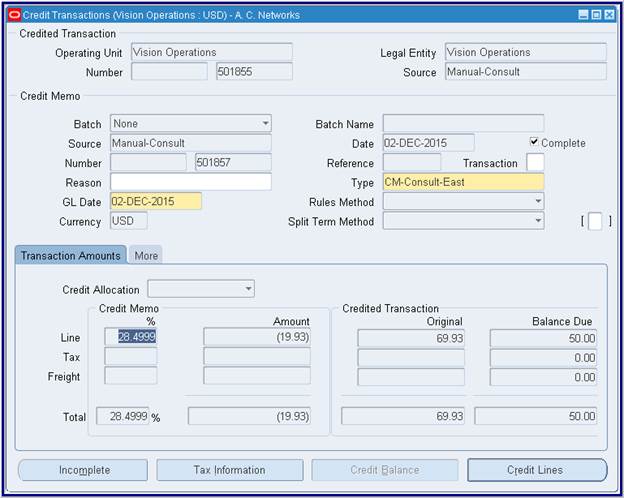
Step# 14: If you are ready to complete this credit memo press the button Complete.
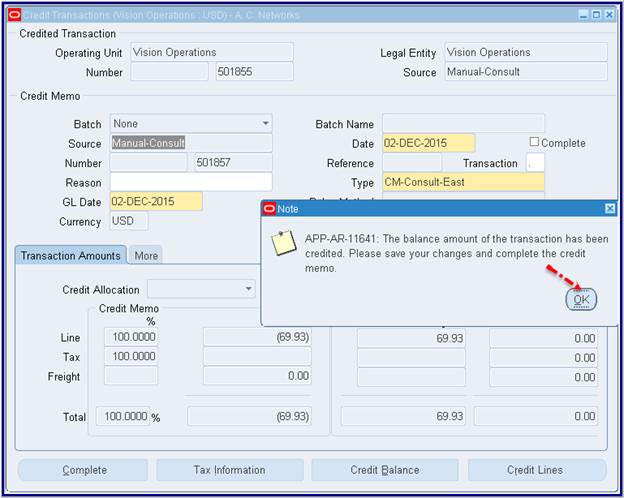
Credit Balance
Oracle Receivables gives you this liberty to credit the entire balance of an invoice to Zero
Navigation : Transaction (N) -> Credit Transaction
Step#1: Query the Transaction that is you want to fully credit
Step#2: On pressing the button (Credit Balance) credit transaction system will gives you this prompt message
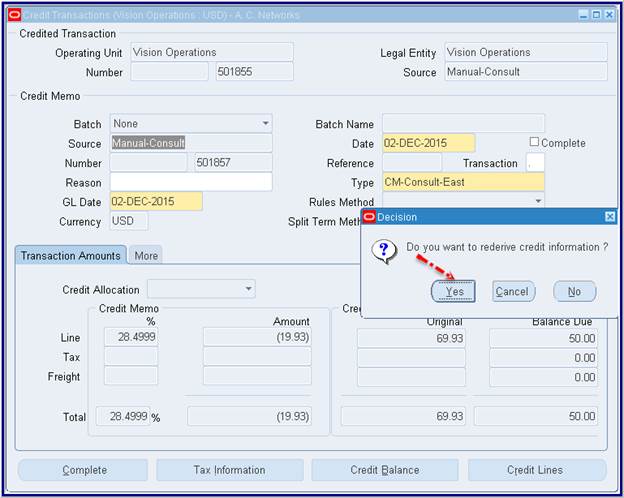
Step#3: On pressing the button "ok" you will find balance to "Zero"
Copy Transaction
Query your respective transaction by following the following navigation
Navigation : Transaction (N) -> Copy Transaction
And after pressing torch button on the transaction window following window will appear
Press the Find
Press the button "Copy to"
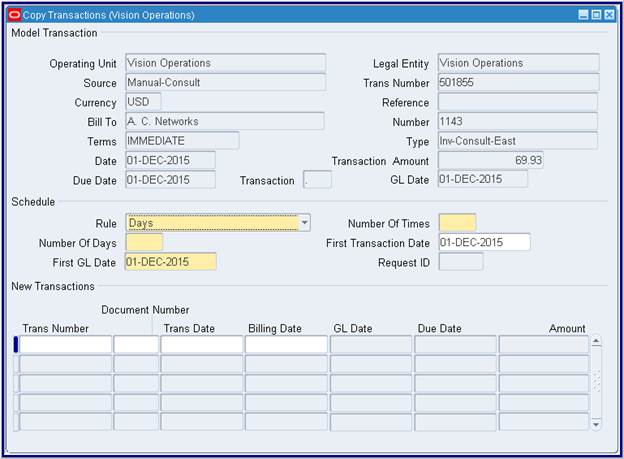
Enter the rule, number of days and number of times you want to create invoices on pressing the Tab button system automatically populated the invoice related information

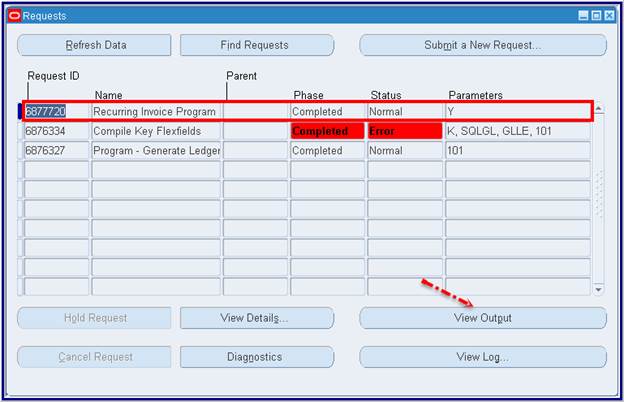
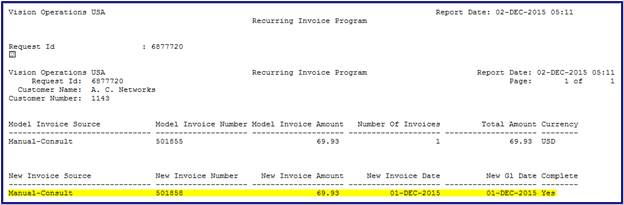
On pressing the button save system will generate the concurrent request mentioned in the Request ID
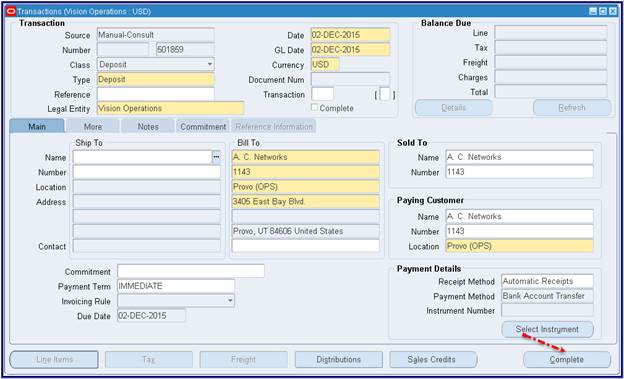
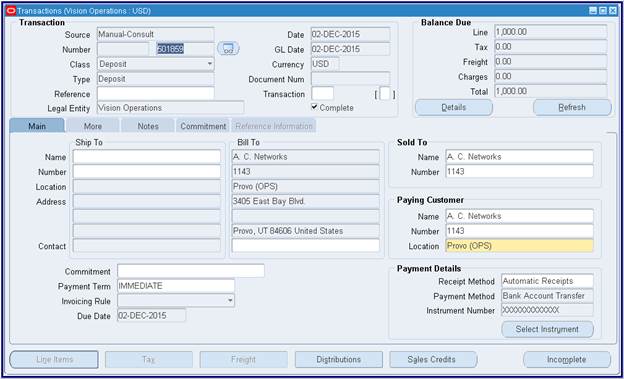
Entering Deposit/Guarantee
Navigation : Transaction (N) -> Transaction
Step#1: Enter the source
Step#2: Enter the class "Deposit"
Step#3: Enter the transaction type.
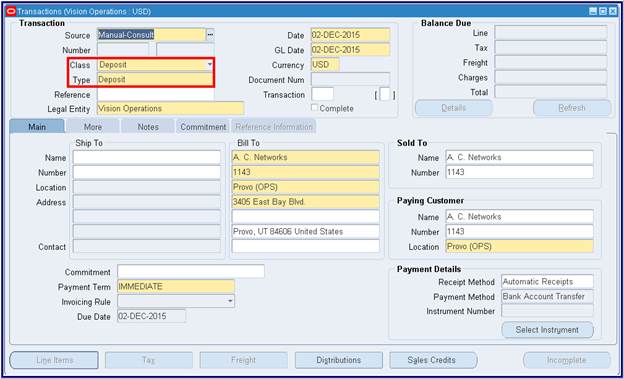
Step#4: Move towards the "Tab" Commitment and enter the details like Effective date, amount and description.
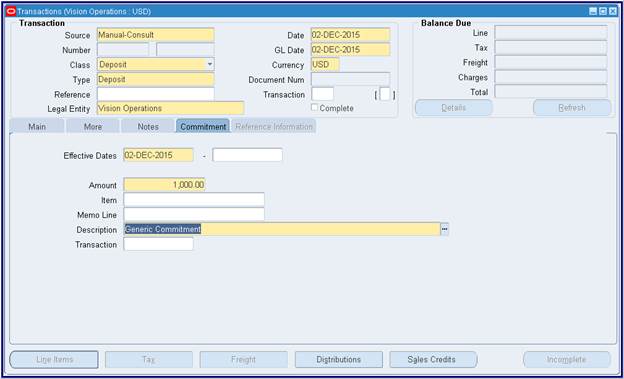
Step#5: After entering all details Press the button complete.
Apply Deposits
Navigation : Transaction (N) -> Transaction
Step#1: Query the invoice on which you want to apply deposit
Step#2: Go to Action button and click on Apply Deposit

Step#3: On clicking the button apply deposit another window will open
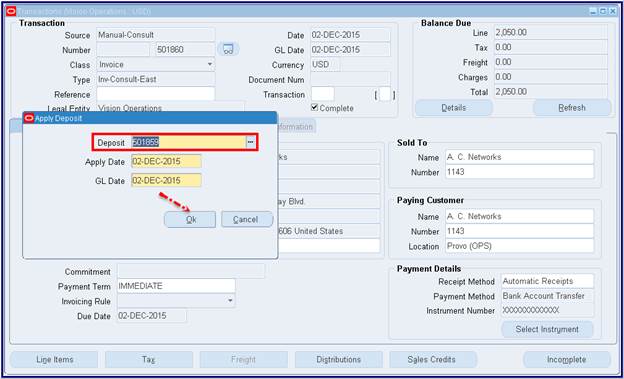
Step#4: Choose the deposit, Apply date and GL date
Step#5: Press the button "Complete"

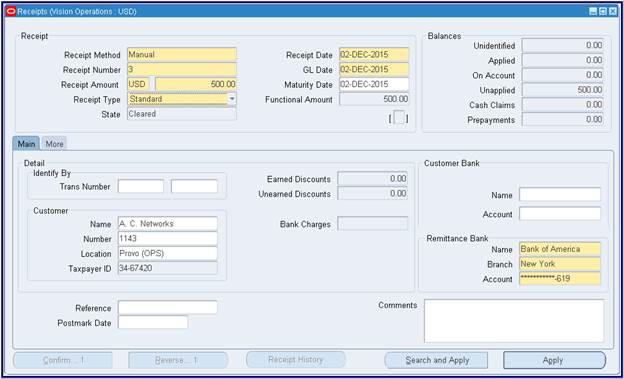
Use the Receipts window to enter new or query existing receipts. You can enter two types of receipts in Receivables:
Standard receipts: Payment (such as cash or a check) that you receive from your customers for goods or services. Also known as cash receipts.
Miscellaneous receipts: Revenue earned from investments, interest, refunds, stock sales, and other nonstandard items.
You can enter receipts and apply them to transactions in either Open or Future accounting periods. You can partially or fully apply a receipt to a single debit item or to several debit items.
Navigation : Receipt (N) -> Receipt
Press on button Apply
Choose values from Apply to
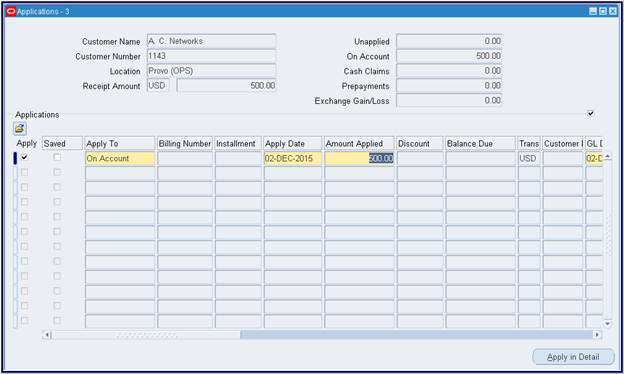
And press the button Save
Viewing the Receipt History:
Use the Receipt History window to view additional details about your saved receipts. This window displays a history of the receipt's statuses, as well as exchange rate adjustments. You can also view all application notes that were made to this receipt. This window also includes Oracle Cash Management-related information.
From the Receipts window, click Receipt History

Receipt Status
A receipt can have one of the following statuses:
Approved: This receipt has been approved for automatic receipt creation. This status is only valid for automatic receipts.
Confirmed: For manually entered receipts, this status indicates the receipt belongs to a receipt class that requires remittance.
Remitted: This receipt has been remitted.
Cleared: The payment of this receipt was transferred to your bank account and the bank statement has been reconciled within Receivables.
Reversed: This receipt has been reversed. You can reverse a receipt when your customer stops payment on a receipt, if a receipt comes from an account with non-sufficient funds or if you want to re-enter and reapply it in Receivables.
Miscellaneous Receipts
Navigate to the Receipts or Receipts Summary window
Step# 1: Enter a payment method. Receivables use the payment method to determine the accounting and remittance bank accounts for this receipt.
Step# 2: Enter the receipt information regarding receipt number
Step# 3: Enter the receipt information regarding receipt currency. You can enter transactions in any currency defined in Oracle Receivables if you have at least one remittance bank account with a Receipts Multi-Currency flag set to Yes. If no such bank account exists, you are limited to entering only those currencies in which bank accounts exist.
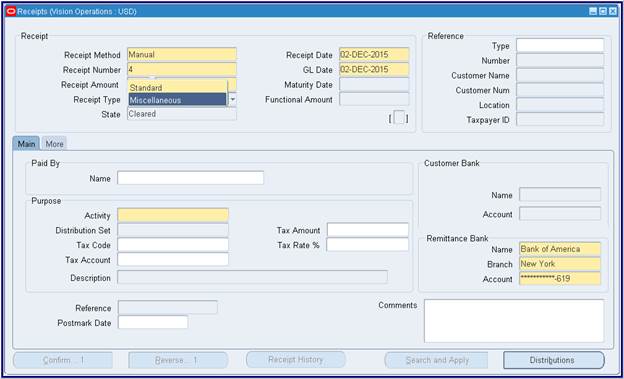
Step# 4: Enter the receipt information regarding receipt amount
Step# 5: Enter the receipt information regarding receipt GL date, and receipt date. The default GL date is the same as the batch GL date. If there is no batch information, the GL date is the same as the receipt date. The default receipt date is the current date, but you can change it. If the Receipt date is not in an open period, Receivables changes the GL date to the last date of the most recent open period. You can change the GL date, but it must be in an open or future period. If this receipt is part of a batch and you change the receipt date, Receivables does not automatically modify the GL date. Choose a receipt type of Standard. But here we are using miscealleous receipt and choose the activity.
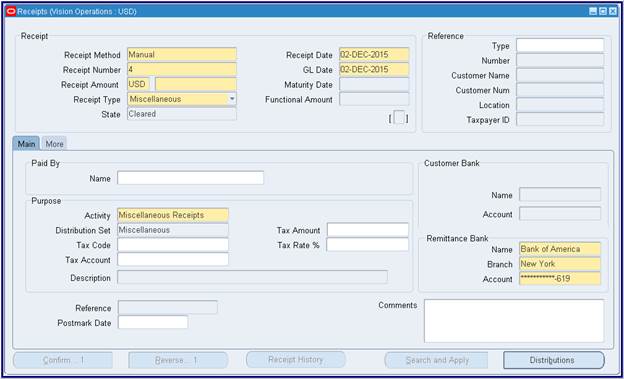
Step# 6: Press the button "Save"
Customer Overview
Use the Customers set of pages to manage customer information in Oracle Receivables. You create customers so that you can properly record and account for sales transactions, as well as all other attributes of your selling relationships. Recording a sales transaction requires that a customer has been created as a party in Oracle Trading
Community Architecture has an account as well as an account site. Consequently, to understand the role of a customer in the context of your trading community, you should also understand other concepts such as party, customer account, and account site.
· Party: An entity that can enter into a business relationship, such as buying and selling, and can be of the type Organization or Person. A party exists separately from any business relationship that it enters into with another party.
· Customer: A party, either an organization or person, with whom you have a selling relationship.
Navigation : Customer(N) -> Customer


· Sites/Addresses:
§ A location is a point in space described by an address.
§ A party site is the location where a party is physically located. Every party has only one identifying address, but a party can have multiple party sites.
§ An account site is a party site that is used in the context of an account. An account can have multiple account sites.
§ A customer address is an account site that is used for billing, shipping, or other purposes.
· Contact: A person who communicates for or acts on behalf of a party or customer account. A contact can exist for a customer at the account or address level. A person usually acts as a contact for an organization, but can also be a contact for another person. For example, an administrative assistant could be the contact for an executive.
Creating a Customer
This procedure lets you create, a new customer, an account for the customer, an account site for the account, a business purpose for the account site
For creating a new customer navigate to the Create Customer page. The Create Customer page displays differently, depending upon your customer type selection, Organization or Person, on the Customer Search page.
Step# 1: Enter Customer name, account number, and account site address. All other details are optional depending on the business requirements at your enterprise.
Step# 2: Click Save and Add Details to go to the Account Overview page to add further account details, such as account sites, profile, payment, and communication details. Add business purpose to the account sites like "Bill to", Ship to" etc.
Step# 3: Click Apply to go to the Customer Overview page to add further customer details, such as accounts, profile, communication, party relationship, and tax profile.
Customer Inquiry
Receivable lets you view detailed or summary information about your invoices, credit memos, debit memos, and commitments that do not have or have outstanding balances relating to any customer.
Use the Account Details window to view the status, due date, number of days late, dispute amount, and the balance due for a specific transaction. You can open this window from the Navigator or by choosing Account Details from the Customer Accounts or Aging window. You can view more detailed information about a transaction by choosing the Details button.
Navigation : Account Detail (N)
The Account Details window does not display receipts, credit memos, on-account credits, adjustments, and debit items that have a transaction type with Open Receivables set to No. Transactions assigned to a transaction type with Open Receivables set to No do not update your customer balances and therefore are not included in the standard aging and collection process.
Inquiry detailed information of specific transaction:
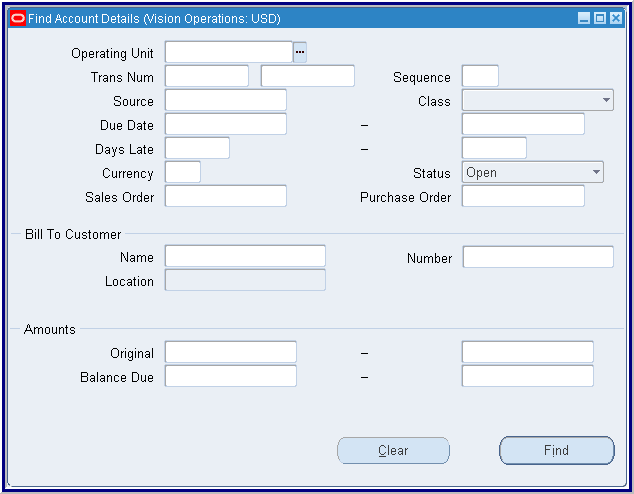
Step# 1: Navigate to the Account Details window.
Step# 2: To limit your query, enter selection criteria in the Find Account Details window. For example, enter a Transaction Number, a range of Due Dates, a Bill-To Customer Name, transaction Class, Status, or low and high values of Balances Due to select only those transactions. Leave a field blank if you do not want to limit your query to transactions matching those criteria.
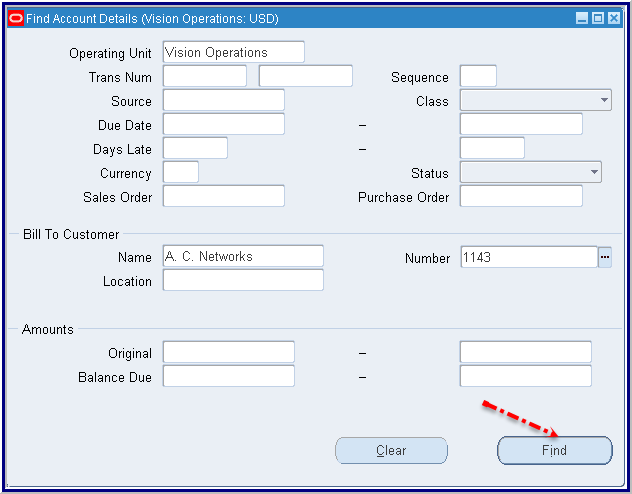
Step# 3: Choose find.
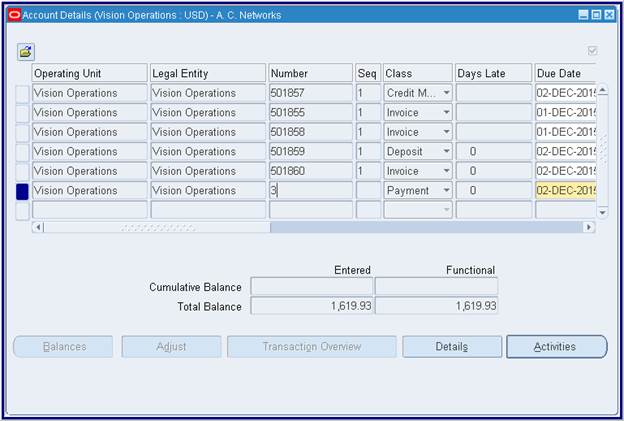
Step# 4: Select the transaction to view, and then choose "Transaction Overview". If you are viewing a Receipt, choose Account Details.
To view open activities against a transaction:
Step# 1: Navigate to the Account Details window.
Step# 2: To limit your query, enter selection criteria in the Find Account Details window. For example, enter a Transaction Number, a range of Due Dates, a Bill-To Customer Name, transaction Class, Status, or low and high values of Balances Due to select only those transactions. Leave a field blank if you do not want to limit your query to transactions matching those criteria.
Step# 3: Choose Find.
Step# 4: Select the transaction to view, and then choose "Activities".


Standard Reports
This chapter explains some of the most important Oracle Receivable Standard reports and listings. It provides step-by-step instructions for submitting a request, illustrates how you can use reports to reconcile transactions to the general ledger, and explain report parameters and headings common to each Oracle Assets report.
Running Standard Reports
Use Oracle Receivable standard reports and listings to analyze and track your accounts Receivable information.
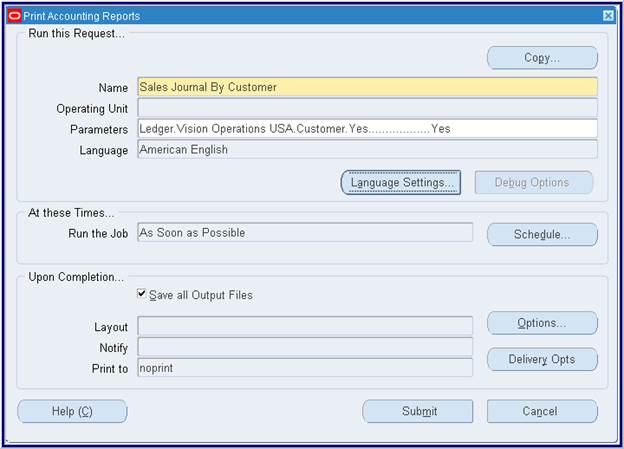
Step# 1: Navigate to Submit Request window.
Reports > Accounting

Step# 2: Select the Name of the request (report or program) you want to run from the LOV in the Name field.
Step# 3: Use the AR Reconciliation Reports to start the reconciliation process. It will provide a summary of your customer, transaction, receipt, and account balances for the period that you specify. It can give you a starting point to identify areas that need research .Use these reports to get the detailed information.
· Sales Journal by customer - Use to review all transactions.
· Transaction Register - Use to check that all items that can be posted are reflected on the Sales Journal .Sales Journal balance should match the total of the transactions here after adding the credit memo total twice .
· Receipt Register - Use to review a list of receipts.
· Sales Journal By GL Account - Use to ensure that the Transaction Register matches the Sales Journal.
· Journal Entries Reports - Use to review the details that make up the general ledger journal entries.
· Receipts Journal Reports - Use to review details of receipts that appear in the Journal Entries reports.
· Aging Reports - Use the last day of the prior month to get the outstanding opening balance.
· Transaction Detail Report- Use this report to review all of the information you entered for your invoices, credit memos, debit memos, chargeback, guarantees, and deposits.
· Adjustment Register - Use to identify any adjustments that affect the transactions for the month.
· Unapplied Receipt Register - Use to determine customer balance after taking into account all on-account and unapplied amount.
· Applied Receipt Register - Use to identify receipts that reduce the outstanding opening balance.
· Invoice Exceptions Reports - Use to identify transactions that reduce the outstanding opening balance .This report shows all transactions where the open Receivable flag is set to No. Therefore, the transactions do not display on the aging but do show in the Transaction Register. This can occur when an item can be ordered in Order Management but not invoiced, such as an internal item.
Report Parameters
A Parameters window automatically appears if you select a request that requires parameter values.
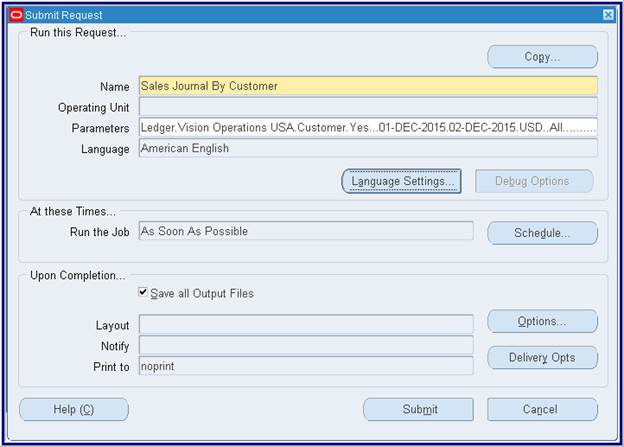
Step# 1: Use the LOV to display a list of valid values for a special parameter
Step# 2: Once you enter the values in the required parameter fields and choose OK, the Parameters window closes, and your parameter values will be displayed in the Parameters field.
Step# 3: Choose the Options Button to specify the numbers of copies you want to print and the printer from which you want to print your report.
Step# 4: Press Submit Button to submit a concurrent process to run the Report.
Step# 5: To view your Report, Navigate to the Requests window by choosing View from the Menu Bar then View Requests
Step# 6: Click the button View Output to see your online generated Report.
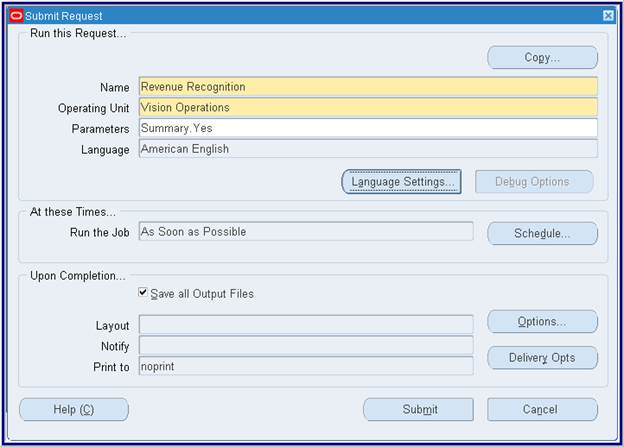
c) Running Revenue Recognition
Step# 1: Navigate to Control > Accounting > Revenue Recognition
Step# 2: The revenue recognition program will automatically run prior to the General Ledger transfer process .You can run the Revenue Recognition program manually at any time as well .The program is run to generate the revenue recognition schedule for invoice with accounting rules. Distributions are created and will pass to the General Ledger during the appropriate accounting period. This is an essential process in accrual-based accounting.
Monthly Transactions
d) Transfer to General Ledger
You create accounting entries for invoices and other transactions in Oracle Receivables using the Oracle Sub ledger accounting architecture.
Oracle Sub-ledger Accounting is a rule-based accounting engine, toolset, and repository that centralizes accounting across the E-Business Suite. Acting as an intermediate step between each of the sub-ledger applications and Oracle General Ledger, Oracle Sub-ledger Accounting creates the final accounting for sub-ledger journal entries and transfers the accounting to Oracle General Ledger.
You have two programs to transfer the Receivable accounting to General Ledger Namely.
Create Accounting
The Create Accounting program creates and transfers journal entries. In general, the parameters described in the table below determine which accounting events are processed.
Create Accounting Program Parameters
Parameters
|
Description
|
Ledger
|
Required; limits
accounting events selected for processing to those of a particular ledger
|
Process Category
|
Optional; restricts the
events selected for accounting to a particular process category. (
Transactions , Adjustment , Standard Receipts etc)
The Create
Accounting program selects events with event types falling into the event
classes Assigned to the process category.
|
End Date
|
Required; end date for
the Create Accounting program; processes only those events with event
dates on or before the end date
|
Mode
|
Required; determines
whether the sub ledger journal entries are created in Draft or Final mode
If Draft mode is
selected, then the Transfer to GL, Post in General Ledger, and General Ledger
Batch Name fields are disabled. Draft entries cannot be transferred to
General Ledger.
|
Errors Only
|
Required; limits the
creation of accounting to those events for which accounting has previously
failed
If Yes is
selected, the Create Accounting program processes all events with a status of
Error.
|
Report
|
Required; determines
whether to generate a report showing the results of the Sub ledger Accounting
program in summary or detail format
|
Transfer to
General Ledger
|
Required; if Mode is set
to Final; determines whether to transfer the sub ledger journal entries to
General Ledger, Journal import is launched if set to Yes.
|
Post in General
Ledger
|
Required; if Mode is set
to Final or Create Accounting is set to No; determines whether to post sub
ledger journal entries in General Ledger
|
General Ledger
Batch Name
|
Optional; user-entered
batch name that appears on the transferred General Ledger sub ledger journal
entries. Transfer to GL option must be set to Yes.
|
Include User
Transaction Identifiers
|
Required; controls whether
the report displays user identifiers' names and values.
|
Submit Accounting
Whenever you run the Submit Accounting program, Receivables first runs the standard Revenue Recognition program with same parameters that are used in Create Accounting Program.
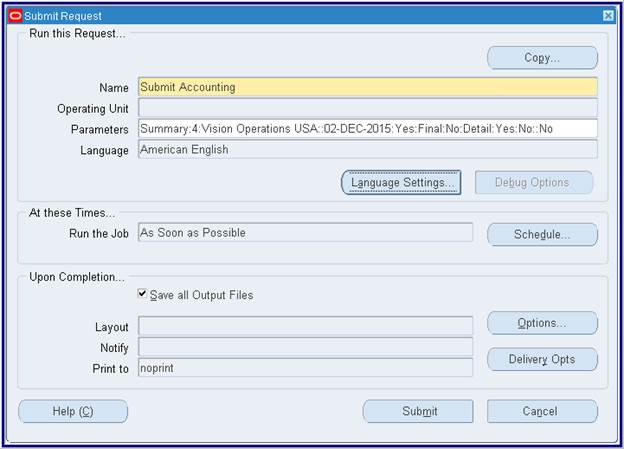
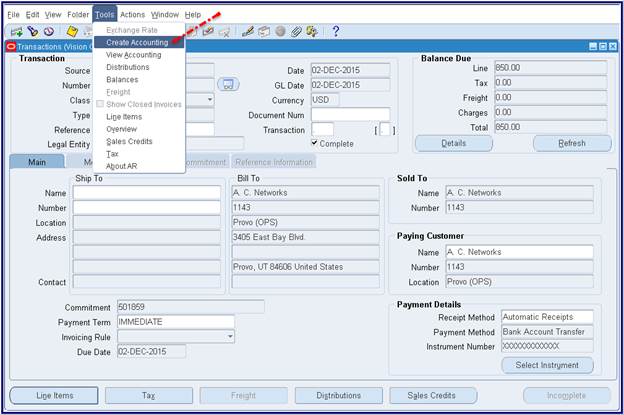
If you want to run the Create accounting or submit Accounting Program for a single transaction, one can also transfer the receivables entries from the current form like Transactions, Receipts etc., to create the accounting for a single Transaction, Receipt.
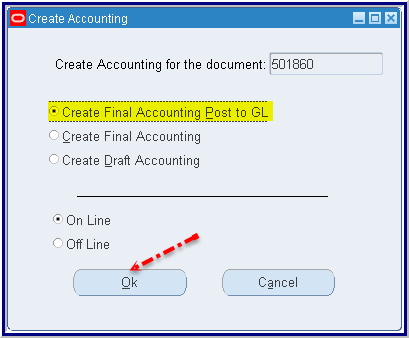
Step# 1: Go to Tools select Create accounting it will open the Create Accounting Window you will find the three options.
a. Create Final Accounting Post to GL
b. Create Final Accounting
c. Create Draft Accounting
Step# 2: Choose the above options to create accounting for a single transaction.
a) Accounts Receivable Period End Close
Open and close accounting periods in your calendar to control the recording of accounting information for these periods. Receivables lets you open future accounting periods while your current period is still open. Receivables also lets you reopen previously closed accounting periods and enter receivables activities without transferring transactions to the general ledger when you set your accounting periods to 'Future.'
Define your receivables calendar in the Accounting Calendar window. Receivables reference the statuses of these accounting periods to control transaction entry and journal entry creation to your general ledger.
You cannot enter an activity in a closed accounting period.
Navigation : Control (N) -> Accounting -> Open/Close Periods
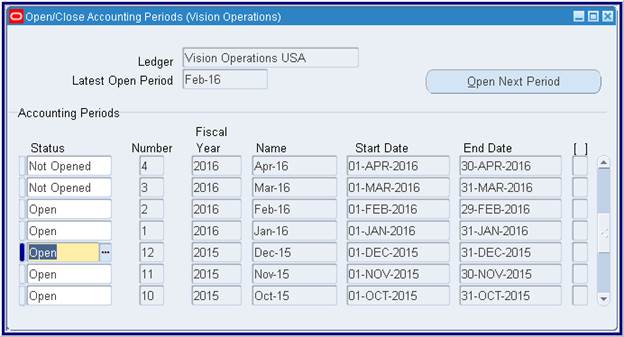
Period Status
An accounting period can have one of the following statuses:
Closed: Journal entry, posting, and transaction entry are not allowed unless the accounting period is reopened. Receivables verify that there are no unposted items in this period. Receivables do not let you close a period that contains unposted items.
Close Pending: Similar to Closed, but does not validate for Unposted items. Journal entry, posting, and transaction entry are not allowed unless the accounting period is reopened.
Future: This period is not yet open, but you can enter transactions in this period. However, you cannot post in this period until you open it.
Not Opened: This period has never been opened and journal entry and posting are not allowed.
Open: Journal entry and posting are allowed.

To open or close an accounting period:
Step# 1: Navigate to the Open/Close Accounting Periods window.
Step# 2: To update the status of an accounting period, place the cursor in the Status field next to that period, then enter a new status.
Step# 3: To open the next accounting period after the Latest Open Period, choose Open Next Period. Receivables change the status of the next period to 'Open.'
Step# 4: Save your work
A. Maintenance Activities
Transaction Types
Use transaction types to define the accounting for the debit memos, credit memos, on-account credits, chargeback, commitments, invoices, and bills receivable you create in Receivables. Transaction types also determine whether your transaction entries update your customers' balances and whether Receivables posts these transactions to your general ledger.
If Auto Accounting depends on transaction type, Receivables uses the general ledger accounts that you enter here, along with your Auto Accounting rules, to determine the default revenue, receivable, freight, tax, unearned revenue, unbilled receivable, finance charges, and Auto Invoice clearing accounts for transactions you create using this type. For bills receivable, the accounts that you enter here determine the bills receivable, unpaid bills receivable, remitted bills receivable, and factored bills receivable accounts for a bill receivable.
You can associate transaction types with your invoice sources in the Transaction Sources window to speed data entry in the Transactions and Credit Transactions windows. Active transaction types appear as list of values choices in the Transactions, Reverse Receipts, Credit Transactions, and Transaction Sources windows, and for bills receivable in the Bills Receivable and Receipt Classes windows.
You can also define credit memo and invoice transaction types to use with Auto Invoice.
You should define your transaction types in the following order:
· Credit memo transaction types
· Invoice, Debit memo, and Chargeback transaction types
· Bills receivable transaction types
· Commitment transaction types
You must define your invoice transaction types before you define your commitment types.
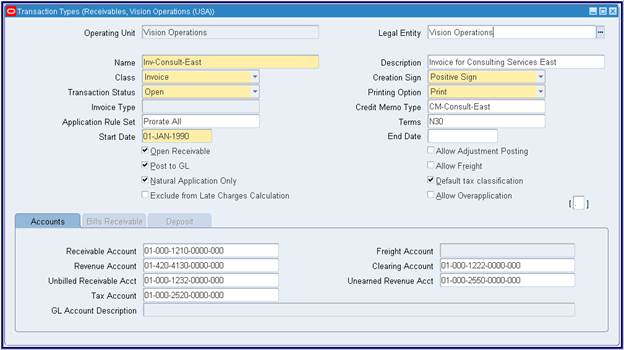
You can change most of the values here but its recommended not to change the Name of the Transaction type, the change will we applicable to the new transaction not the existing ones.
Payment Terms
Receivables lets you define standard payment terms for your customers to specify the due date and discount date for their open items. Payment terms can include a discount percent for early payment and you can assign multiple discounts to each payment term line. For example, the payment term '2% 10, Net 30' indicates that a customer is allowed a two percent discount if payment is received within 10 days; after 10 days, the entire balance is due within 30 days of the transaction date with no applicable discount.
You can define balance forward payment terms to bill customers periodically (daily, weekly, or monthly) at the account or site level using balance forward billing. The balance forward bill for a billing period shows the previous balance carried over from the last billing period, payment received, current charges and activities, and current total outstanding balance.
You can also create split payment terms for invoice installments that have different due dates.
You can use payment terms to determine the amount of each installment. Receivables lets you either distribute tax and freight charges across all installments, or allocate all freight and tax amounts in the first installment of a split term invoice. You can use prepayment payment terms to indicate which business transactions require prepayment for goods and services. Receivables displays the active payment terms you define as list of values choices in the Customers, Customer Profile Classes, and Transactions windows
Receivables Activity
Define receivables activities to default accounting information for certain activities, such as miscellaneous cash, discounts, late charges, adjustments, and receipt write-off applications for a complete list of activities.
Activities that you define appear as list of values choices in various Receivables windows. You can define as many activities as you need.
The Tax Code Source you specify determines whether Receivables calculates and accounts for tax on adjustments, discounts, and miscellaneous receipts assigned to this activity. If you specify a Tax Code Source of Invoice, then Receivables uses the tax accounting information defined for the invoice tax code(s) to automatically account for the tax. If the Receivables Activity type is Miscellaneous Cash, then you can allocate tax to the Asset or Liability tax accounts that you define for this Receivables Activity.
Receivables uses Late Charges activity's accounting information when you record late charges as adjustments to overdue transactions Query the Chargeback Adjustment activity that Receivables provides and specify GL accounts for this activity before creating chargebacks in Receivables.
Query the Credit Card Chargeback activity that Receivables provides and specify a GL clearing account for this activity, before recording credit card chargebacks in Receivables.
You can make an activity inactive by unchecking the Active check box and then saving your work.
Navigation : Setup (N) -> Receipts -> Receivable Activities
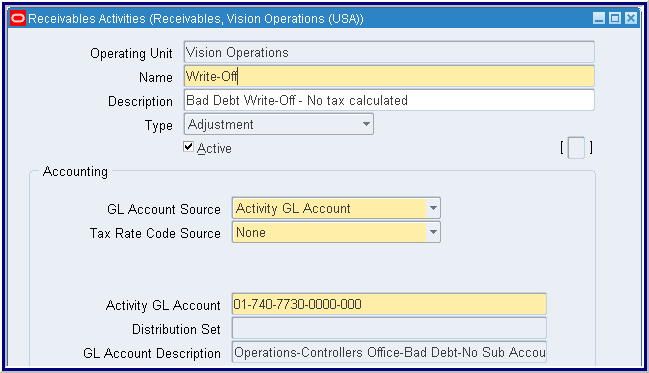
Once you define an activity, you cannot change its type. However, you can update an existing activity's GL account, even if you have already assigned this activity to a transaction.
Receipt Classes
Define receipt classes to determine the required processing steps for receipts to which you assign receipt methods with this class. These steps include confirmation, remittance, and reconciliation. You can specify any combination of these processing steps with one exception: if you confirm and reconcile, then you must also remit. If you enter No for all three of these steps, Receivables automatically creates receipts assigned to this receipt class with a status of Cleared.
Receivables uses the receipt method you assign to a receipt class to determine how to account for receipts you create using this receipt class.
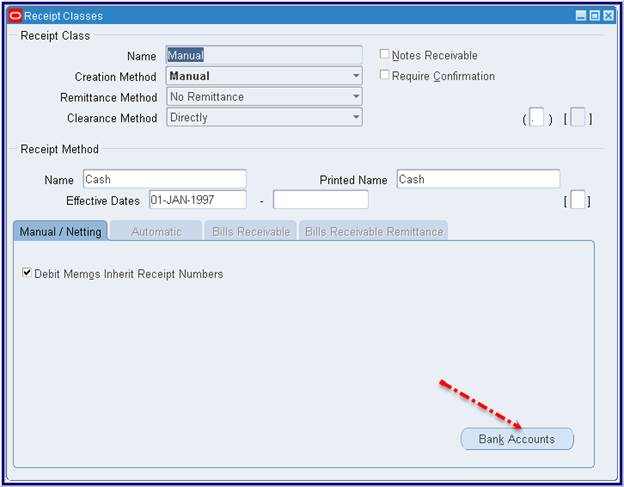
For each receipt class, you can specify a creation method, remittance method, and whether to require bank clearance for receipts that you assign to this class. If you are defining a receipt class whose creation method is Bills Receivable, then Require Confirmation, Remittance Method, and Clearance Method are disabled. If you are defining a receipt class whose creation method is Automatic, then the Remittance Method cannot be No Remittance.
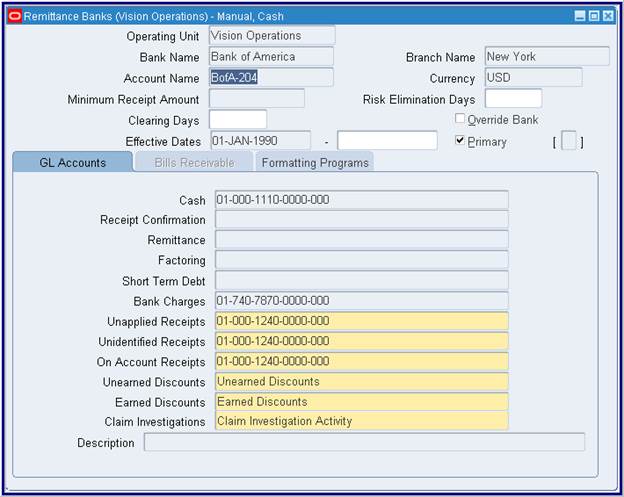
In bank account detail all the details will populate automatically from bank window but you can override them here


No comments:
Post a Comment