
Summary :
1. Navigate to the Find Assets window using the
menu path Asset-->Asset Work Bench and click on the Addition button.
2. Enter the Description of the asset and select
the Asset Category Code Combination from the list of values.
3. Enter the Number of units. It is by default 1 but
can be changed.
4. Choose whether to include the asset in Physical
inventory.
5. Enter
additional information i.e. whether the asset is owned or leased or
is it new or old.
6. To enter financial information click on the Continue button.
7. Assign the asset to relevant Corporate book.
8. Enter the Current Cost and Salvage
Value of the asset.
9. Choose the Date In Service of the asset. By
default it will be the current date in the system but can be changed. The
Earliest Date placed in service cannot be less than 1-Jan-2010
10. According to the asset category a depreciation box will be
assigned to the asset. Uncheck the Depreciation box if you do
not want to depreciate the asset.
11. Click on the Continue button to assign the
asset.
12. Enter the Number of Units, Employee Name or Number, Default
Expense Account for charging depreciation and the Physical
Location of the asset.
13. Click on the Done button to save your
entries.
14. Click on the OK button and the asset will be
created with a unique asset number assigned by the system.
|
Detail additions will be used where anyone of the following conditions hold true:
§ Assets
that have a salvage value
§ Assets
with more than one assignment
§ Assets
with more than one source line
§ Assets to
which the category default depreciation rules do not apply
§ Subcomponent
assets
To add an
asset specifying detail information:
1.
Choose Assets > Asset Workbench from the Navigator window,
following window will appear:


2. Choose Additions.
The following window appears:

3. In the Asset Details window, enter a Description of the asset.
4. Enter the asset Category code combination. You can enter it directly or by clicking on the list of values button.
5. A system generated sequence number would be assigned to each asset as asset number.
6. Manual asset numbers can be captured in asset Tag Number field.
7. In the units field the system gives a default of "one", change the number of Units.

8. Enter the Manufacturer and Model of your asset.(Optional)
9. Choose whether to include the asset in physical inventory comparisons. By default, the In Physical Inventory check box is set according to the asset category you specified, but you can override that value here.
10. Enter additional information, such as Property Type and Class, and whether the asset is Owned or Leased and New or Used.
11. Optionally choose Source Lines to enter purchasing information such as the Supplier Name and Purchase Order Number for the asset.
Note: In case of units populated through Accounts Payable Module, this data will be automatically populated.
12 Optionally Enter the Asset warranties Information.
10. Choose Continue to continue adding your asset.
The following window appears:

Entering Financial Information
To enter financial information for a new asset:
1. Assign your asset to a corporate
depreciation Book.
2. Enter the current Cost.
3. Enter the Salvage Value of the
asset.
4. Specify the asset's Date In
Service. By default current system date is displayed.
5. Based on the asset category the
Depreciation Checkbox will be selected by default. Uncheck if
you do not want to Depreciate the asset.
6. The Depreciation Method and
associated depreciation information will be defaulted from the asset category.
You can override this default information.
7. Optionally Choose the Descriptive
Flex field values of Assets historical cost and Old Asset number
8. Click on Continue to continue
adding your asset.
The following window appears:

Assigning an Asset
Assign your asset to an employee, depreciation expense account,
and location:
1. Enter the number of units of the asset. The system will not allow you to proceed unless all the units have been assigned. (Units to assign field must display "0".)
2. In the Employee Name region select the name of the employee to which the asset is to be assigned.

Enter the default Expense Account to which depreciation will be charged.

3.Enter the physical location of the asset. In this field location, enter the location flexfield combination of the asset.
4. Choose Done to save work.

The system will display the following message:

"Transaction saved for Asset Number "61"
Click OK and the asset will be created with a unique asset number assigned by the system.
Summary
1. Navigate
to the Find Assets window using the menu path Assets-->Assets
Workbench.
2. Click
on the Addition button.
3. Enter Description,
Category and Asset Key.
4. Uncheck In
Use box and select CIP for Asset Type.
5. Click
on the Continue button.
6. Enter
the Book.
7. Click
on the Continue button.
8. Assign
the asset to an Employee, Expense Account and Location.
9. Click
on the Done button.
|
After creation of CIP assets, you build the cost of CIP assets.
Creation of CIP Assets
Navigate Assets / Assets Workbench.

The following window appears:

Select Additions. The following window appears.

Enter Description, Category, Asset Key. Uncheck In Use box and select CIP for Asset Type.
Select Continue.
The following window appears:

Enter the Book.
The rest of the information defaults.
Note: For CIP Assets Current Cost is zero.
Select Continue.
The following window appears:


Assign the asset to an employee, expense account and location.
Select Done.
Building Cost of CIP Assets
Summary
1. Navigate
to the Find Assets window using the menu path Assets-->Assets
Workbench.
2. Click
on the Find button.
3. Click
on the Source Lines button.
4. Enter
the Invoice Number, Description, Optional Line Number and Amount.
5. You
can optionally enter Supplier Information and Purchase
Order Information.
6. Click
on the Done button.
|
1. Query the CIP assets through Find Asset window.
Navigate Assets / Assets Workbench, select Asset Type CIP or give an appropriate criteria for searching the asset and click Find.
Following window will appear:


2. Choose Source lines:
The following window appears:


3. In the source lines window enter the Invoice Number, Description, an optional line number and amount.
4. You can optionally enter Supplier information and Purchase Order information.
5. Choose "Done" to save your work.
Capitalize CIP Assets
Summary
1. Navigate
to the Find Assets window using the menu path Assets-->Capitalize
CIP Assets.
2. Choose
the Corporate Book to which CIP assets belong.
3. Query
the relevant CIP assets and click on the Find button.
4. In
the Capitalize CIP Assets window, check the CIP assets to be
capitalized.
5. Choose
Capitalize.
|
1. To capitalize CIP assets, navigate through Assets>Capitalize CIP Assets.

The following window appears:

2. Choose the corporate book to which CIP assets belong.
3. Query the relevant CIP assets. Select Find.
The following window appears:

4. In the capitalize CIP assets window, check the CIP assets to be capitalized.
5. Choose Capitalize.
6. Find the Asset that you capitalized in the asset workbench window
Reversing Asset Capitalized
Summary
1. Navigate to the Find Assets window using the menu path Assets>Capitalize CIP Assets.
2. Choose the corporate book in the Fixed Asset window.
3. Change the asset type from CIP to Capitalized and click on the Find button.
4. Select the Capitalized Asset through the checkmark box.
5. Click on the Reverse button.
|
1. To reverse, the asset capitalized, navigate Assets>Capitalize CIP Assets.

2. Choose the corporate book in the Fixed Asset window. Change the asset type from CIP to capitalized
3. Choose "Find".
The following window appears:

4. Select the Capitalized asset through the checkmark box..
5. Choose Reverse. The system will reinstate the asset as CIP Asset..
1.1 Mass Additions
The mass additions process lets you add new assets or cost adjustments from invoice lines brought over to Oracle Assets from Oracle Payables.
The Mass Addition process consists of following steps.

Mass Addition Queues
Each mass addition belongs to a queue that describes its status, and the queue name changes according to the transactions you perform on the mass addition. You can define your own mass additions hold queues in the QuickCodes window. The following table describes each Oracle Assets mass addition queue name:

Entering Invoices to Create Mass Additions
Create an invoice first in Oracle Payables before bringing over
potential asset invoice distribution lines to Oracle Assets.
1. In Oracle Payables, open the Invoice window.
2. Select invoice type Standard.
3. Enter the supplier and supplier site.
4. Enter the invoice date or accept the Payables default date by
pressing [Tab].
5. Enter the invoice number or accept the Payables default date by
pressing [Tab].
6. Enter the invoice description to appear on the payment document.
7. Enter the full Invoice
Amount including tax, freight and miscellaneous charges.
8. In the Terms column, payment terms will
default from the Supplier site but can be overridden.
9. Save your work.
10. Click on All Distribution Button
to go to Distribution Window. Type column will default to Item.
11. Enter the amount in Amount column.
Remember that the amount should always be net of Sales Tax..
12. Click on the Distributions button and Enter
the amount in the Amount field.
13. Click on the account column
and select Asset Clearing Account for capitalized assets and CIP Clearing
Account for CIP assets.
14. "Track as Asset"
check box will be automatically ticked for all asset clearing accounts.
15. Enter the Asset Book for
the Asset Invoice
16. After completing the above steps
save your work.
Conditions For Asset Invoice Line Distributions To Be Imported
For the mass additions create process to import an invoice line
distribution to Oracle Assets, these specific conditions must be met:
1. The line is charged to an account set up as an Asset account
2. The account is set up for an existing asset category as either
the asset clearing account or the CIP clearing account
3. The Track As Asset check box is checked. (It is automatically
checked if the account is an Asset account)
4. The invoice is approved
5. The invoice line distribution has performed create accounting
in Oracle Payable
Conditions For Expensed Invoice Line Distributions To Be Imported
You can create expensed items from
expensed invoice line distributions in Oracle Payables. Oracle Assets does not
depreciate or create journal entries for expensed items. You cannot change an
expensed item to a capitalized or CIP asset.
1. The create mass additions process imports an expensed line only
if:
2. The invoice line distribution is charged to an Expense account
3. Track as Asset is checked
4. The invoice is approved
5. The invoice line distribution has performed create accounting
in Oracle Payable
Running the Create Mass Additions For
Oracle Assets Program in Payables
You can run Create Mass Additions for Oracle Assets as many times
as you like during a period. Each time it sends potential asset invoice line
distributions and any associated discount lines to Oracle Assets. Payables
ensure that it does not bring over the same line twice.
Attention: Verify that you are creating mass additions for the correct
corporate book in Oracle Assets, because you cannot undo the process and resend
them to a different book.
1. Open the Submit Request form in Oracle Payables.
2. Choose Mass Additions Create from the Request name list of
values.
3. In the Parameters window, choose the corporate book and specify
the latest general ledger date which is on, before or after the current date.
4. Select Submit to submit the concurrent request. Oracle Payables
automatically runs the Mass Additions Create Report. Review a list of the mass
additions created.
Review the log files and print reports after the request is
completed. Also review the mass additions in the Prepare Mass Additions form in
Oracle Assets.
Review newly created mass addition lines before posting them to Oracle Assets. Enter additional mass addition source, descriptive, and depreciation information in the Mass Additions window. Assign the mass addition to one or more distributions, or change existing distributions, in the Assignments window. If the mass addition is not an asset, or if it was created in error, you can delete it.
You can place a group of mass additions in the POST, ON HOLD, or DELETE queues all at once. You can also perform a split, merge, or cost adjustment on mass additions before you post them. You can continue to review a mass addition until you post it. To review mass additions that have not yet been posted, run the Unposted Mass Additions or Mass Additions Status Report.
Once you have verified that the mass addition is ready to become an asset, change the queue to POST. The next time you Post Mass Additions to Oracle Assets this mass addition becomes an asset. The Mass Additions post program defaults depreciation rules from the asset category, book, and date placed in service. You can override the depreciation rules in the Books window if necessary.
To review a mass addition line choose Mass Additions > Prepare Mass Additions from the Navigator window.
1. Find mass additions with the queue name NEW, ON HOLD, or user–defined hold queue in the Find Mass Additions window.


- If you want to find mass additions by Invoice Number, PO Number, or Supplier Number, your search criteria must match exactly, including capitalization.

- Choose the mass addition line you want to review, and choose Open.

- In the Mass Addition window, optionally enter additional mass addition source, descriptive, and depreciation information.
- If you want to assign this mass addition to multiple distributions, or you want to review or change existing distributions, choose the Assignments button.
You can only view the distribution for a merged parent or a merged child one at a time in the Assignments window; however, if you check Show Merged Distributions, Oracle Assets displays all the distributions of both the parent and children.
- In the Assignments window, manually enter or change the distribution(s) for the mass addition line. To automatically assign a predefined distribution set to your mass addition line, use the Distribution Set poplist.
- Choose Done to save your work and return to the Mass Additions window.
- Change the queue name. If you are ready to turn a mass addition line into an asset, change the queue name to POST. While you are processing, you can put a mass addition line in the ON HOLD or a user–defined queue. If you want to delete an unwanted line, assign it to the DELETE queue.
- Save your work.
To place a group of mass additions in the POST, ON HOLD, or DELETE queue
Choose Mass Additions > Prepare Mass Additions from the Navigator window.
Use the Find Mass Additions window to query the group of mass additions you want to place in the POST, ON HOLD, or DELETE queue. Oracle Assets displays the mass additions that meet your search criteria in the Mass Additions Summary window.
From the menu, choose Special, Post All, Hold All, or Delete All.
Caution: Oracle Assets places EACH mass addition that meets your search criteria into the queue you specify.
Post All: Oracle Assets checks each mass addition, ensures that it is prepared for posting, and places it in the POST queue. If it encounters a problem with a mass addition, Oracle Assets alerts you with an error message and terminates the Post All process. Note that this mass addition and all other subsequent mass additions are not yet in the POST queue. For example, if you choose to Post All, and Oracle Assets alerts you that a mass addition is incomplete, you can supply the missing information for it in the Mass Additions window, save your work, return to the Mass Additions Summary window, and choose Special, Post All from the menu to resume the process. If you receive an error message and you want to omit a mass addition from the Post All process, you can use Edit, Clear Record from the menu to clear the mass addition from the Mass Additions Summary window. Choose Special, Post All from the menu to resume the process.
Delete All: You may want to review the mass additions you query in the Mass Additions Summary window before you choose Delete All, since this process automatically places each mass addition that meets your search criteria in the DELETE queue.
To add a mass addition line to an existing asset
You can only perform cost adjustments for mass additions in the NEW, ON HOLD, or user–defined hold queues.
Choose Mass Additions > Prepare Mass Additions from the Navigator window.
1. Find
the mass addition(s) for this transaction in the Find Mass Additions window.
2. Choose
the mass addition line you want to add to an existing asset as a cost
adjustment.
3. Choose
Add to Asset.
4. Query
and choose the asset to which to add the line. You can find assets by Asset
Detail, Assignment, Source, and Lease.
5. Choose
whether to amortize or expense the adjustment to the existing asset.
6. Check
New Category and Description to change the category and description of the
existing asset to those of the mass addition you are adding as a cost
adjustment.
7. Save
your work.
8. Choose Open and change the queue name to POST.
9. Save your work.
To undo an addition to an existing asset
Choose Mass Additions > Prepare Mass Additions from the Navigator window.
1. Find the mass addition(s) for this transaction in the Find Mass Additions window.
2. Choose the cost adjustment you want to undo in the Mass Additions window.
3. Choose Remove from Asset.
4. Save your work.
To merge mass addition lines:
Attention: You can only merge mass additions in the NEW, ON HOLD, or POST queues.
Choose Mass Additions > Prepare Mass Additions from the Navigator window.

1. Find
the mass addition(s) for this transaction in the Find Mass Additions window.
2. Choose
the mass addition line into which you want to merge other
lines (the merged parent).
3. Choose
Merge.
4. In the
Merge Mass Additions window, query the mass additions line through Query by
Example.
5. Choose
whether to sum the number of units or keep the original number of units for the
line. The Units field shows the total units for the new merged mass addition,
depending on the value of the Sum Units check box. The Merged Units field
displays the sum of children's units only.
6. If you
are merging a multi–distributed mass addition, and you do not
check the Sum Units check box, Oracle Assets uses the distribution of the
merged parent for the new merged mass addition line. If you check the Sum Units
check box, Oracle Assets uses BOTH the merged parent and child distributions
for the new merged mass addition line.
7. If you
are adjusting the cost of a parent mass addition, and Sum Units is checked, you
are cost adjusting the SUM. Otherwise, the adjustment difference is applied to
the parent line only.
8. In the
Merged Lines block, choose the line(s) you want to merge into the merged
parent. If you want to merge all the lines, choose Tool, Merge
All from the menu. Oracle Assets assigns the line(s) to the MERGED queue.
Note: If you use the default query or blind query,
only the other lines in the same invoice are shown. Use Query – Run with a % in
any field to bring up all potential invoice lines for the same book.
9. Save
your work.
To undo a merge
Choose
Mass Additions > Prepare Mass Additions from the Navigator window.
1. Find
the mass addition(s) for this transaction in the Find Mass Additions window.
2. Choose
the merged parent(s) you want to undo.
3. Choose
Merge.
4. Uncheck
the line(s) for which you want to undo the merge. If you want to unmerge all the
lines, choose Special, Unmerge All from the menu.
5. Save
your work. Oracle Assets changes the queue name for the unmerged lines to the
original queue name before the merge.
Split
Mass Additions
Choose
Mass Additions > Prepare Mass Additions from the Navigator window.
1. Find
the mass addition(s) for this transaction in the Find Mass Additions window.
2. Choose
the mass addition line that you want to split.
3. Choose
Split. Oracle Assets splits the line into multiple single–unit mass addition
lines. Review the new lines in the Mass Additions window.
Note: This also splits any merged children on the
line, and keeps them merged into the split child.
Note: If you split a multi–distributed mass addition
line, Oracle Assets proportionately divides each split child's unit between all
of the parent's distributions.
To undo a
previously split mass addition line
1. Choose
the split mass addition line you want to undo in the Mass Additions window.
2. Choose
Undo split.
You can
undo a split only before posting the split children.
When you post mass additions, Oracle Assets creates assets from your mass additions in the POST queue and adds mass additions in the COST ADJUSTMENT queue to existing assets.

Choose Mass Additions > Post Mass Additions from the Navigator.
1.In the Parameters window, specify the corporate book for which you want to post your mass additions.
2. Choose Submit to submit a concurrent process to post your mass additions to Oracle Assets. When the program completes successfully, Oracle Assets automatically runs the Mass Additions Posting Report, which gives you an audit trail of the processed mass additions.
3. Review the log file and report after the request completes.
Clean Up Mass Additions
Delete unwanted mass addition lines
The Delete Mass Additions program removes mass addition lines in the following queues:
1. Mass additions in the SPLIT queue for which you have already posted the child mass addition lines created by the split
2. Mass additions in the POSTED queue that have already become assets
3. Mass additions in the DELETE queue.
Note: that Oracle Assets does not create a journal entry to clear the clearing account, since the line does not become an asset
Lines assigned to the DELETE queue do not get journal entries; you must clear them manually.
Deleting Mass Additions from Oracle Assets
To delete mass additions from Oracle Assets Choose Mass Additions > Delete Mass Additions from the Navigator.
1. In the Parameters window, specify the corporate book for which you want to clean up mass additions.
2. Choose Submit to submit a concurrent process to remove the lines. When the program completes successfully, Oracle Assets automatically runs the Mass Additions Delete Report, which gives you an audit trail of the processed mass addition lines.
3. Review the log file and report after the request completes.
To purge the audit trail for deleted mass additions
The Purge Mass Additions from Oracle Assets program removes mass additions from the interim table FA_DELETED_MASS_ADDITIONS.
The items in the interim table are the audit trail from the mass addition lines you marked DELETE and removed using Delete Mass Additions. When you purge the interim table, you lose your audit trail. For security, the Purge Mass Additions from Oracle Assets program can only be accessed through the Fixed Assets Administrator standard responsibility.
To purge the audit trail for deleted mass additions change Responsibilities to Fixed Assets Administrator and Choose Purge > Mass Additions from the Navigator.
1. Enter the Batch Number of the Create Mass Additions batch associated with the deleted mass additions for which you want to purge the audit trail from Oracle Assets. The create batch number is on the Mass Additions window and the Create Mass Additions Report.
2. Choose Submit to submit a concurrent process that removes archived lines from the audit trail table for deleted mass additions. When the program completes successfully, Oracle Assets automatically runs the Mass Additions Purge Report, which lists the mass addition lines you purged.
3. Review the log file and report after the request completes.
1.2 Handle Returns
You can easily process and track returns using mass additions. For example, you receive an invoice, post it, and create an asset using mass additions. You then discover that the asset is defective and you must return it.
1. Reverse the invoice in Payables, the credit invoice line distribution will be charged to the same asset clearing account.
2. Then you run mass additions to bring over the credit line.
3. Add this line to the existing asset to bring the asset cost to zero.
4. Now you can retire the asset. The asset does not affect your balance sheet, but its audit trail remains intact.
1.3 Changing Financial Information
What you can adjust depends on the time period and the asset type.
Time Period or Asset Type
| |
Before running depreciation
|
Anything about an asset
|
After running depreciation
|
Asset cost, salvage value, prorate convention, depreciation method, life, capacity and unit of measure (in the corporate book), rate bonus rule, depreciation ceiling, date placed in service, and revaluation ceiling
|
Fully reserved asset
|
The same fields as an asset for which you have run depreciation
|
Fully retired asset
|
Nothing
|
Summary
Single Asset
1. Navigate to the Find Asset window using the menu path Asset-->Asset Work Bench.
2. Find the asset you have to change. Query by asset number or serial number since these are unique values.
3. Click on the Books button and choose the Book to which the asset belongs.
4. Enter the new financial information for that asset.
|
To change financial information for a single asset:
1. From the Navigator window. Choose Asset > Asset Workbench.
The following window appears:

2. Find the asset for which you want to change financial information. Query by giving an appropriate search criteria such as asset number or serial number since they are unique values.
The following window appears:

3. Choose Books.
5.In the window "Book", Choose the Book to which the asset belongs. The following window appears:

5. Enter the new financial information for the asset.
To change financial information for a GROUP of assets:
1. Choose
Mass Transactions > Changes from the Navigator window.
2. In the
Mass changes window enter the Book to which the assets belong.
3. Select
the assets you want to change. Specify the asset numbers, dates placed in
service, and category for which the Mass Change applies. You can use the Before
and After fields as either information to change or as a selection criterion
without changing the information. When you enter the same value for the Before
and After fields, the mass change affects only assets that match that
information.
4. Choose
whether to Change Fully Reserved Assets.
5. Specify
the new financial information for these assets in the After column.
6. Choose
whether to amortize the adjustment or expense it in the current period.
7. Choose Preview
to run the Mass Change Preview report. Use this report to preview what effects
to expect from the Mass Change before you perform it. If necessary, update the
definition and run the preview report again. The mass change status determines
what action to perform next.
8. To
perform the mass change, query the definition and choose Run. Oracle Assets
submits a concurrent process to perform the change.
9. To review
a completed mass change, query the definition and choose Review. Oracle Assets
runs the Mass Change Review report.
10. Review
the log file and report after the request completes.
1.4 Transferring An Asset Between Expense Accounts, Employees And Locations
Summary
1. Navigate to the Find Assets window using the menu path Asset-->Asset Work Bench.
2.Find the asset you want to transfer and click on the Assignment button.
3. Enter a negative number in the Units Change field for the assignment line from which you want to transfer the asset.
4. Create one or more new lines, entering a positive number in the Units Change field for the assignment lines to which you want to transfer the asset.
|
2 Choose Asset > Asset Workbench from the Navigator window.
The Following window appears:

2. Find the asset you want to transfer between employees, expense accounts, and/or locations.
For best performance, query by asset number or
tag number since they are unique values.
The following window appears:

3 Select the asset and Choose Assignments.
The following window appears:

4. In the Assignments window, optionally update the Transfer Date.
"If you transfer an asset during the period in which it was added, the Transfer Date automatically defaults to the asset's date placed in service and you cannot change it".
5. In the Units Change field, enter a negative number for the assignment line from which you want to transfer the asset.
6. Create one or more new lines, entering a positive number in the Units Change field for the assignment lines to which you want to transfer the asset.
7. Enter the new Employee Name, Expense Account, and/or Location for the new distribution.
8. Save your changes.
To transfer a GROUP of assets between employees, expense
accounts, and locations:
Summary
1. Navigate to the Mass Transfer window using the menu path Mass Transactions > Transfers.
2. Select the corporate depreciation Book for the assets you want to transfer.
3. Optionally update the Transfer Date.
4. Enter one or more selection criteria for the mass transfer in the Transfer From and Transfer To fields.
5.Click on the Preview button to run the Mass Transfers Preview report.
6.Select the menu item View-->Requests and click on the Find button.
|
1. Choose Mass Transactions > Transfers from the Navigator window.
2. Choose the corporate depreciation Book for the assets you want to transfer.
3. Optionally update the Transfer Date.
You can change the transfer date to a prior period date. You cannot change the date to a future period date.
4. Enter one or more selection criteria for the mass transfer in the
Transfer From and Transfer To fields.
5. Choose Preview to run the Mass Transfers Preview report. Use this
report to preview the expected effects of the Mass Transfer before
you perform it. If necessary, update the definition and run the
preview report again.

View your Preview Report by selecting View / Requests.
The following window appears:
Select Find.
The following window appears:

Select View Output.
The following window appears:

Query the Transaction.
Choose Mass Transactions > Transfers from the Navigator window.
The following window appears:
Select View / Find:
Select the transaction No:

To perform the Mass Transfer, after querying the mass transfer, choose Run.

7.Oracle Assets submits a concurrent process to perform the transfer.
8.Review the log file after the request completes.
1.7 Reclassification of An Asset from one Category to another
Summary
· Navigate to the Find Assets window using the menu path Asset-->Asset Work Bench.
· Find the asset you want to reclassify and click on the Open button.
· Enter revised Category in the Category field for the reclassification from which you want to transfer the asset.
|
1 Choose Asset > Asset Workbench from the Navigator window.
The Following window appears:

2. Find the asset you want to Reclassify.
For best performance, query by asset number or tag number since they are unique values.
The following window appears:
2 Press Open.
The following window appears:

3 In Category, revise and update the category.


4 Press "OK" and "Done" to complete the transaction.
To reclassify a GROUP of assets from one category to another:
Summary
· Navigate to the Mass Transfer window using the menu path Mass Transactions > Reclassification.
· Select the corporate depreciation Book for the assets you want to transfer.
· Enter one or more selection criteria for the mass reclassification from one Category to another.
· Click on the Preview button to run the Mass Reclassification Preview report.
· Select the menu item View-->Requests and click on the Find button.
|
1. Choose Mass Transactions > Reclassification from the Navigator window.
2. Choose the corporate depreciation Book for the assets you want to Reclassify.
3. Enter one or more selection criteria for the mass reclassification from one category to another category.
4. Choose Preview to run the Mass Reclassification Preview report. Use this report to preview the expected effects of the Mass Reclassification before you perform it. If necessary, update the definition and run the preview report again.


View your Preview Report by selecting View / Requests.


The following window appears:
Select Find.
The following window appears:

Select View Output.
The following window appears:

Query the Transaction.
Choose Mass Transaction > Reclassification from the Navigator window.
The following window appears:
Select View / Find:
Select the transaction No:

To perform the Mass Reclassification, after querying the mass reclassification, choose Run.

9.Oracle Assets submits a concurrent process to perform the transfer.
10.Review the log file after the request completes.
1.8 Projecting Depreciation Expense
Summary
1. Navigate
to the Depreciation Projections window using the menu
path Depreciation>Projections.
2. Enter
the Projection Calendar
3. Enter
the Number of Periods for which you want to project depreciation.
You can project depreciation expense for any number of future periods, on up to
four depreciation books at once.
4. Enter
the Starting Period for your projection.
5. Check Cost
Center Detail to print a separate depreciation projection amount for
each cost center. Otherwise, Oracle Assets prints a consolidated projection
report for each expense account without cost center detail.
6. Check Asset
Detail to print a separate depreciation amount for each asset.
Otherwise, Oracle Assets prints a consolidated projection report without asset
detail.
7. Enter the
Book(s) that you want to include in your projection
8. Click on
the Run button.
9. View the
projection results by navigating to the concurrent request window.
|
To project depreciation expense:


1. Navigate to the Depreciation Projections window through Depreciation>Projections.
2. Enter the Projection Calendar i.e.
3. Enter the Number of Periods for which you want to project depreciation. You can project depreciation expense for any number of future periods, on up to four depreciation books at once.
4. Enter the Starting Period for your projection.
5. Check Cost Center Detail to print a separate depreciation projection amount for each cost center. Otherwise, Oracle Assets prints a consolidated projection report for each expense account without cost center detail.
6. Check Asset Detail to print a separate depreciation amount for each asset. Otherwise, Oracle Assets prints a consolidated projection report without asset detail.
7. Enter the Book(s) that you want to include in your projection
8. Choose Run.
Oracle Assets submits a concurrent process to calculate the projection.
View the projection results by navigating to the concurrent request window.
1.9 What-If Depreciation Analysis
Summary
1.
Navigate to the What–If Depreciation Analysis window in Oracle
Assets using the menu path Depreciation>What-if Analysis.
2.
Enter the book containing the assets for which you want to run what–if
analysis.
3.
In the Assets to Analyze tabbed region, enter the parameters
you want to use to identify
the set of assets for
which you want to run what–if depreciation analysis.
OR
In the Hypothetical
Assets tabbed region, enter the parameters to identify the
hypothetical asset for which you want to run what–if depreciation analysis.
4.
Enter the Depreciation Scenario parameters to identify the
depreciation rules to be used in the analysis.
5.
Choose Run to run what–if depreciation analysis.
6.
Review the results of the What–If Depreciation Report or the Hypothetical
What–If Report by navigating to the View Requests window.
|
To forecast depreciation using what–if depreciation analysis:

1. Navigate to the What–If Depreciation Analysis window in Oracle Assets through "Depreciation>What-if Analysis".
2. Enter the book containing the assets for which you want to run what–if analysis.
3. In the Assets to Analyze tabbed region, enter the parameters you want to use to identify the set of assets for which you want to run what–if depreciation analysis.
OR
In the Hypothetical Assets tabbed region, enter the parameters to identify the hypothetical asset for which you want to run what–if depreciation analysis.

4. Enter the Depreciation Scenario parameters to identify the depreciation rules to be used in the analysis.
5. Choose Run to run what–if depreciation analysis.
6. Review the results of the What–If Depreciation Report or the Hypothetical What–If Report by navigating to the View My Requests window.
2.1 Running Depreciation
Summary
1.Navigate to the Run Depreciation window using the menu path Depreciation-->Run Depreciation.
2. Choose whether you want Oracle Assets to close the period after successfully depreciating all assets.
3.Click on the Run to submit concurrent requests to run the calculate gains and losses, depreciation, and reporting programs.
4.Review the log files and report after the request completes.
|
Navigate to the Run Depreciation window through Depreciation > Run Depreciation


1. Choose the Book for which you want to run depreciation. The system will automatically populate the Period field with the current Open Period.
2. Choose whether you want Oracle Assets to close the period after successfully depreciating all assets.
It is recommended that the depreciation process should always be initially run without checking the period close checkbox.
3. Choose Run to submit concurrent requests to run the calculate gains and losses, depreciation, and reporting programs.
You cannot enter transactions for the book while depreciation is running. Oracle Assets automatically runs the Journal Entry Reserve Ledger report when you run the depreciation program for a corporate book, so you can review the depreciation calculated.
4. Review the log files and report after the request completes.
2.2 Journal Entries
Create Accounting
Summary
1. Navigate to the Create Accounting window through path Create Accounting
2. In the parameter window enter the Corporate book name. Select the relevant period by clicking on the list of values button.
3.Click on the OK button.
4.In the submit request window, Choose Submit.
5.Click on the OK button.
|
1. To post the journal entries to General Ledger navigate to the Request window through Journal Entries >Standard.

The following window appears:

2.In the parameter window enter the corporate book name. Select the relevant period by clicking on the list of values button.
3.Choose "OK".
4.In the submit request window, Choose "submit".
5.The system will display the message "Request submitted (Request ID=______)".
6.Choose "OK".
You can view the successful completion of the request through request window.
2.3 Retiring Assets
Summary
Full Retirement
1. Navigate to the Find
Assets window using the menu path Assets > Asset Workbench.
2. Find the asset you want to
retire.
3. Click on the Retirements button.
4. Select the Depreciation
Book from which you want to retire the asset.
5. Enter the Date of
the retirement. It must be in the current fiscal year, and cannot be before
any other transaction on the asset.
6. To fully retire the asset,
enter all the units or the entire cost.
7. If you are retiring an
asset before it is fully reserved, enter the Retirement Convention.
8. Enter the Retirement
Type.
9. Click on the Done button.
Partial Retirement
To partially retire an asset, repeat the above procedure with the exception that in the Units Retired or Cost Retired field, enter the number of units or the cost of the asset you want to retire.
|

To FULLY retire an asset:
1. Choose Assets > Asset Workbench from the Navigator window.
The following window appears:

Enter search criteria and Choose Find:
The following window appears:

2. Find the asset you want to retire.
3. Choose Retirements.
The following window appears:

1.Select the depreciation Book from which you want to retire the asset.
2.Enter the date of the retirement. It must be in the current fiscal year, and cannot be before any other transaction on the asset.
3.To fully retire the asset, enter all the units or the entire cost.
4.If you are retiring an asset before it is fully reserved, enter the Retirement Convention.
5.Enter the Retirement Type
6.Optionally Enter Sale proceeds/Cost of Removal.
7.Choose "Done".
Oracle Assets assigns each retirement transaction a unique Reference Number that you can use to track the retirement.
8. Each retirement transaction has a status pending. Optionally calculate gains and losses to change the status of the retirement transaction from PENDING to PROCESSED.
To Partially retire an asset:
Enter the number of units or cost you want to retire.
Attention: If you partially retire by units, you must choose Continue to specify which units to retire in the Assignments window.
2.4 Calculating Gains and Losses for Retirements
Run the calculate gains and losses program to:
§ Calculate gains and losses resulting from retirements
§ Correct the accumulated depreciation for reinstated assets
Although the depreciation program automatically processes retirements, you can run the Calculate Gains and Losses program several times during the period to
reduce period end processing time.
Summary
1.Navigate to the Parameters window using the menu path Depreciation-->Calculate Gains and Losses.
2.Choose the Book for which you want to calculate gains or losses and click on the Submit button.
3.Review the log file after the request completes
|
To calculate gains and losses for retirements:
1. Choose Depreciation > Calculate Gains and Losses from the Navigator window.
The following window appears:

2. In the Parameters window, enter the Book for which you want to calculate gains and losses.
3. Choose Submit to submit a concurrent process to calculate gains and losses.
4. Review the log file after the request completes.
2.5 Revaluation
1.Open the Mass Revaluation window using the following menu path
Mass Transactions> Revaluation

Following screen will appear:

2. Enter the
Book, Asset Category or Asset number as required
3. Enter the
Revaluation Rate
4. Preview
the revaluation definition to view the impact of revaluation
5. Make the
necessary changes in the revaluation definition, if required, and again Preview
the results.
6. To
perform the revaluation, Query the revaluation definition and Run it.
2.6 Insurance Policies
Insurance information will be entered for each asset separately. Same insurance policy can be assigned to multiple assets and multiple policies can be assigned to one asset.
Summary
1. Navigate to the Insurance Policy window using the menu path Asset--> Insurance Insurance Policy Details.
2. Find the asset to which you want to assign an insurance policy.
3. Enter the insurance policy number.
4. Select an Insurance company.
5. Select Calculation Method.
6. Enter Base Index date, Base insurance value and insured amount.
7. Save your work.
1. Choose Asset--> Insurance à Insurance Policy Details from the Navigator window.
The Following window appears:
2. Find the asset you for which you want to enter insurance information.
For best performance, query by asset number or tag number since they are unique values.

The Following window appears:

3. In Policy Region enter following information:
Policy Number. Enter the insurance policy number.
Insurance Company. Enter a valid insurance company name. The list of values for this field will only display suppliers that have been set up in Oracle Payables with a supplier type of Insurance Company.
Supplier Site. Enter the supplier site for the insurance company.
Address. The company address for the supplier site displays automatically.
Calculation Method. Enter the method of calculation to use for this asset insurance:
• Value as New - the base insurance value, which can be indexed annually.
• Market Value - the current market value, calculated as the base insurance value less
depreciation, which can be indexed annually.
• Manual Value - a value you enter manually. This calculation method allows you to update the Current Value field.
Base Index Date. Enter the date that is used as the base date for indexation. The Base Index Date must be one of the following:
• For new assets, enter the date the asset was placed in service.
• For assets purchased second-hand, enter the original date of construction of the asset.
• For the Manual Value calculation method, you can enter a maintenance date.
Base Insurance Value. Enter the base insurance value of the asset as defined in the insurance policy.
Current Value. This field displays the current insurance value of the asset, calculated
automatically, unless you chose the Manual Value calculation method.
The value displayed depends upon the calculation method:
• For Value as New, the value displayed is the indexed base insurance value. This value will also be updated to account for transactions, such as adjustments or retirements, that affect the asset value.
• For Market Value, the value displayed is the indexed net book value of the asset (original cost less depreciation). This value will also be updated to account for transactions, such as adjustments or retirements, that affect the asset value.
• For Manual Value, the value displayed can be updated. If you enter a maintenance date for the asset in the Base Index Date field, indexation of the manual value begins with this date, and then follows the Value as New calculation method.
Insured Amount. Enter the amount for which the asset is insured under that policy.

4.Click on lines button.
Following window will appear:
1. Line. Enter the insurance policy line number for the category of insurance covered by the policy.
2. Insurance Category. Enter the insurance category in the Insurance Category field.

3. Hazard Class. Enter the hazard class assigned to this policy line.
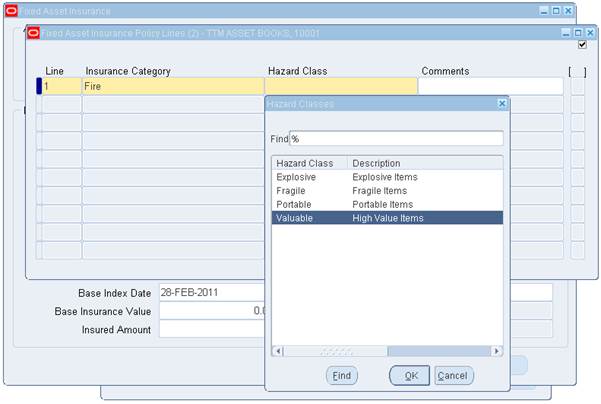
Save your work.
2.7 Viewing Assets
Use the Financial Information windows to view descriptive and financial information for an asset. You can review the transactions, depreciation, and cost history of the asset you select.
Summary
1. Navigate
to the Find Assets window using the menu path Inquiry-->Financial
Information.
2. Enter the
search criteria in one or more of the tabbed region and click on the Find button.
3. To view
the current assignment(s) for an asset, click on the asset you want to review
and click on the Assignments button.
4. Click on
the Source Lines button to view source line information.
5. Click on
the Books button to view financial information for the asset.
6. Click on
the Transactions button to review transaction history of
this asset in theTransaction History window.
7. To view
individual transaction details for this asset, click on a transaction and click
on the Details button.
8. Click on
the Depreciation button in the View Financial
Information 1 window to review depreciation history for this asset.
9. Click on
the Cost History button in the View Financial
Information 1 to review cost history of this asset.
|
To view descriptive and financial information for an asset:
1. Choose Inquiry > Financial Information from the Navigator window.
The following window appears:

2. In the Find Assets window, you can use the pop list to Find assets by Detail, Assignment, Invoice, Lease, or Project. You can enter search criteria in one or more tabbed regions.
3. Choose the Find button to query the asset(s) you want to review.
The View Assets window shows you detail information for the asset(s) you query.

4. To view the current assignment(s) for an asset, click on the asset you want to review and choose the Assignments button.

5. Choose Source Lines to view source line information.

6. Choose the Financial Inquiry button to view financial information for the asset.

The View Financial Information window includes the asset you choose in the title, and lists, financial information for the asset.
Choose Transactions to review transaction history of this asset in the Transaction History window. To view individual transaction details for this asset, check a transaction and choose Details to open
the Transaction Detail window.

Choose Depreciation to review depreciation history for this asset.

Choose Cost History to review cost history of this asset.

If you change any information except cost for the asset in the period you added it, the Cost History window shows you the ADDITION/VOID transaction, not the ADDITION Transaction
.
You can view the detail accounting lines for the transaction in the form of a balanced accounting entry (i.e., debits equal credits). You can also choose to view the detail accounting as t–accounts.
Use the Transaction History windows to review all the transactions for any book, accounting period, transaction type, or range of assets.
Summary
1. Navigate to the Find Transactions window using the menu path Inquiry--> Transaction History.
2. Enter search criteria for your inquiry and click on the Find button.
3. To view details, click on a transaction and click on the Details button.
|
To perform a transaction history inquiry:
1. Choose Inquiry > Transaction History from the Navigator window.
2. In the Find Transactions window, enter search criteria for your inquiry. You must enter a Book and Reference Number or Asset Numbers to query a transaction history. You can optionally enter other search criteria, including Periods, Transaction Type, and Category.


4. Choose Find.
5. You can see a summary of the transactions for the asset.

4. To view details, check a transaction and then choose the Details button.
(You can view the detail accounting lines for the transaction in the form of a balanced accounting entry (i.e., debits equal credits). You can also choose to view the detail
accounting as t–accounts.)
The following window appears:

2.10 Running Standard Reports
Use Oracle Assets standard reports and listings to keep track of your assets, and to reconcile Oracle Assets to your general ledger. Oracle Assets standard reports and listings include both standard fixed format reports and standard variable format reports.
Summary
1. Navigate to the Submit Request window using the menu path Other-->Requests-->Run.
2. Choose whether you want to run a Single Request or a Request Set.
3. Enter the Request Parameters and click on the Submit button.
4. Review the status of your request.
|
To run a standard report, listing, or request set:
1. Open the Submit Requests window.
2. Choose whether to run a request or request set, then choose the request or request set you want to run.

The following window appears:

Select OK.
The following window appears:

3. Enter the request parameters.
4. Choose Submit to submit your request.
5. Review the status of your request.


5 comments:
Excellent work. Dude Keep it up !!!
awesom
Thanks a lot
Good
Excellent.. Detail info
Thx a lot
Post a Comment