
General Ledger Activities
The following are demonstrations and activities for Oracle
Fusion General Ledger:
·
Shared Components Demonstration
·
Create Value Sets Demonstration and Activity
·
Create a Chart of Accounts Demonstration
·
Create a Chart of Accounts Structure Activity
·
Create a Chart of Accounts Instance Activity
·
Enter Values Activity
·
Create an Accounting Hierarchy Demonstration
·
Create an Account Combination Activity
·
Define Cross-Validation Rules Demonstration
·
Create a Calendar Activity
·
Create Currencies Demonstration and Activity
·
Create Conversion Rate Types Demonstration and Activity
·
Create a Primary Ledger Demonstration and Activity
·
Ledger Options Demonstration
·
Journal Processing Ledger Options Demonstration
·
Specify Ledger Options Activity
·
Reporting Currencies Demonstration
·
Create a Ledger Set Demonstration
·
Data Access Set Security Demonstration and Activity
·
Create an Allocation Rule Activity
·
Generate an Allocation Activity
·
View a Financial Report in HTML Activity
·
Configure an Account Group Activity
Shared Components Demonstration
BackgroundThe chart of accounts, calendar, and currencies as well as journal source and category are shared across the ledger and related subledgers.
Activity Scope
Perform this demonstration to show the three C's and other shared components in the Create Journal page:
1. Login
the application

2. Select Navigator
> General Accounting > Journals > Create Journals. Make sure your
data access set is the Infusion Data Access Set.

3. Point
out the Accounting Period which is populated from the Calendar.
4. Point
out the Source of Manual which defaults on a manual journal.
5. Point
out the Currency field.
6. Point
out the Category field.
7. Click
the Search and Select Category down arrow to show the various
categories.
8. Select
the Category of Adjustment.
9. Click
the Currency down arrow to show all the enabled currencies.
10. Click
on the Select: Account icon at the end of Line 1 in the Journal
Lines region to show the segments and default values of an accounting
flexfield.
11. Select
the Search: Account drop down arrow in the Account segment.
12. Select 11200
Cash.
13. Click OK
to show how an account combination is displayed.
14. Explain
the segments and the separator.
15. Click
the Cancel button to exit the page.

Create Value Sets Activity
BackgroundValue sets are created as the first step in the chart of accounts configuration. The value sets are then assigned to the chart of accounts instance. Do not create values until after assigning your values sets to the chart of accounts segments because this step is needed to establish which value set attributes should be exposed.
Note: It is strongly recommended that you choose the Value Data Type of Character and Value Subtype of Text. These can never be changed. If you only want to use numbers, just define only numeric values for that value set. If you choose the Value Subtype of Numeric digits only, then you will be stuck with your decision and you will never be able to use characters or letters for your values in the future.
Activity Scope
Create one value sets for your chart of accounts: XXAccount replacing XX with your initials.
Note: For the Company and Department segments, we will use existing value sets called Corporate Company and Corporate Cost Center.
1.
From your implementation project, Navigate > Define
Common Applications Configuration > Define Enterprise Structures for
Financials > Define Financial Reporting Structures > Define Chart of
Accounts > Manage Chart of Accounts Value Sets > Go
to Task.
2. Click
the Create icon to create the following value set.


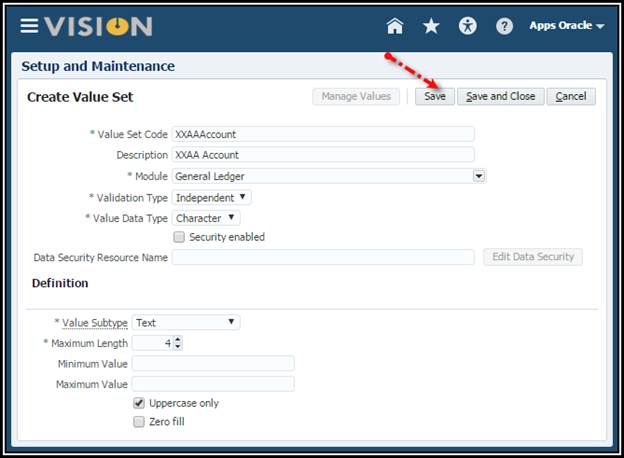
Note: It is strongly recommended that you choose the Value Data Type of Character and Value Subtype of Text. These can never be changed. If you only want to use numbers, just define numeric values for that value set. If you choose the Value Subtype of Numeric digits only, then you will be stuck with your decision and you will never be able to use characters or letters in the future.
3. Save
and Close.
Note on Table-Validated Value
Sets in the Cloud: Only supported if:
1. The
table or view is already provided by Oracle. (It cannot be a table created by
the customer)
2. Customer
only wants to reference a single table or view. (Cannot join multiple
tables / views)
3. Customer
is okay with not adding any filter conditions. In other words, of the values in
that table are valid values.)
4. The
table or view already contains columns named flex_value_attribute1 through 20
and custom_value_attribute1 through 10.
In other words, table-validated value sets are not really
supported in the cloud.
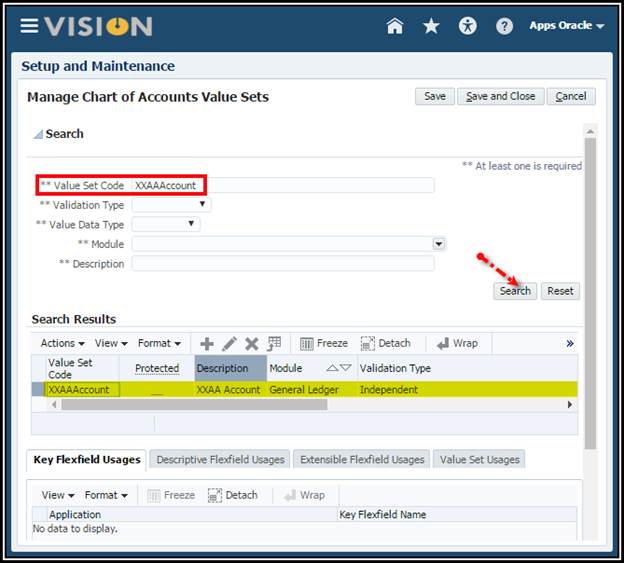
4. In the
Manage Chart of Accounts Value Sets page, search on Value Set Code XX, where
XX are your initials.
5. Click Done
to close the window.
Create a Chart of Accounts Structure Activity
BackgroundChart of accounts structure defines the framework for one or more chart of accounts instances.
Activity Scope
Create your chart of accounts structure called: XXChart of Account replacing XX with your initials.
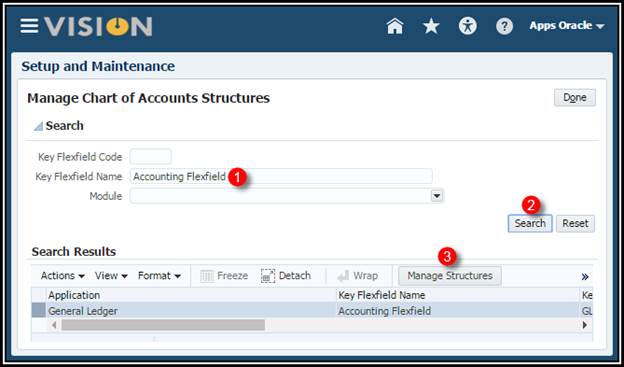
1. From
your implementation project, Navigate > Define Common Applications
Configuration for Financials > Define Enterprise Structures for Financials
> Define Financial Reporting Structures > Define Chart Of Accounts > Manage
Chart of Accounts Structures > Go to Task.
2. Click Search
button.
3. Select Accounting
Flexfield.
4. Click Manage
Structures button.
5. Click Create
icon to create the following structure.
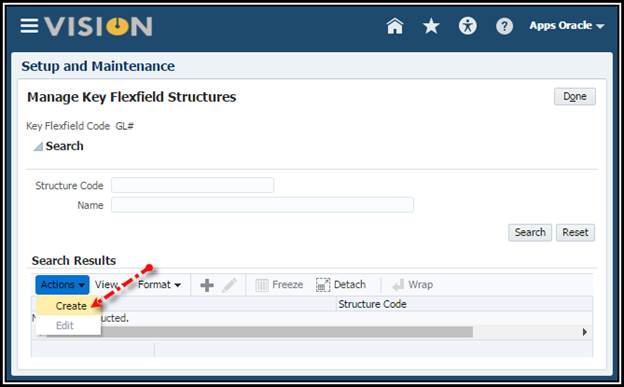
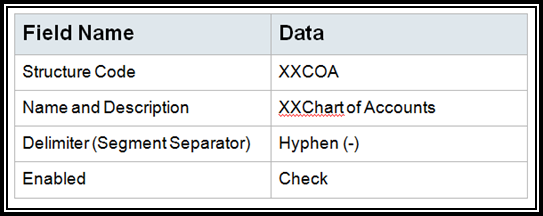
Note: I personally prefer the Period delimiter to use the key pad more
effectively.
6. Save.
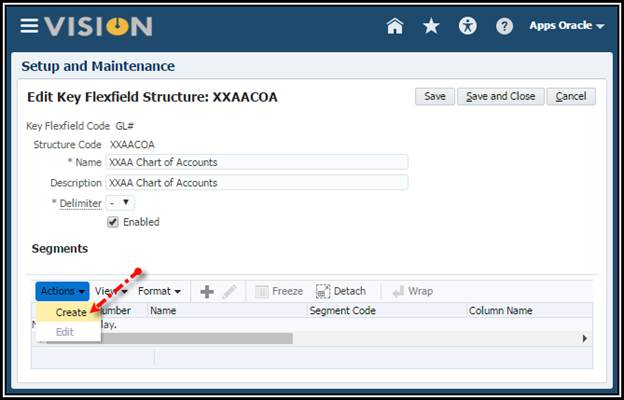
7. Define
the individual segments by clicking the Create icon in the Segments
table. (Note: If you do not save the structure, the Create icon will be
grayed out.)
8. Create
the structure based on the segment information in the following table and check
Enabled on all segments:
Create the Company Segment:
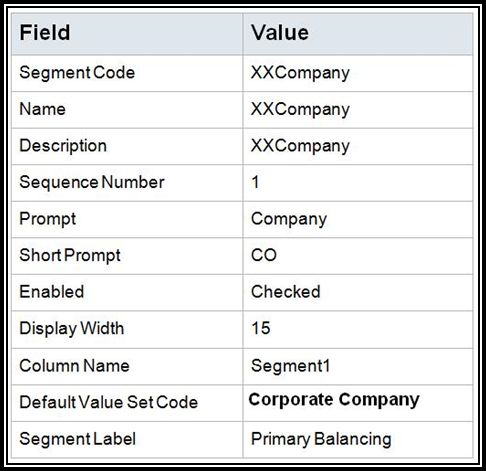
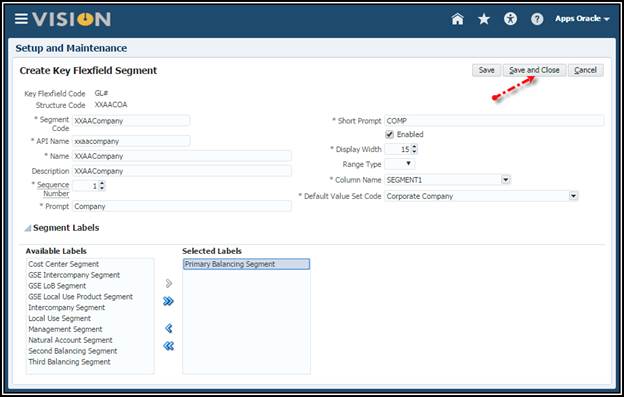
9. Save
and Close.
10. Click Create
icon in the Segments table to add the next segment.
Create the Department Segment:
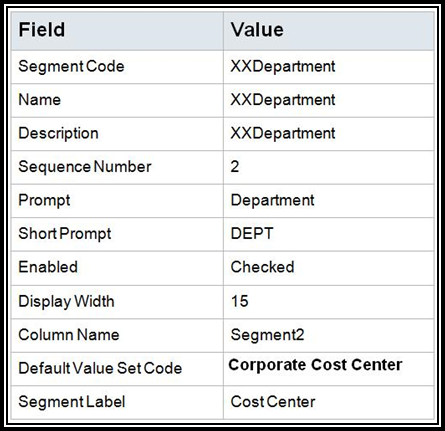
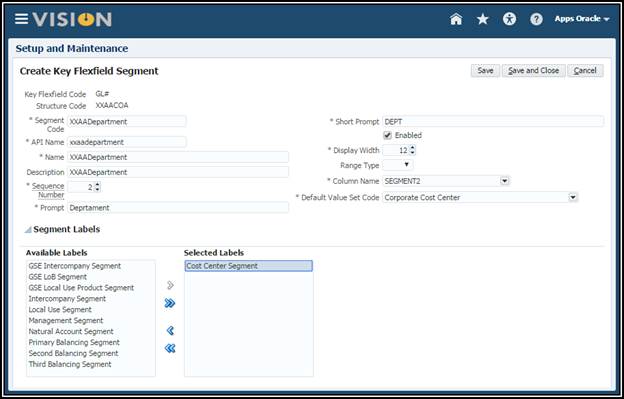
NOTE: We are reusing a value set already defined.
11. Save
and Close.
12. Click Create
icon in the Segments table to add the next segment
Create the Account Segment:

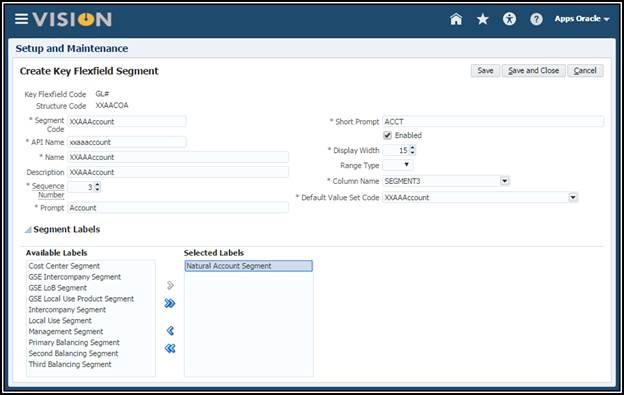
13. Save
and Close.
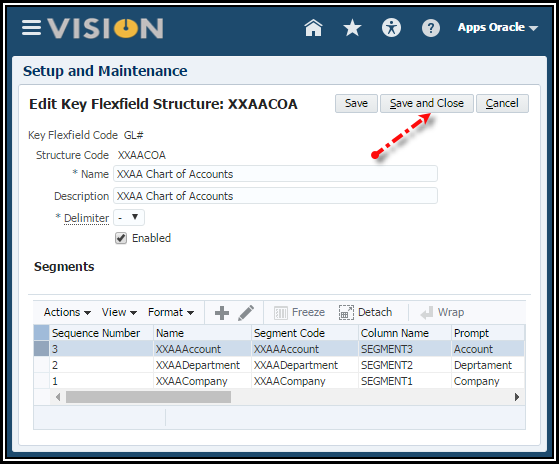
You should now see 3 segments in your structure.
14. Save
and Close to close the Create Key Flexfield Structure page.
15. Click Done
to return to the Manage Chart of Accounts Structure page.
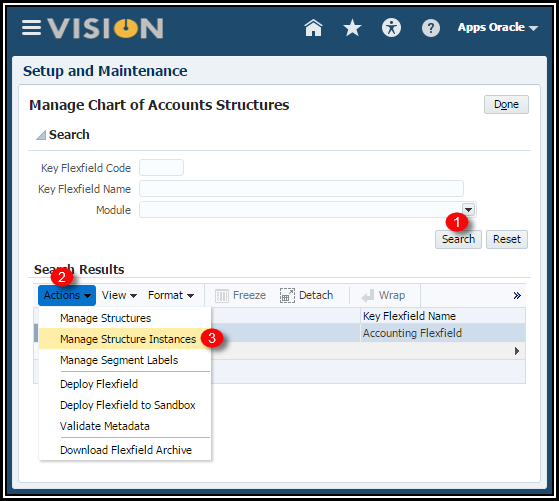
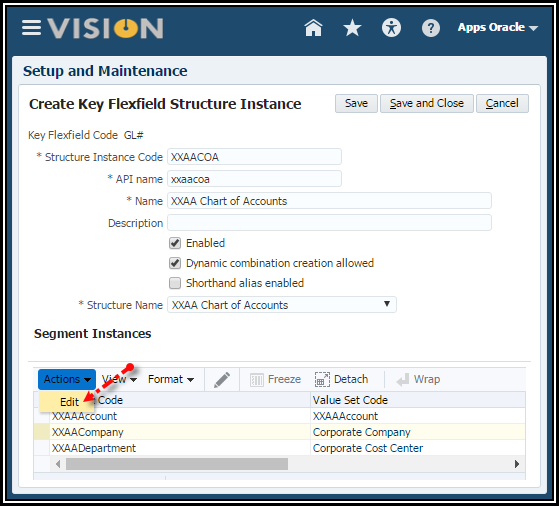
Create a Chart of Accounts Instance Activity
1. From
the Manage Chart of Accounts Structures page,
click Manage Structure Instances button.
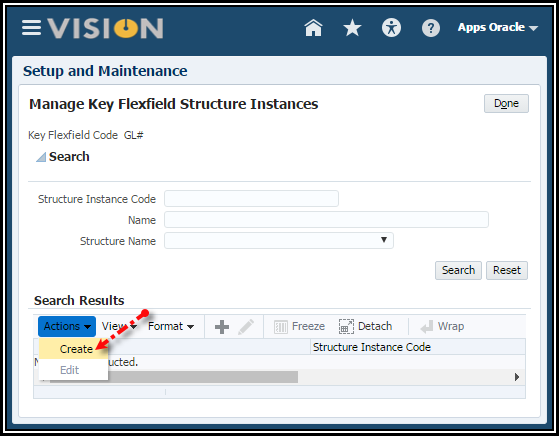
2. In the
Manage Key Flexfields Structure Instances page, Click Create icon to
create the instance.
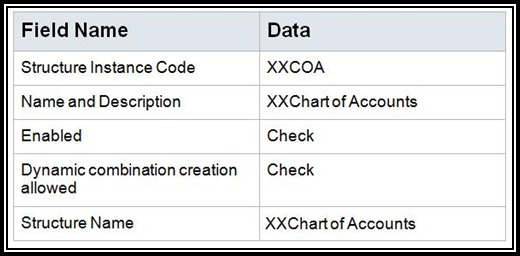
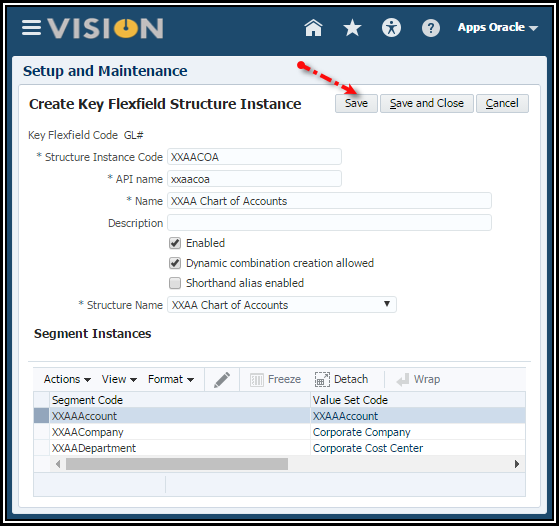
3. Save.
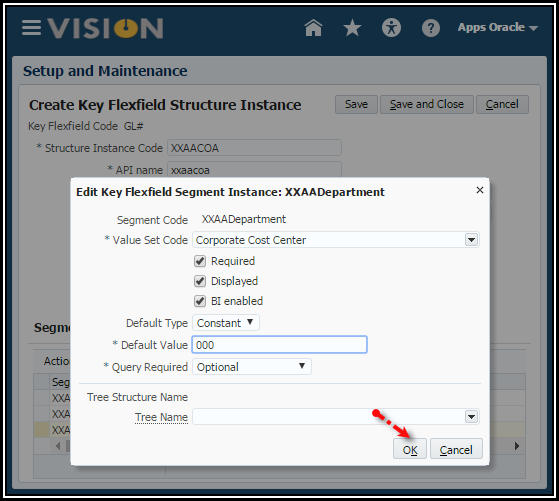
4. Define
the defaults for the individual segments.
5. Click
the Edit icon.
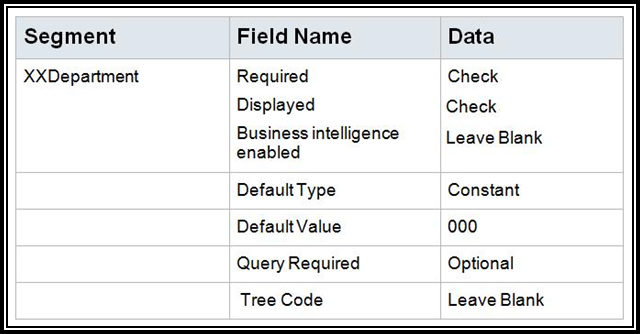
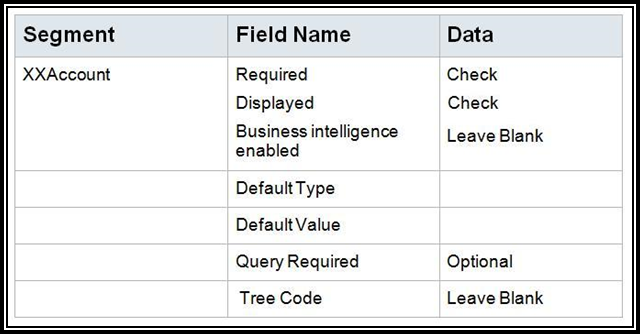
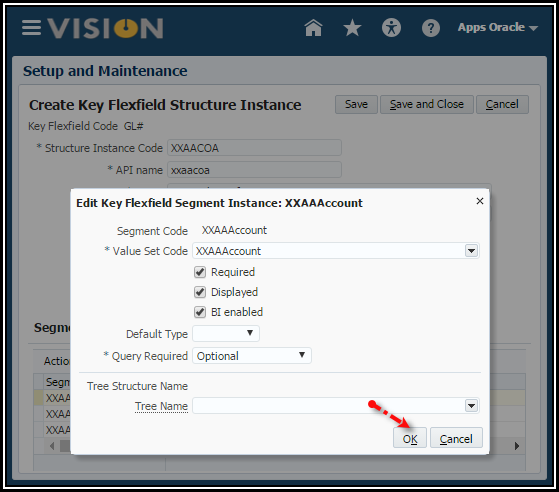
6. Use the
following tables to enter the segment data.
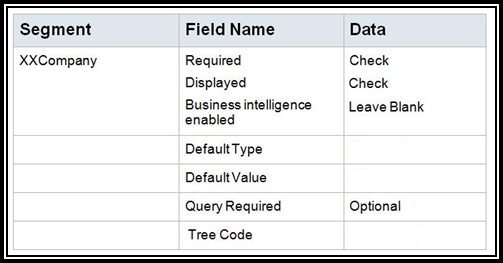
Note: When you enable Business Intelligence for a segment, it tells OTBI that you want to use that segment’s values in OTBI reports to filter reports by specific values. For example, if you want to see all AP invoices by a specific Company Value, you would enable BI for that segment. Out of the box, we always show the entire account combination for transactions because an entire combination is treated as a text string. You would ONLY enable BI if you want to run reports by specific values for that segment, but you will need a System Administrator to perform a RPD to COA Mapping so that OTBI reports don’t break.
Note: You would only assign a Tree Code if you want to use a hierarchy in cross validation rules, chart of accounts mappings, revaluations, data access sets, and segment value security rules. In other words, for things other than reporting or allocations.
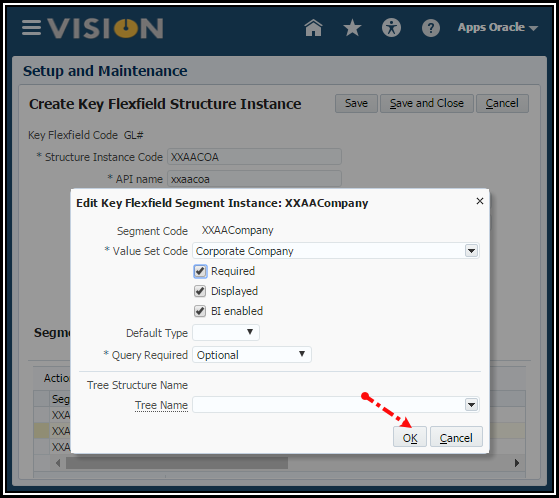
7. Click OK.
8. Click
OK.
9. Click OK.
10. Save
and Close.
11. Click Done.
12. In the
Manage Chart of Accounts Structure Instances page, select the General Ledger
Accounting Flexfield and click Deploy Flexfield. This process deploys
(formerly compiles) all chart of account instances on the system.

Wait for the process to complete without errors. (Warnings are OK,
but should be investigated. If you get a warning about analytics, it is
probably because you enabled BI for a segment and the RPD to COA Mapping hasn’t
been done).

13. Click OK.
14. Click Done.
Note: You are not creating account combinations; you are only creating the lists of individual values for each segment.
REMEMBER: You must only define values AFTER values sets have been associated to a chart of accounts instance.
Here's the list of words we should NEVER use for parent nodes:
http://docs.oracle.com/cd/E12825_01/epm.111/esb_dbag/frameset.htm?esb_restricted_names.htm
For example, NEVER use ALL or the name of the segment as a value. You can use “T.”
When naming dimensions, members, and aliases in the database outline, follow these rules:
·
At
the beginning of dimension or member names, do not use the characters listed
below. Essbase will not be able to create cubes successfully if you use special
characters.
Restricted Characters
for Dimension, Member, and Alias Names
Character
|
Description
|
·
Do
not place spaces at the beginning or end of names. Essbase ignores such spaces.
AND
|
ASSIGN
|
|
AVERAGE
|
CALC
|
CALCMBR
|
COPYFORWARD
|
CROSSDIM
|
CURMBRNAME
|
DIM
|
DIMNAME
|
DIV
|
DYNAMIC
|
EMPTYPARM
|
EQ
|
EQOP
|
EXCEPT
|
EXP
|
EXPERROR
|
FLOAT
|
FUNCTION
|
GE
|
GEN
|
GENRANGE
|
GROUP
|
GT
|
ID
|
IDERROR
|
INTEGER
|
LE
|
LEVELRANGE
|
LOOPBLOCK
|
LOOPPARMS
|
LT
|
MBR
|
MBRNAME
|
MBRONLY
|
MINUS
|
MISSING
|
MUL
|
MULOP
|
NE
|
NON
|
NONINPUT
|
NOT
|
OR
|
PAREN
|
PARENPARM
|
PERCENT
|
PLUS
|
RELOP
|
SET
|
SKIPBOTH
|
SKIPMISSING
|
SKIPNONE
|
SKIPZERO
|
TO
|
TOLOCALRATE
|
TRAILMISSING
|
TRAILSUM
|
UMINUS
|
UPPER
|
VARORXMBR
|
XMBRONLY
|
$$$UNIVERSE$$$
|
#MISSING
|
Note: If you enable Dynamic Time Series
members, do not use the associated generation names—History, Year, Season,
Period, Quarter, Month, Week, or Day.
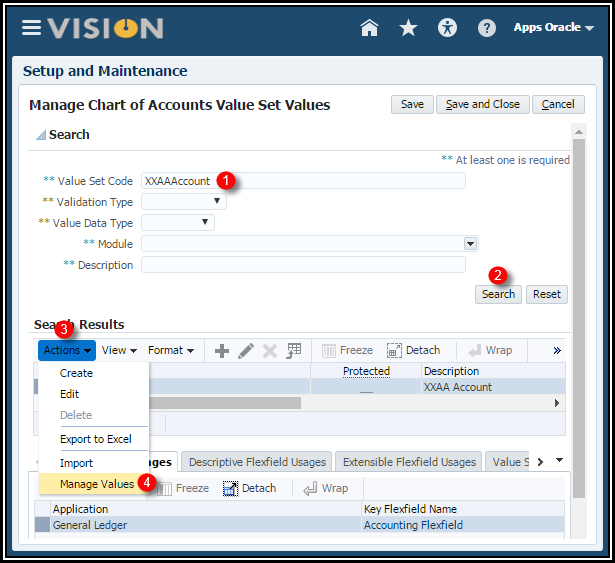
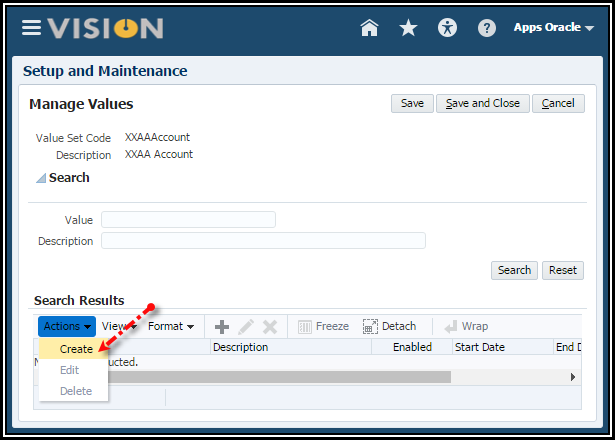
Enter Values
1. Select
the Go to Task icon for Manage Chart of Accounts Value Set Values.
Note: This UI is the exact same UI as Manage Chart of Accounts Value
Set.
2. Find
your XXAccount value set. (Hint: You can query on your initials
in the Value Set Code field).
3. Click Manage
Values button.
1. Click Create
icon to create your values.
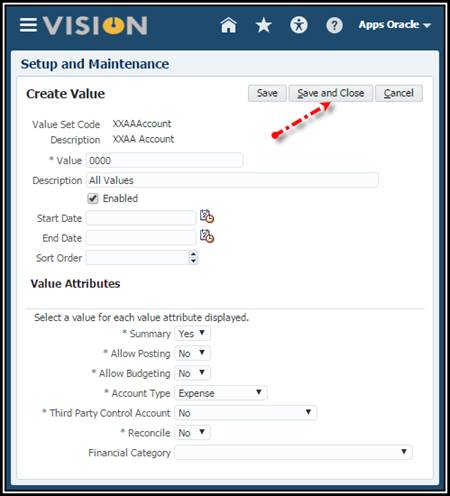
Enter the values for XXAA Account segment. Make sure the account type is correct for each account.
Value
|
Description
|
Enabled
|
Summary
|
Allow
Posting and Budgeting
|
Account
Type
|
0000
|
All
Values
|
Yes
|
Yes
|
No,
No
|
Expense
|
1000
|
Total
Assets
|
Yes
|
Yes
|
No,
No
|
Asset
|
1110
|
Cash
|
Yes
|
No
|
Yes,
Yes
|
Asset
|
1210
|
Accounts
Receivable
|
Yes
|
No
|
Yes,
Yes
|
Asset
|
2000
|
Total
Liabilities
|
Yes
|
Yes
|
No,
No
|
Liability
|
2210
|
Accounts
Payable
|
Yes
|
No
|
Yes,
Yes
|
Liability
|
3000
|
Total Owners’ Equity
|
Yes
|
Yes
|
No, No
|
Owner’s Equity
|
3310
|
Retained Earnings
|
Yes
|
No
|
Yes, Yes
|
Owner’s Equity
|
Note: The Reconciliation Flag will not be used as it is not in scope for V1, hence the values are set to No.
Save and Close. and Done
Create an Accounting Hierarchy
BackgroundYour company uses hierarchies in reports, cross validation rules revaluations, segment value security, allocations, and COA Mapping.
Note: Even though you could theoretically use the same tree for all of the above processes, you would typically create at least two different trees: One for reporting and allocations and another for cross-validation rules, segment value security, revaluations and COA Mappings. You need to carefully consider the usage for your trees. If using the tree for reporting and allocations, you need to flatten the rows to be able to use drilldown in Smartview and you must publish the tree to view the hierarchy in the Essbase cubes. If using the tree for other purposes outside of reporting and allocations, then you must flatten the rows, but you do not need to publish the hierarchy. If using the tree for OTBI, you must flatten the columns.
Note about Segment Value Security: It is very common for companies to use segment value security in reports to prevent certain users from being able to view balances for certain cost centers, accounts, etc. If your customer has this requirement, then you should use your reporting hierarchy when defining segment value security rules. If you do not, then segment value security rules will only be applied to transactions.
Note: You should define your hierarchies BEFORE you enter/upload journal entries. If you create hierarchies AFTER you have posted journals, then you must make sure no posted balances have been posted to parent values that were erroneously flagged as a child value. This will cause major issues in creating your Essbase cube if you change a child value to a parent after balances have been posted.
Activity Scope
Create an account hierarchy for your account segment using your value set XXAccount to use for reporting and allocations.
NOTE: Before you begin this, you need to know the exact name of your value set on the natural account segment.
Create a Tree
1. From
your implementation project, Navigate > Define Common Applications
Configuration for Financials > Define Enterprise Structures for Financials
> Define Financial Reporting Structures > Define Chart Of Accounts > Manage
Account Hierarchies > Go to Task.
2. Use the
Manage Account Hierarchies page to search, create, and edit account
hierarchies.
3. Click
the Create Tree icon to open the definition of the tree.
This opens the Manage Account Hierarchies: Specify Definition
page to define the basic details of the tree.
4. Enter
the Name and Code fields: XXAA_Fin_Tree. (No Spaces).
NOTE: Tree names and Tree Version names cannot be more than 30 characters. It will cause problems when inquiring on GL balances.
5. Select
the Tree Structure: Accounting Flexfield Hierarchy.
6. Enter
the Description for the tree: XXAA Financial Tree.
7. In the
Data Source Parameters: Click the Expand button to expand the Accounting
Flexfield Hierarchy Detail Values and Accounting Flexfield Hierarchy
Parent Values rows.
Note: For the Accounting Flexfield Hierarchy Detail Values, how you read it is select the Value Set Code for a value set where the summary flag is N (or No). Then on the Accounting Flexfield Hierarchy Parent Values, you read it as select the Value Set Code for a value set where the summary flag is Y (or Yes).
8. In the Bind_ValueSetCode
field, enter the exact name of your value set (Your initalsAccount).
9. VERY
IMPORANT!!! Click the Save button on the Data Source Parameters
table’s tool bar in the middle of the page. (You will get an error message if
you select Next before saving).
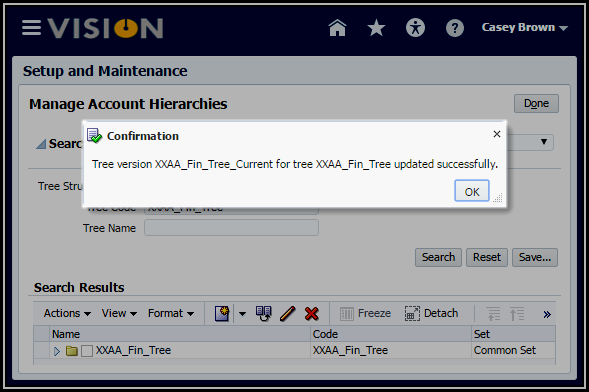
10. A
message confirms that your new values have been updated.
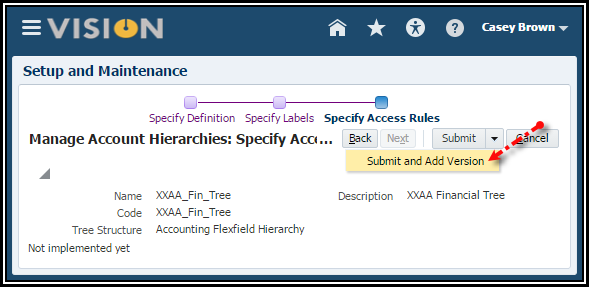
11. Click
the Next button twice to navigate through the next two pages.

12. Click
the Submit and Add Version to save your newly created tree structure and
immediately create a version.
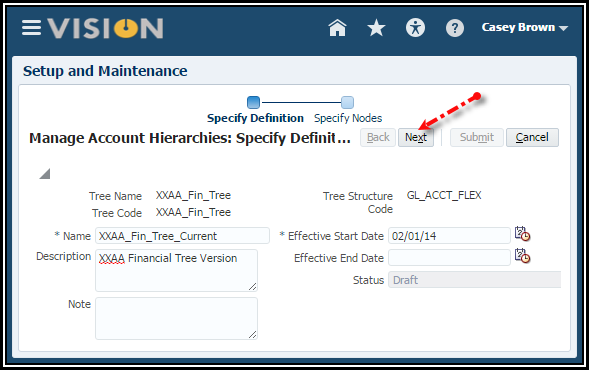
Create a Tree Version
1. Enter
the Name and Description for the tree version
XXAA_Fin_Tree_Current.
NOTE: Tree names and Tree Version names cannot be more than 30 characters. It will cause problems when inquiring on GL balances.
2. Enter
the Effective Start Date. Enter 1/1/14 in the date format suggested in
the UI.
3. Click
the Next button.
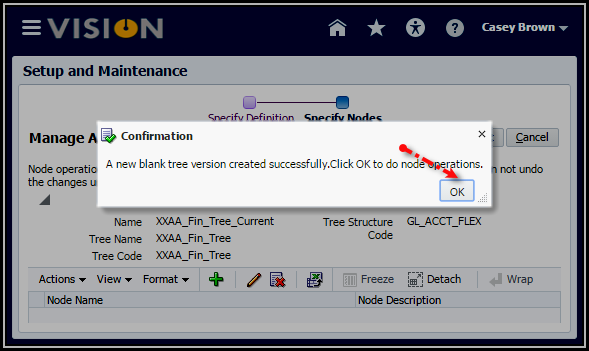
4. Click
the OK button to acknowledge the confirmation of the creation of a new
blank tree version.
5. Click
the Add  icon.
icon.
 icon.
icon.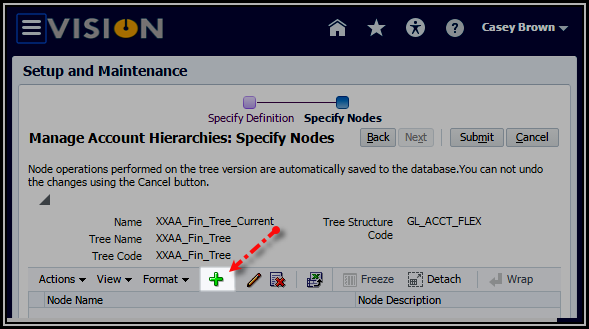
6. With
the Tree Node Type, Specific value selected, select the Data
Source: Accounting Flexfield Hierarchy Parent Values.
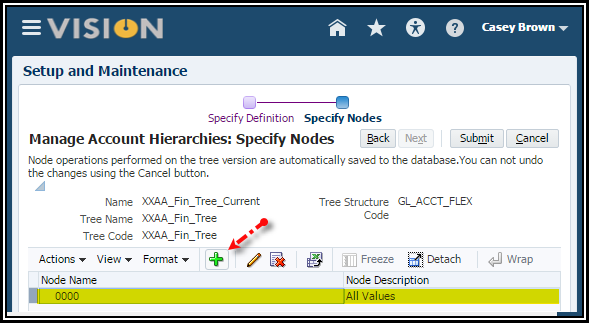
7. Select
the 0000 Parent Node. This is the top most root node. You want to
work from the top down. Then move it to the right column. Click OK in the
popup.

8. Select
the 0000 Value and click the Add icon to start building your hierarchy.
9. Select Accounting
Flexfield Hierarchy Parent Values.
10. Select
all the next level parent values, and move them to the right. Click OK
in the popup.
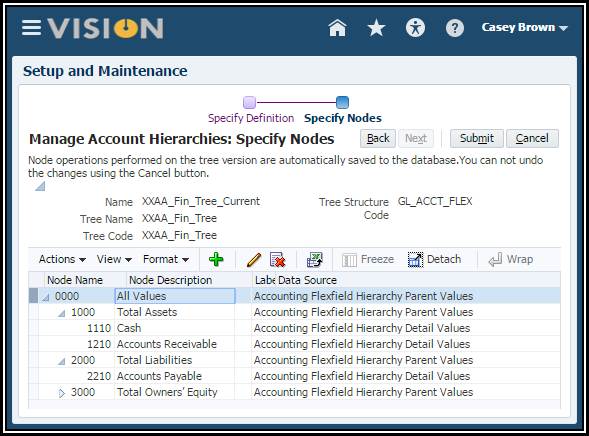
11. Now you
just keep building your hierarchy levels by assigning parents values and child
values where needed.
12. Click
the Expand button on the Parent nodes to see the children.
Your hierarchy should look like this:
13. Click
the Submit button, then click OK to the message informing you the tree
version was successful.
Complete the Account Hierarchy
1. Highlight
your tree version. (Note: You need to expand your tree to
select the VERSION.)
2. Click
the Actions menu > Audit
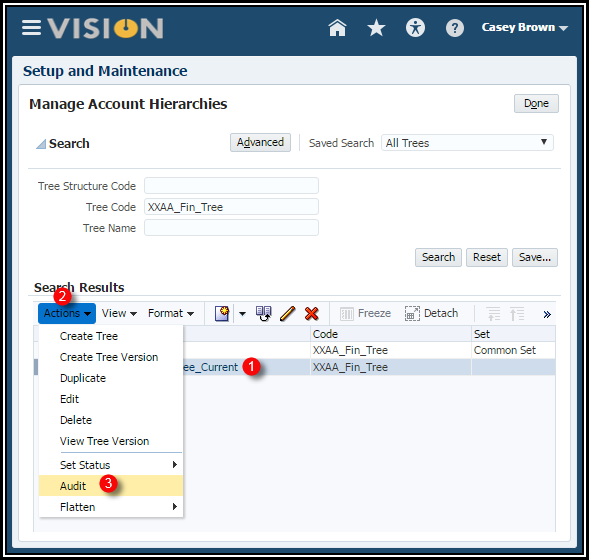
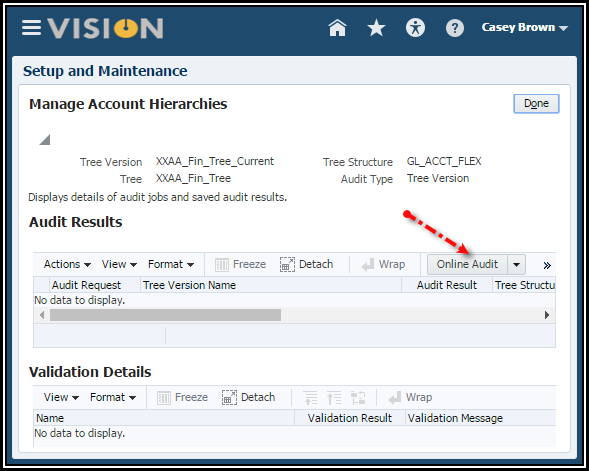
3. Use the
Audit Results region to start the Audit process.
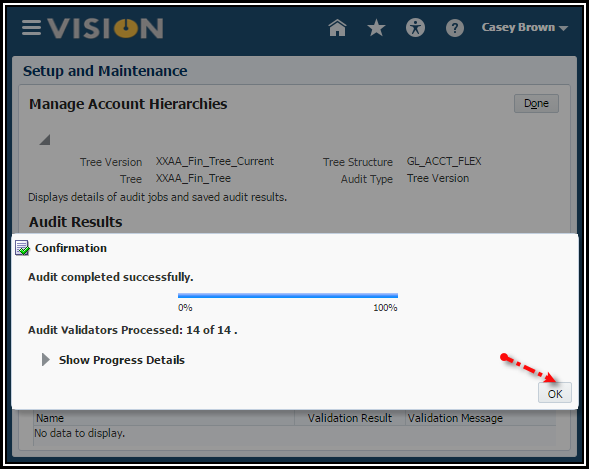
4. Click
the Online Audit button to start the Audit process. Once the
audit is performed, the status of the tree version can be set to active.
5. Click
the Done button.
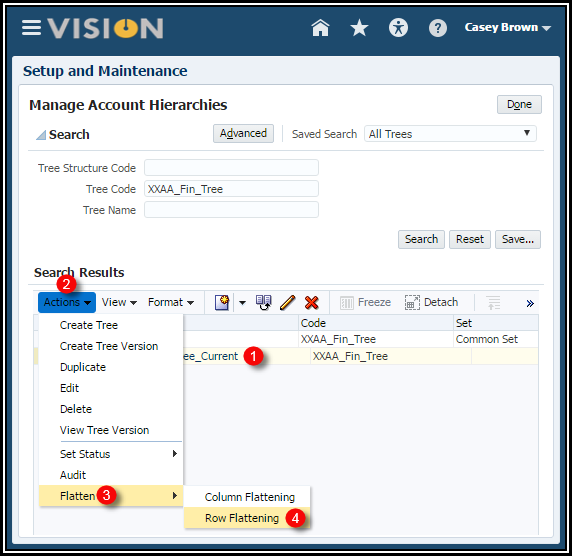
6. Select
your tree version and click Actions > Flatten> Row
Flattening.
Row flattening optimizes parent-child information for run-time performance by storing an additional column in a table for all parents of a child.
Row flattening optimizes parent-child information for run-time performance by storing an additional column in a table for all parents of a child.
Note: You could also flatten the column. It’s only required if using the hierarchy for OTBI reports, but if you just want to flatten rows and columns for all your hierarchies, it will not hurt anything.
7. Click
the Online Flattening button.
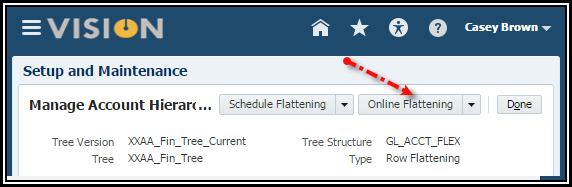
8. Select
the OK button to acknowledge the successful completion message.
9. Click
the Done button.
10. Use the
Actions menu > Set Status menu > Active to activate
the tree.
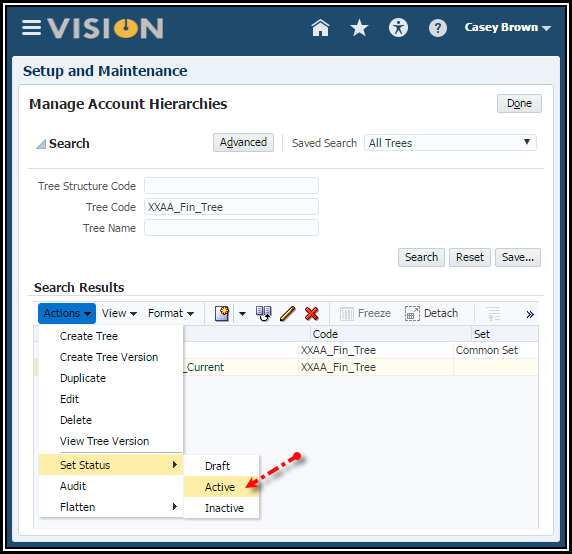
11. Click
Done.
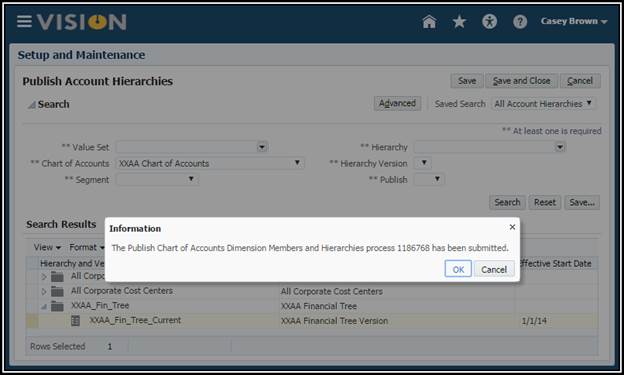
Publishing Accounting Hierarchy
1. For the
next task, Publish Account Hierarchies, select the Go to Task icon.
2. Search
for your tree version using your Chart of Account name.
3. Expand
the XXAA_Fin_Tree_Current.
4. Scroll
all the way to the right and check the Publish check box.
5. Select
the Publish button.
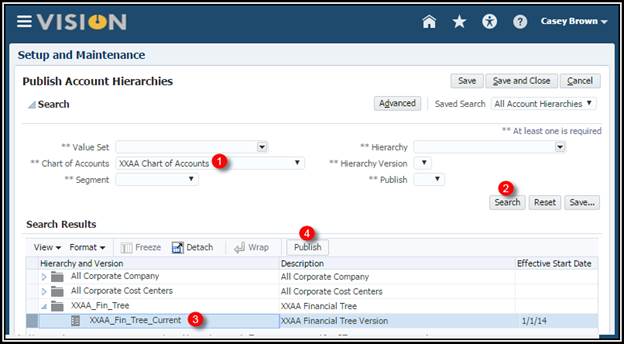
6. Click
Save and Close.
Create a Duplicate of All Accounting
Hierarchies Used for Reporting and Allocations
If
your company uses hierarchies in reports and allocations, be sure you
create a duplicate of the hierarchy. You must also audit, flatten, and publish
this copied hierarchy. This is very important to reduce maintenance overhead of
reports and allocations going forward when a new hierarchy version is later
created. It is recommended you name the current version CURRENT and the copy BASELINE. Please see this white paper https://beehiveonline.oracle.com/content/dav/Oracle/Fusion_ERP_Partner_Implementation_Training_Workspace/Documents/Financials/Implementation%20Training%20for%20Release%207/Best%20Practice%20White%20Papers%20and%20Trouble%20Shooting/General%20Ledger/GL_HierarchiesWhitePaper.pdf for more information.
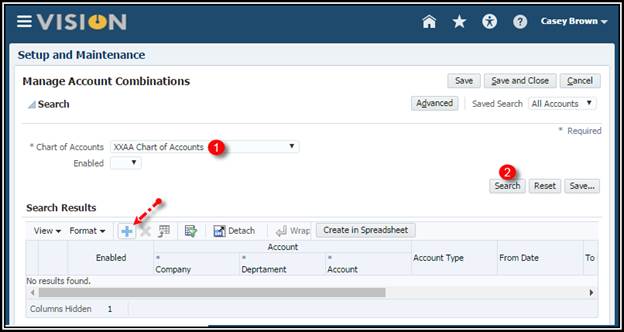
Create an Account Combinations Activity
BackgroundAccount combinations contain a completed set of segment values that uniquely identifies an account in the chart of accounts.
From your implementation project, Navigate > Define Common Applications Configuration > Define Enterprise Structures for Financials > Define Financial Reporting Structures > Define Chart Of Accounts > Manage Account Combinations > Go to Task.
1. Search
by your Chart of Accounts. (There will be no search results).
2. Click
the Add Row icon.
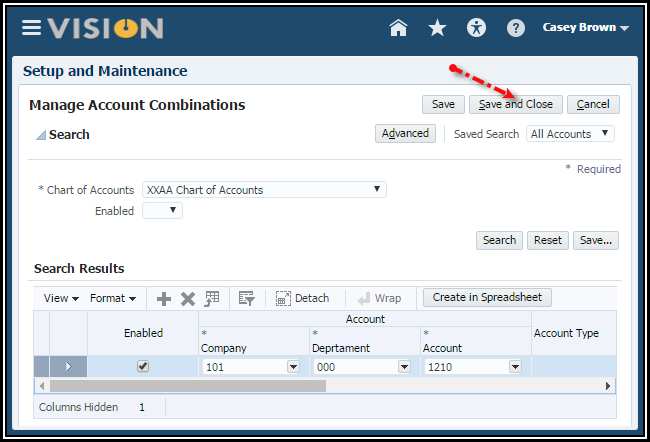
3. Verify
that the Enabled check box is checked.
4. Enter
101-000-1210.
5. Optionally
enter a From Date, To Date and an Alternate Account.
6. Click
the Save and Close button.
Note: If you enabled Dynamic combination creation allowed for your chart of account instances, you do not need to manually create account combinations. The system will automatically create them for you during transaction and journal entry.
Define Cross-Validation Rules Demonstration
BackgroundCreate cross-validation rules to prevent specific combinations of segment values in your account combinations, for example, preventing a particular cost center from being combined with a specific company value. Cross validation rules only affect the creation of new account combinations.
Activity Scope
Enter a new cross validation rule to prevent your InFusion US Chart of Accounts Company value 102 from being combined with your marketing cost center value 139. Let’s assume InFusion US LE 2 BU 2 legal entity does not have a marketing cost center.
1. From
your implementation project, Navigate > Define Common
Applications Configuration > Define Enterprise Structures for Financials
> Define Financial Reporting Structures > Define Chart of Accounts > Manage
Cross-Validation Rules > Go to Task.
2. Select InFusion
US Chart of Accounts.
3. Click
the Add Row icon.
4. Specify
a unique rule Name, NOMAR102, an optional Description: Do not
combine North America Marketing cost center 139 with InFusion America US LE2
BU2 102.
5. Enter
an optional effective From Date of today.
6. Check Enabled.
7. Click
on the Change filter condition on the Condition Filter. Select Add
Fields and select Company. Enter Company Equals 102. The
cross validation rule evaluates if Company 102 was entered and if it is the
defined value, then, the validation process continues to evaluate the rule. Note:
If you do not specify any statement in the condition filter, then the rule is
always evaluated.
8. Click
OK.
9. Click
on the Change filter condition on the Validation Filter. Select Add
Fields.
10. Select Cost
Center Does not equal to 139. Click OK. When the rule is
evaluated, an account combination must contain a cost center other than
139 for company 102 before it can be created.
11. Enter
an Error Message: We do not have a marketing department, select a
different cost center. The message displays in the relevant user interfaces
and processes when an account combination cannot be created because it violates
the rule.
12. Click Save
and Close.
Test:
1. Navigate
> Manage Account Combinations task from within your implementation
project > Go to Task icon.
2. Select InFusion
US Chart of Accounts.
3. Click
the Add Row icon.
4. Enter
102-10-62520-139-000-000.
5. Save. The
error message appears.
Define Cross-Validation Rules Activity
Activity ScopeEnter a new cross validation rule to prevent balance sheet accounts from using any other department besides 000 and 121.
1. From
your implementation project, Navigate > Define Common
Applications Configuration > Define Enterprise Structures for Financials
> Define Financial Reporting Structures > Define Chart of Accounts > Manage
Cross-Validation Rules > Go to Task.
2. Select your
chart of accounts.
3. Click
the Add Row icon.
4. Specify
a Name: “Dept 000 and 121” and Description: “Balance Sheet
Accounts can only be combined with Dept 000 and 121.”
5. Check Enabled.
6. For the
Condition Filter, select the filter icon and select Add Fields
and select Account.
7. Enter Account
Between 1000 – 3000.
8. For the
Validation Filter, enter Department Equals 000 and Department Equals 121.
9. Error
Message: “Use Dept 000 or 121 with balance sheet accounts.”
10. Click
Save and Close.
Test:
1. Navigate
> Manage Account Combinations task from within your implementation
project > Go to Task icon.
2. Select your
Chart of Accounts.
3. Click
the Add Row icon.
4. Enter
101-138-1210.
5. Save. The
error message appears.
Create a new accounting calendar for three years starting January 1, 2013 and ending December 31st each with one adjusting period at the end of the year.
1. From
within your implementation project, Navigate > Define Common
Applications Configuration for Financials > Define Enterprise Structures for
Financials > Define Financial Reporting Structures > Define Calendars
> Manage Accounting Calendars > Go
to Task.
2. Use the
Manage Accounting Calendar page to create and edit calendars.
3. Click
the Create button.
4. Enter
the desired information into the Name and Description field.
Enter XXCalendar.
5. Enter
the desired information into the Start Date field. Enter 1/1/13.
6. Select
Monthly in the Period Frequency field.
7. Accept
the defaults in the Period Name Format.
8. Select
the Once at year end list item in the Adjusting Period
Frequency field.
9. Click
the Next button.
10. Use the
Create Accounting Calendar : Period Details to review the calendar
period data. Only 2013 year has been created.
11. Click Save
and Close button.
12. Click
on the name of your calendar.
13. Click
the Add Year button to add 2014 year. Note: You can only add one year at
a time between saves.
14. Click Save
and Close button.
15. Click
the Done button.
16. You
have successfully created a new accounting calendar.
Your company, InFusion America Inc, has a ledger currency of United States dollars (USD), and is doing business with suppliers in:
·
Canada in Canadian dollars (CAD).
·
Mexico in
Mexican pesos (MXP).
·
Ultraland, a new country which uses Ultraland dollars (ULD).
Activity ScoUltralandpe
Verify that USD, CAD, MXP and GPS are enabled and create currency for Ultraland.
1. From
your implementation, Navigate > Define Common Applications Configuration
> Define Enterprise Structures for Financials > Define Financial
Reporting Structures > Define Currencies > Manage
Currencies > Go to Task.
2. Verifying
that USD, CAD, MXP, and GBP currencies are enabled.
3. Create
a new currency for Ultraland (XXULD) where XX represents your initials.
·
Currency Code: Unique
identifier used to reference the currency in user interfaces. Enter XXULD
replacing XX with your initials.
·
Currency Name: Ultraland
Dollars.
·
Description: Currency
for Ultraland.
·
Enabled: Check box to start
using the currency. Check the box.
·
Start and End Dates: Used
to begin or end use of a currency on a specific date. Start Date default is the
current date. Accept the default date.
4. Click Save.
5. Expand your
currency and accept the defaults in the following fields:
·
Issuing Territory:
Optionally, select among predefined country names per International Standards
Organization (ISO) Standard #3166.
·
Symbol: Optionally, enter the
symbol for the currency.
·
Precision:
Designate the number of digits to the right of the decimal point used in
regular currency transactions. Default is 2.
·
Extended Precision:
Designate the number of digits to the right of the decimal point used in
calculations. Default is 5. You must specify a number greater than or
equal to the number in the Precision field.
·
Minimum Accountable Unit:
Optionally, enter the smallest denomination used.
·
ISO Currency:
Identify ISO currencies. Default is checked.
·
Type: Select Currency or
Statistical to indicate how the currency is used in transactions and journal
entries. Type also determines how the balances are shown. Default is
Currency.
·
Derivation Type: Use
only for the euro and national currencies of the European Monetary Union (EMU)
member states during the transition period. All other currencies do not have
derivation types.
·
Derivation Factor: Enter
a fixed conversion rate by which you multiply one euro to derive the equivalent
EMU currency amount. The euro currency itself does not have a derivation
factor.
·
Derivation Effective Date: Enter
the date on which the relationship between the EMU currency and the euro
begins.
- Click Save and Close
Create Conversion Rate Types Activity
BackgroundYour company, InFusion America Inc, has a ledger currency of United States dollars (USD), and needs different conversion rate types for your payables and receivables transactions with Ultraland, which uses Ultraland dollars (ULD).
·
For receivables, use your corporate conversion rate types.
·
For payables, use a special corporate conversion rate type.
Activity Scope
Create a new conversion rate type for your payables transactions called XXSPCORP (replace XX with your initials).
1. From
within your implementation project, Navigate > Define Common
Applications Configuration > Define Enterprise Structures for Financials
> Define Financial Reporting Structures > Define Currencies > Manage
Conversion Rate Types > Go to Task.
2. Click
the Add row icon.
3. Enter
Name XXSPCORP where XX are your initials. Enter Description
Payables Special Rate Type.
4. Enable Enforce
Inverse Relationship and Enable Cross Rates.
5. Enter
your currency XXULD as the Cross Rate Pivot Currency.
6. Add USD
and CAD as the contra currencies by clicking the Add Row button in the Contra
Currencies region.
7. Click Save
and Close.
Create a Primary Ledger Activity
Activity ScopeCreate a primary ledger using InFusion US Chart of Accounts, AccountingMMYY calendar, USD as the currency, and Standard Accrual as accounting method.
1. From
your implementation project, Navigate > Define Common
Applications Configuration for Financials> Define Ledgers > Define
Accounting Configurations > Manage
Primary Ledgers > Go to Task.
2. Click
the Create icon in the Manage Primary Ledger page.
3. Enter a
unique Name (without any periods) and Description: XXPrimary
Ledger. Your Ledger name will appear on reports so name it correctly.
Note: Do NOT use periods in your Ledger Name, such as ABC Co., Inc.
Essbase will error. Currently, the UI does not validate this.
4. Select Chart
of Accounts: InFusion US Chart of Accounts.
5. Select
your Calendar: XXCalendar.
6. Select Currency:
USD.
7. Select
the Accounting Method: Standard Accrual.
8. Click
the Save and Edit Task List button to save your primary ledger
and return to the Setup and Maintenance work area or your project plan.
9. Select Assign
Legal Entities > Go To Task
10. In the
Select Scope popup, for the Primary Ledger field, select the Select and Add option,
then select the Apply and Go to Task button.
11. Select
your XXPrimary Ledger and then click Save and Close button at the
very bottom of the window.
12. In the
Assign Legal Entities page, select the Add icon and choose your legal entity, XX
Legal Entity, then click Apply, then Done.
13. Click Save and
Close.
14. Your Primary Ledger
name now appears as the Selected Scope across all components of this Accounting
Configuration.
Specify Ledger Options Activity
BackgroundSetting ledger options is one of the most important tasks in configuring your ledgers.
From your implementation project, Navigate > Define Common Applications Configuration for Financials> Define Ledgers > Define Accounting Configurations >
1. Specify
Ledger Options > Go to Task.
Accounting Calendar Options
2. Review
the Accounting Calendar that defaults from your ledger.
3. Select
01-13 as the First Opened Period for your ledger.
4.
Enter 3 for the Number of Future Enterable Periods.
Subledger Accounting Options
5. Review
the Accounting Method from your ledger.
6.
Select US American English as your Journal Language.
Period Close Options
7. Enter Retained
Earnings Account: 101.10.33100.000.000.000.
8.
Enter Cumulative Translation Adjustment Account:
101.10.35000.000.000.000.
Journal Processing Options
Balancing options:
9. Enable Suspense
General Ledger and Subledger Accounting.
10. Default
Suspense Account:101.10.29900.000.000.000.
11. Rounding
Account: 101.10.78550.000.000.000.
12. Entered
Currency Balancing Account: 101.10.29900.000.000.000.
13. Balancing
Threshold Percent: 10.
Enable the following Entry options:
14. Enable
journal approval.
15. Notify
when prior period journal is entered.
16. Allow
mixed statistical and monetary journals.
17. Validate
reference date.
18. Separate
journals by accounting date during journal import.
For Reversal options:
19. Leave
blank. You can select any predefined criteria set from the list of values in
the Journal Reversal Criteria Set at any time.
20. Uncheck
Run AutoReverse after open period. You can return to this page and
enable this option later.
21. For
Intercompany options: Click the Enable intercompany accounting.
22. For
Average Balance Options: Do not enable average balance processing.
Note: Disabling the ADB option will hide this region when you later
update the ledger options.
23. Save
and Close to return to your implementation project.
24. Optionally,
you could assign balancing segment values to legal entities and ledgers and
assign reporting currencies and secondary ledgers.
25. Navigate
> Review and Submit Account Configuration > Go to Task.
26. Click
Submit to create your accounting configuration. This will
automatically create a Data Access Set with full read and write access to your
primary ledger. The system automatically generates data roles for every
data access set.
27. Verify
Data Role Generation for Ledgers > Go to Task
28. Click Search
– Role Templates
29. Enter
Display Name: General Ledger Template for Ledger
30. Click Search
31. Click Open
32. Click Generate
Roles button
33. Click
Summary tab and expand Valid Roles. You should see your General
Ledger data roles that are appended with your ledger name. You assign these
data roles to your users to access those ledgers.
34. Close
the Entitlements Server (a.k.a Access Policy Manager (APM)) window.
35. Provision
Roles to Implementation Users > Go to Task.
This opens Oracle Identity Manager (OIM).
36. Click
the Administration link.
37. Search
for your user.
38. Click
the Roles tab and Assign one of the GL data roles you just created, such as General
Accounting Manager XX Primary Ledger.
39. Close
OIM.
40. The
next step is to open the period. Do not open the period for this exercise.
Reporting Currencies Demonstration
BackgroundA reporting currency is linked to a primary or secondary ledger, and is maintained at one of three data conversion levels.
Activity Scope
Set up reporting currencies tied to your XXPrimary Ledger.
1. From
your implementation project, Navigate > Define Common Applications
Configuration > Define Ledgers > Define Accounting Configurations >
select your XXPrimary Ledger > Manage Reporting Currencies > Go
to Task.
2. Click
the Create icon.
3. Name
and Description: Enter XXReporting Currencies.
4. Currency
Conversion Level: Select Journal.
5. Currency: Enter
GBP.
1. First
Open Period: Enter Jan-11.
2. Rounding
Account: 101.10.78550.000.000.000.
3. Revaluation
Basis: Select Entered currency instead of Primary ledger currency.
4. Enable
journal approval: Click check box.
1. Default
Conversion Rate Type: Corporate.
2. Retain
Transaction Rate Type: Yes
Enter 5 for the Number of Days to Find Last Rate.
1. Retain
Journal Creator from Source Ledger: Yes.
2. Click
the Add icon.
3. Journal
Source: Enter Other.
4. Journal
Category: Enter Other.
5. Convert
Journals to this Reporting Currency: Enter Yes.
6. Click Save
and Close.
Create a Ledger Set Demonstration
BackgroundLedger Sets enable you to group multiple ledgers that share the same chart of accounts and calendar combination.
Activity Scope
Create a ledger set using your XXPrimary Ledger and one of the other student's ledgers.
1. From
within your implementation project, Navigate > Define Common Applications
Configuration > Define General Ledger Options > Manage
Ledger Sets > Go to Task.
2. Click
the Create icon. Name and Description: XXSet
3. Select
your Chart of Accounts: XXChart of Accounts.
4. Select
your Calendar: XXCalendar.
5. Default Ledger:
XXPrimary Ledger.
6. Ledger
or Ledger Set: XXPrimary Ledger (Add one of the student's primary ledger.)
7. Type:
Ledger.
8. Save
and Close.
Data Access Set Security Activity
BackgroundData Access Sets are used to control access to specific ledgers, ledgers sets, or primary balancing segments of ledgers.
Activity Scope
Once you submit the Accounting Configuration, a Data Access Set is automatically created with full read/write access to the Primary Ledger. You only need to create a Data Access Set to grant more granular access to specific balancing segment values or alter the read and write privileges or grant access to multiple ledgers.
1. From
your implementation project, Navigate > Define Common Applications
Configuration for Financials> Define Security for Financials > Define
Data Security for Financials> Manage Data Access Sets > Go
to Task.
2. Click
the Create icon.
3. Enter
unique Name and Description: XXData Access Set, replacing XX is
your initials.
4. Select
the Access Set Type: Full Ledger or Primary Balancing Segment Value.
5. Select
your Chart of Accounts: InFusion US Chart of Accounts.
6. Select
you Accounting Calendar: XXCalendar.
7. Select
the Default Ledger: XXLedger.
8. Click
the Add icon in the Access Set Assignments.
9. Enter
Your Ledger: XXLedger.
10. Select Privilege:
Read and Write.
11. Save.
Note: If you select Access Set Type of Primary Balancing Segment Value, then you have to additionally decide:
1. Check All
Values or leave unchecked to enter one or more primary balancing segment
values.
2. Select Specific
Value: Parent to represent a group of balancing segments or Single Value.
3. If you
select Parent Value, then you must select a Tree Code to indicate the
source of the hierarchy information, a Tree Version Name, and the
primary balancing Segment Value.
Note: You will ONLY be able to select the Tree Code that is
assigned to your segment that was denoted as the Primary Balancing Segment of
your Chart of Accounts Instance.
4. Continue
to add rows to include more than one primary balancing segment value, if
needed.
Segment Value Security Demonstration
BackgroundEnabling Segment Value Security controls what accounting segment values users can see and use throughout the GL UIs.
Functionally, defining and enabling such rules consists of several steps:
1) Enabling Segment Value Security at the value set level
2) Creating a Data Security Condition
3) Creating a Data Security Policy
Before proceeding with these steps, confirm in OIM what roles (as part of the data roles created for each ledger for the respective chart of accounts) are assigned to the users who will be using these ledgers. This is important because as part of the definition of security policies you need to specify what roles are impacted by the policies.
From within your implementation project navigate to
Define Common Applications Configuration for Fusion Accounting Hub > Define Implementation Users > Create Implementation Users > Go to Task.
This opens Identity Manager.
1. Click
on the Administration link on the top right hand corner of the main
page.
2. Search
for your user at the top left corner and click on the Display Name.
3. From
the Roles tab, expand the General Accounting Manager XXPrimary Ledger
role and note it is based on the General Accounting Manager Job Role for
the XXPrimary Ledger Data Access Set.
In case you plan to use tree operators in your policy definitions, review your tree definitions and make sure they are properly set up for the desired security behavior.
Activity Scope
·
Enable security for XXAccount value set associated with your chart
of accounts.
·
Provide the General Accounting Manager XXPrimary Ledger
data role with access to a range of account values.
·
Deny all other users access to all account value set values.
I. Enable Segment Value Security at the value set level.
From within your implementation project navigate to
Define Common Applications Configuration for Fusion Accounting Hub > Define Enterprise Structures for Fusion Accounting Hub > Define Financial Reporting Structures > Define Chart of Accounts > Manage Segment Value Security Rules > Go to Task.
1. Search
for Value Set Code XXAccount and click on Edit.
2. Check
the Security enabled checkbox and click on Edit Data Security
button to proceed with defining a security condition and policy.
II. Create a Data Security Condition.
1. With
the Condition tab selected, click the Create button to begin
creating the policy.
2. Enter XXRestricted
Access for both Name and Displayed name.
3. Click Add
in the Conditions section.
4. Select Column
Name: VALUE, Operator: Between, Value: 1000-7999.
You can use either tree or non-tree operators.
The following non-tree operators are supported:
-
Equal to
-
Not Equal to
-
Between
-
Not Between.
Similarly, the following tree operators are supported:
-
Is a last descendant of
-
Is a descendant of.
5. Once
you have finished defining the desired conditions, click on Save.
III. Create a Data Security Policy.
1. When
you are on the Policy tab, click on the Create button to begin
creating a new policy. Begin by specifying information in the General
Information tab.
2. After
specifying the General Information, proceed to the Role tab and
search for the relevant data role that you desire to be affected by this
policy.
(Note that the search functionality for roles in the Select and
Add popup does not work very well, i.e. it does not like wildcard
characters.)
3. Once
the desired role shows up in the Role tab, click on the Rule tab
in order to associate the condition with the policy.
4. The Row
Set field determines what range of value set values are affected by the
policy. Select Multiple Values.
5. Select
your XXRestricted Access condition that was defined earlier.
6. Click
on the Submit button.
Generate the flexfield (from the Manage Key Flexfields UI).


No comments:
Post a Comment