

Thursday, June 30, 2016

Oracle Cloud ERP - Supplier Import Process Throough File Based Data Loader (FBDL) Template
Overview
The Supplier Import Programs
can be used to import Supplier's information from external systems into Oracle
Fusion Applications using Open Interface tables. An organization may need to
use the Import Suppliers process under different circumstances:
·
Acquisitions or mergers that necessitate importing suppliers into
the organization.
·
Migrating suppliers from legacy systems into Fusion Applications
It is first important to
understand the setup of Business Units related to suppliers, as this affects
the way the import process works. Oracle Fusion Applications allows users
to define client - service provider relationships between procurement business
units. A Procurement Business Unit may act as a service provider offering
procurement services for one or more client requisitioning Business Units.
Supplier Sites are always setup to be Procurement Business Unit specific. Site
Assignments are created to associate the Supplier Site with client Business
Units. These include both requisitioning business units and sold-to
(payables) business units
Programs and Interface
Tables
The following are the four
processes that are used to import Supplier information:
ü
Suppliers
ü
Supplier Address
ü
Supplier Sites
ü
Supplier Site Assignments
ü
Supplier Contacts
ü
Supplier Business Classifications
ü
Supplier Products and Services Categories
Supplier Import functionality
validates and imports the information loaded into the Supplier Interface table
and reports on any errors for suppliers that cannot be imported. The names of
these tables are given below:
ü
POZ_SUPPLIERS_INT
ü
POZ_SUP_ADDRESSES_INT
ü
POZ_SUPPLIER_SITES_INT
ü
POZ_SITE_ASSIGNMENTS_INT
ü
POZ_SUP_CONTACTS_INT
ü
POZ_SUP_CONTACT_ADDRESSES_INT
ü
POZ_SUP_BUS_CLASS_INT
ü
POZ_SUP_PROD_SERV_INT
Process Flow
Basically
there are 3 steps involved if suppliers imports
ü Download the xlsm template
from Repository and prepare the data based on instruction provided.
ü Upload the data files to
respective UCM folder.
ü Run the Import Process
Suppliers
Import
Step 1: Download the file based data loader (FBDL) template from oracle
fusion repository. You can access the repository by using below link
Enter the below search details and hit on Search. It will list out
all file based data imports for supplier related imports. Please see below
screen shot.

Step 2: Click on Suppliers Import, at the bottom section under Overview
note down the UCM account
UCM Account : prc/supplier/import

In details table right click on XLSM template link and choose the
option “Save link as...”
XLSM Template: SupplierImportTemplate.xlsm

Save it to your local machine.
Step 3: Open the XLSM template from your local machine. DON’T make any
changes to the first tab. Follow the instruction and feed data into POZ_SUPPLIERS_INT
tab.


Note: While preparing the data make sure verify below
ü Provide
the date format mentioned in instruction sheet for date columns.
ü Few
columns are lookup based, pick the value from them. See below

ü Verify
the comment associated for each column to find the actual values accepted by
the import process. See below for Supplier Type column.

Step 4: After entering the data points for the required fields and any
additional fields which you want to import, go to Instructions tab and click on
Generate CSV File button.

This generates the csv file and zip into a folder. See below
PozSuppliersInt.zip

PozSuppliersInt.csv

Click on Ok

Note: The filenames generated by the FBDI template
(SupplierImportTemplate.xlsm) should NOT be changed for csv files.
Filenames are of the following format:
ü Interface
table names in bookcase format. For example: POZ_SUPPLIERS_INT will have a csv
file with name PozSuppliersInt.csv
ü You
will get below errors if any changes .csv files
Invalid
data format
No metadata found
No metadata found
This
issue is because of wrong file names of csv files or incorrect contents in the
csv files.
Step 5: Use any user related to procurement area to login Fusion application For suppliers
import I have used “Calvin.Roth”.
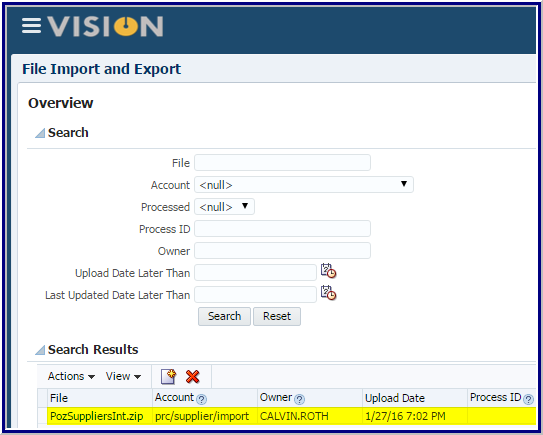
Step 6: Click on navigator as shown below.

Under
Tools, select File Import and Export option.

It
will open below screen.
Click
on upload option to add the zip file to content management server.

It
will prompt for File and Account.
Select
the zip file generated by previous step and use account “prc/supplier/import”
from LOV. The zip file will be placed on content management server in the
specified folder.

Note: Make sure you
select the correct folder. This information is provided on Overview tab of
repository. See below

Click on Save and Close.
Step 7: Load the data into respective interface tables using “Load
Interface File for Import” ESS job.
Click on Navigator -> Tools -> Scheduled Process as
shown below.

It will open below screen. Click on Schedule New Process as shown
below.

It will open Schedule New Process Dialog box. Select Job and
expand the LOV and click on the Search link

Enter “Load%Interface%” and hit search button. Select Load
Interface File For Import and click OK button.


It will below window. Select the Import Process “Import Supplier”
and your zip file uploaded in the previous step in Data File Lov. Click on
Submit Button.

Click on Ok

It will submit 2 Child ESS jobs as shown below. Click on the
refresh  button to check newly submitted
requests
button to check newly submitted
requests
 button to check newly submitted
requests
button to check newly submitted
requests
1)
Transfer File
2)
Load File to Interface
Make sure all 3 ESS jobs should complete normal if there are no
errors in your data file. In case of any errors, click on error job and check
for Log and Out files for errors and fix it. Repeat the above process for
uploading and loading the revised data file. See below example
Double click on the program and click on the log file


Step 8: After successfully loading the data file into interface table
submit the “Import Supplier” ESS Job. This job will validate the
interface data and imports into base tables.
Navigator -> Procurement -> Suppliers

This will open below screen, Click on Import Suppliers under
Tasks. Click on the Actions click on the Import Suppliers task page.

It launches the “Import Suppliers” Ess Job. Select the parameters
as New and No as shown below.


Monitor the Job and make sure the job is successfully completed in
order to import the supplier to the base tables. If any error verify the
out/log files and fix them.

Click on the View Output.

Output file gives you the summary of the suppliers import and not
import.


Follow the Step 1 to Step 7 for importing Supplier Addresses,
Sites, Site Assignments and Supplier Contacts. The only difference is xlsm
templates, Import Processes and respective data files.
Please refer the below table for your reference.
No
|
XLSM
Template Name
|
Import
Process
|
Navigation
|
1
|
SupplierAddressImportTemplate.xlsm
|
Import
Supplier Addresses
|
Navigator -> Procurement -> Suppliers
Click on Import Supplier on Tasks(It opens Import Supplier Page)
Import -> Supplier Addresses
|
2
|
SupplierSiteImportTemplate.xlsm
|
Import
Supplier Sites
|
Navigator -> Procurement -> Suppliers
Click on Import Supplier on Tasks(It opens Import Supplier Page)
Import
-> Supplier Sites
|
3
|
SupplierSiteAssignmentImportTemplate.xlsm
|
Import
Supplier Site Assignments
|
Navigator -> Procurement -> Suppliers
Click on Import Supplier on Tasks(It opens Import Supplier Page)
Import
-> Supplier Site Assignments
|
4
|
SupplierContactImportTemplate.xlsm
|
Import
Supplier Contacts
|
Navigator -> Procurement -> Suppliers
Click on Import Supplier on Tasks(It opens Import Supplier Page)
Import
-> Supplier Contacts
|
5
|
SupplierBusinessClassificationImportTemplate.xlsm
|
Import
Supplier Business Classifications
|
Navigator -> Procurement -> Suppliers
Click on Import Supplier on Tasks(It opens Import Supplier Page)
Import -> Supplier Business Classifications
|
6
|
SupplierProductsandServicesCategoryImportTemplate.xlsm
|
Import
Supplier Products and Services Categories
|
Navigator -> Procurement -> Suppliers
Click on Import Supplier on Tasks(It opens Import Supplier Page)
Import -> Supplier Products and Services Categories
|
Please see below screen shot for your reference for navigation of
supplier imports.

Monday, June 27, 2016
Oracle Cloud ERP (Fusion) Check Template Setups and Process Training Manul
EXECUTIVE OVERVIEW
Generating payment checks from the
Fusion has traditionally required either a third party or
considerable customization of the delivered check print reports. The check
print format is very specific to each banking organization, requiring specific
fonts and pixel-perfect layout. The existing E-Business Suite reports generate
flat text output and do not support these features. Oracle XML Publisher now
offers an integrated, cost-effective method to generate the check output
directly from the Fusion.

INTRODUCTION
Check printing from the Fusion has historically required a third-party solution that can either query
the necessary data and format the output or accept the existing flat text
output generated by the provided check print programs. To then generate the
checks, the format components had to be placed with pixel-perfect precision
onto the page using the necessary MICR font to format the bank routing number
and bank account of the payee. Alternatively customers could take the existing
check print program and customize it to format the output correctly. These
solutions are costly in terms of their implementation, their ongoing
maintenance and their complexity. This all adds to the total cost of ownership
for the E-Business Suite.
Oracle XML Publisher offers
integrated functionality that allows customers to design their own check format
using familiar desktop tools that can then be applied to a check print data
source, whether that is the seeded Fusion Report or a custom solution. This
format is easily maintainable and can include all the necessary components
required in the final output to be printed onto blank check stock.
Taking this approach reduces the
complexity of the systems surrounding the check generation and thereby reducing
the total cost of ownership of the Fusion.
Pre-requisites:
Download
BI Publisher Template Builder for Word version 10.1.3.4.1 from
download.oracle.com
Basic
requirements to start creating checks are to have an RTF file (Template) and an
XML file (data definition).
There
are 2 ways that you can have an RTF file:
o Create your own, or
o (Recommended) Download standard oracle Template
‘Standard Check Format’ IBYDC_STD1.rtf or
Standard Check Format : IBYDC_STD1A.rtf
àBetter way is to follow the instructions in Doc ID: 465389.1 R12 Create Or Modify A Payment Format Using XML Builder. This note explains the same steps that I have defined below
MICR Fonts
This
is another important requirement which you will run into later on. So I have
decided to address it right away because you may end up spending a lot more
time if you start thinking about it later. One of the easiest way is to buy the
MICR font from a third party like IDAutomation (http://www.idautomation.com/) and use
MICRW1B.ttf. Typical cost is around $750.00 per user license – you may need to
purchase only one license. You may also download their Demo version which is
good for testing.
The good news is that Oracle also provides a MICR font which is available if you have downloaded the BI Template Builder. Some banks reject this font, but so far I did not have any problem with the bank that we used.
Download and install BI Publisher ver 10.1.3.4.1
Font File Location: C:\Program Files\Oracle\BI Publisher\BI Publisher Desktop\Template Builder for Word\fonts\ MICR____.TTF
In order to use this file in the RTF template, copy the font file MICR____.TTF to C:\WINDOWS\Fonts
At this stage, you may or may not have designed the Check
template. But you can still use IBYDC_STD1.rtf downloaded earlier.
Following steps are needed to create a check in AP from scratch. These steps may also be used to create the initial payment to get the XML file.
Following steps are needed to create a check in AP from scratch. These steps may also be used to create the initial payment to get the XML file.
Step 1 : Creating Template
Go to Navigator and click on Reports and Analytics

Click
on Browse Catalog

Expand
the Shared Folder then Expand Financials then click on Payments and click on the edit link in Disbursement Payment file Format

Click
on the Add new Layout link

Click
on the upload layout link

Enter
the Layout name and select the RTF file and save
Name
|
Value
|
Layout Name
|
XXAA_CHECK_FORMAT
|
Type
|
RTF Template
|
Locale
|
English
|


Click
on view list and set the custom layout as default

Select
the output types as PDF and XML and click on Save.

Step 2: Creating Payment Format
Go to Navigator and click on Setup and Maintenance

Search
with Manage Formats and click on Go
To Task

Select
Disbursement Payment File Formats
and click on Create

Enter
the details and click on Save and Close
Name
|
Value
|
Name
|
XXAA_CHECK_FORMAT
|
Code
|
XXAA_CHECK_FORMAT
|
BI Publisher Template
|
XXAA_CHECK_FORMAT (Created in Step1)
|

Step 3: Creating Payment Document
Go to Navigator and click on Setup and Maintenance

Search
with Manage Bank Accounts and click
on Go To Task

Search
with bank : Bank of America and
click on Go To Task then click on the bank account : BofA-2869

Click
on the Edit button to add the new document

Click
on the create  button
 button
Enter
the details and click on ok
Name
|
Value
|
Payment Document
|
XXAA_CHECK_FORMAT
|
Format
|
XXAA_CHECK_FORMAT (Created in Step2)
|
Paper Stock Type
|
Numbered Stock
|
First Available Doc No
|
10000
|
Last Available Doc No
|
99999
|

Click
on Save and Close button

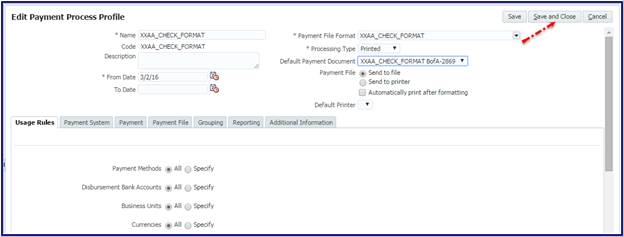
Step 4: Creating Payment Process Profile
Go to Navigator and click on Setup and Maintenance

Search
with Manage Payment Process Profiles
and click on Go To Task

Click
on create button

Enter
the details and save
Name
|
Value
|
Name
|
XXAA_CHECK_FORMAT
|
Code
|
XXAA_CHECK_FORMAT
|
Payment File Format
|
XXAA_CHECK_FORMAT (Created in Step3)
|
Processing Type
|
Printed
|
Enable
|
Send to File
|
Note
: Don’t select the payment document at this step
Note
ID : Cannot Save New Payment Process Profile (Doc ID 1981556.1)

Click
on Ok then select the Payment Document : XXAA_CHECK_FORMAT
BofA-2869 and save
Step 5 : Creating PPR Template
Nav :
Payables àPayments
àTasks
à Manage
Payment Process Request Templates àActions àCreate

Enter
the below values save it
Name
|
Value
|
Template Name
|
XXAA_CHECK_FORMAT
|
Payment Method
|
Check
|
Disbursement Bank Account
|
BofA-2869
|
Payment Document
|
XXAA_CHECK_FORMAT (Created in Step2)
|
Payment Process Profile
|
XXAA_CHECK_FORMAT (Created in Step4)
|
Payment Conversion Rate
|
Corporate
|
Review Proposed Payments
|
Enable
|
Create payment File Immediately
|
Enable
|

Step 6 : Void the Payments
Nav :
Payables àPayments
àTasks
à Manage
Payments
Search
the payment and select any payment and void the payment

Click
on Submit
Step 7 : Submitting PPR
Nav :
Payables àPayments
àTasks
à Submit
Payment Process Request
Enter
the PPR name and select the PPR template created in Step 5 then it will
populate the all default values and click on submit


Go to
Manage Payment Process Request
Search
with above created PPR and click on the Action button

Click
on Resume Payment Process

If
the payment struck with “Waiting For Payment File Processing” status then
submit “Create Printed Payment Files”
Nav :
Payables àPayments
àTasks
à Create
Printed Payment Files
Enter
the below details:
Name
|
Value
|
Disbursement Bank Account
|
BofA-2869
|
Currency
|
USD
|
Business Unit
|
US1 Business Unit
|
Payment Process Profile
|
XXAA_CHECK_FORMAT
|
Payment Process Request
|
PPR001
|
Payment Document
|
XXAA_CHECK_FORMAT
|
Print Now
|
No
|

Now
Go to “Manage Payment Process Request” Search with above created PPR and click
on the Action button

Click
on Submit

Click
on “Record the Print Status”


Go to Navigator and click on and click on Scheduled Processes

Refresh
and click on output link:

Subscribe to:
Comments (Atom)
