
Introduction:
There are basically two ways to enter
data into Oracle: by typing it into a user interface (Java Form or Web Page) or
by taking a file and programmatically interfacing the data. Web ADI falls
into the second category in that it takes an Excel file and programmatically
loads the data into Oracle. If you find it easier to enter data into
Excel than Oracle forms, you should look into using Web ADI.
Downloading a Web
ADI
The first step in
downloading a template is to locate the responsibility and menu that is linked
to that template. Some templates can be downloaded from the Desktop
Integration menu and others must be downloaded from a specific responsibility.
For security, some templates are linked to specific responsibilities. For
example, we can download the GL Journals template from the Desktop Integration
responsibility but we can’t download the Project Transaction Import template
from the same responsibility.
To download a template
you will use the following components: integrator, viewer, layout, and content.
Based on how the menu is setup, some of these components may default for you.
Integrator
The integrator defines
what data you will be uploading to Oracle. Each integrator serves a
specific purpose and cannot be used to enter other data.
Viewer
The viewer is the
Microsoft program you will use to enter data into the template
Layout
The layout is how the
data columns are organized on the template. You have two main sections to
a template: a header and lines. The header information applies to all the
lines when the data is uploaded to Oracle.
Content
The content is a text
file that you can import into your template. You can use this feature if
you have an external system that outputs text file and you want to import that
into the template.
Pre-requisites for working on Development or use of WEBADIs
1.Check the value for
profile option named BNE Allow No Security Rule
and set the value to Yes

2.
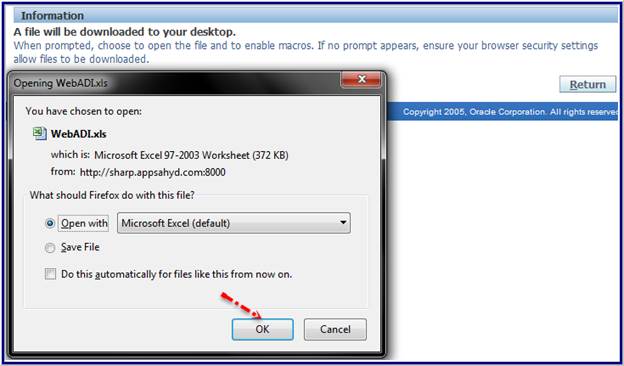
Enable the Macros options for your excel sheet

Select Excel option to
set the properties
Click on Trust Centre
-> Trust center Settings

Select Macro Settings
-> Enable all macros and check the option Trust access to the VBA Project
object model

Apply and save your settings
Assign responsibility Oracle WEBADI or Desktop
Integrator to do the development of new WEBADIs
Compile the below
Custom table and Package in APPS schema
CREATE TABLE XXAA_APINV_IFACE_TBL
PACKAGE XXAA_APINV_IFACE_PKG
PROCEDURE XXAA_APINV_IFACE_LOAD_PRC
PROCEDURE XXAA_APINV_IFACE_IMPORT_PRC;
-->
====================================================================
Integrator
1.
Create Integrator
Navigation
: Desktop Integration Manager Responsibility-> Create Integrator

Integrator
Name : XXAA APINV Interface
Integrator
Internal
Name : XXAA_APINV_IFACE_INTEGRATOR
Application
: Payables
Click on Next button

2. Create Interface
Interface
Name : XXAA APINV Interface
Interface
Type : API – Procedure
Package
Name : XXAA_APINV_IFACE_PKG
Procedure/Funtion
: XXAA_APINV_IFACE_LOAD_PRC
API Returns
: FND Message Code
Click on Apply button

Select the Interface and Click on
Next button

3.
Create Content
Content
Name
: XXAA APINV Interface Content
Content
Type :
Text File
Number
of columns : 9
Apply

Rename the display names as per csv
header columns for better under standing
And provide the content parameter
(download parameter) as Web ADI: Download "Text File" Parameters

4. Create Uploader


5. Create Importer
Select importer type as PL/SQL API
Importer
Name
: XXAA_APINV_IFACE

Click on PL/SQL API Call plus button
to add our custom procedure

Enter following information
API
Type
: PL/SQL Procedure
Package
Name : XXAA_APINV_IFACE_PKG
Procedure
Name : XXAA_APINV_IFACE_IMPORT_PRC
API
Returns
: FND Message Code
Click on apply and then submit
button


Layout
1.
Create
Layout
Navigation:
Desktop Integration Responsibility àDefine Layout
Select
the integrator àGo àCreate
button

2.
Enter
the name : XXAA APINV
Interface Layout

3.
Include
the fields in layout, Select the line in Placement

Click
on Apply button


2. Define Mapping
1.
Define
mapping
Navigation:
Desktop Integration Responsibility -> Defining mapping-> select
integrator-> go

2.
Click
on define mapping button

3.
Enter
the mapping details
Mapping
Name : XXAA APINV Interface Mapping
Mapping
Key : XXAA_APINV_IFACE_MAPPING
Number
of column : 9

4.
Map
the source and target columns


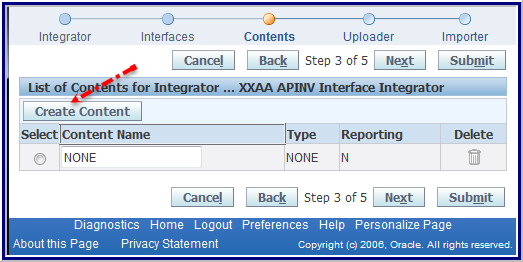
3. Create Document
1.
Create
Document :- Test the document with sample data
Navigation:
Desktop Integration Responsibility -> Create Document -> select
integrator
2.
Select
the desktop application like excel or word

3.
Select
the layout if there are multiple layouts
4.
Select
the content

5.
Select
the data file

6.
Select
the NONE to open the Excel file

7.
Click
on create document button

8.
Click
on create document button to download the sheet


Enter
the data and upload and verify the invoice number from application

Note:
we have developed the sheet. Now it needs some cosmetic changes
Changes
1.
Change
the Labels of fields
Navigation:
Go to integrator-> Interface-> Enter the Integrator name and click on Go

Click
on Update button

Click
on Next

Select
the Integrator

Change
the Prompt Left Label

Click
on the Update button and change Above Prompt then Save and Submit

è
Create
the document to check new changes

2.
Assign
LOV and hints to the columns
Navigation:
Go to integrator-> Interface->click on update button of respective
attribute (say P_INVOICE_CURRENCY) to add LOV
check
the not null check box to indicate required columns in spread sheet
Select
the validation type as table and enter below information
Validation
Type
: Table
Id
Column
: CURRENCY_CODE
Meaning
Column : CURRENCY_CODE
Desc
Column
: CURRENCY_CODE
Validation
Entity : FND_CURRENCIES
Provide
the information under user hint text item as ‘*List–Text’ to give an idea
user about what value should be entered or select

è
Do
the same for other columns too then save and get the new document to see the
changes
3.
Add
default value as ‘USD’ to currency code item
Navigation:
Go to integrator-> Interface-> select the default type and default value
for currency code attribute

Do
the changes for all required fields

Result

Defining the Form Function for Integrator
Define
the form function for integrator to run the custom ADI document from any
responsibility
1.
Define
the custom Form Function
Navigation ->
Application Developer -> Application -> Function

Function
: XXAA_APINV_IFACE_FF
User Function Name : XXAA
APINV Interface Integrator

Properties àType
- SSWA servlet function

Form àParameters
bne:page=BneCreateDoc&bne:viewer=BNE:EXCEL2007&bne:reporting=N&bne:integrator=USER_NAME:XXAA APINV Interface Integrator&bne:noreview=Yes

Web HTML àHTML Call : BneApplicationService

Save it.
Assign
Function to Custom Menu
Go and add the
function into the custom responsibility
Navigation->
Application Developer -> Application -> Menu

Search for your menu
where you want to add this ADI
Menu
: AP_NAVIGATE_GUI12
Prompt
: XXAA APINV
Interface Integrator
Function
: XXAA APINV Interface Integrator

Now you can navigate to your custom
responsibility to see the ADI which you have assigned.

Test the sheet
1.
Once
you create document, it will populate the file data on the sheet

2.
Fill
the required information

3.
Upload
the data into oracle
Navigation:
Add-Ins Tab-> Oracle-> Upload

4.
Once
we click on upload button, it will pop up the upload page where we have to
select ‘Automatically Submit Import’ check box as we have added import
procedure in importer rule. If it is checked then only it will call that import
program, otherwise it wont


5.
If
there is any error, then program will return error message and will rollback
the transaction

6.
After
correcting the data, run again. And if there is no error, then program will
insert all validated data into oracle tables and call the import journal
program

Click
on Upload button

Wait until Import
program completed


7.
We
can monitor the import program from spread sheet itself by clicking on monitor
button
Click on the Monitor
to check the request id
Nav : Add-Ins àOracle
àMonitor


Verify the concurrent
request id from application

Click on View Output
button


Search with Invoice
number from payables responsibility


Check the from the
backend tables


10 comments:
Excellent ...!!!
Great job !!
Excellent Work,
thank you
Hi, The application name which you have provided as Payable, how that can be changed once the integrator is created?
Thank you
Download the "Web ADI - Oracle Custom WEB ADI Setups and Process for AP Invoice Interface" document from below link:
https://drive.google.com/file/d/1m7xiwlIAtrWho1Q7m8GAP6VGEbBfWE5O/
https://drive.google.com/file/d/1m7xiw1IAtrWho1Q7m8GAP6VGEbBfWE5O/
Many, many Tks Raju, very useful your post.
VEry nice doc
very useful your post
Post a Comment