
Set of Books
A set of books consists of Chart of Accounts, Accounting Calendar and Functional Currencies for a company or group of companies. If you need to get reports in multiple currencies then you will have to create a separate set of books for each currency. The Primary set of books will be for functional currency. You can enable budgetary control on your set of books which will create automatic encumbrances transactions in General Ledger, Purchasing and Payables.
Chart of Accounts
Chart of Accounts is used to define accounts structure. Oracle has provided a very flexible feature in Oracle Applications to define Chart of Account that is Accounting Flexfields (AFF).
There are maximum 30 segments available with 25 characters length of each segment. To Create an Accounting Flexfield the following steps need to be performed,
♦ Value Sets
♦ Accounting Flexfield
♦ Filling Value Sets with Data
Segments:
We will create the following three segments in our accounting flexfield (AFF),
Segment Qualifier
Company Balancing segment
Cost Center Cost Center segment
Natural Account Natural Account Segment
1. Define Value Sets
To define value sets login as General Ledger,
General Ledger : Setup > Financials > Flexfields >Validation > Sets
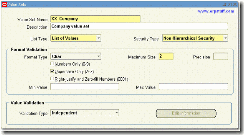
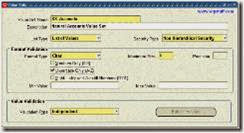
1.1. Company
Field Name Value
Value Set Name XX_Company
Description XX_Company
Security Type Non-Hierarchical Security
List Type List of values
Format Type Char
Maximum Size 2
Uppercase only Yes
Validation type Independent
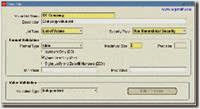
1.2. Cost Center/ Department
Field Name Value
Value Set Name XX_Cost Centre
Description XX_Cost Centre
Security Type Non-Hierarchical Security
List Type List of values
Format Type Char
Maximum Size 3
Uppercase only Yes
Validation type Independent
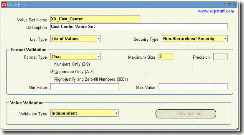
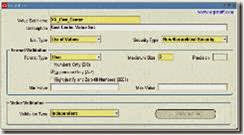
1.3. Accounts
Field Name Value
Value Set Name XX_Accounts
Description XX_Accounts
Security Type Non-Hierarchical Security
List Type List of values
Format Type Char
Maximum Size 4
Uppercase only Yes
Validation type Independent

Accounting Flexfield
1. Defining the flexfield
1.1. Open the Key Flexfield segments window.
General Ledger : Setup > Financials > Flexfields > Key > Segments
1.2. Use the (Icon) Find in the Tool bar or use the Menu Bar View > Find to select the Accounting flexfield structure
Field Name Value
Application General Ledger
Title Accounting Flexfield
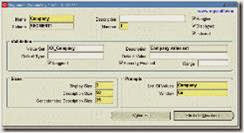
1.3. Position your cursor in the Structure Code field and select the green+ icon to insert a new record.
1.4. Enter the following information:
Code Title Description View Name
XX_AFF XX AFF XX_Accounting Flexfiled XX_AFF_VIEW
Note: Use only Characters, Numerals and underscore while entering a view name.

Note: You can select Segment Separator from the LOV. Here we have selected Period(.).
1.5. Save the work and click (Button) Segments to define the segments.
1.6. Enter the following information.
Name Window prompt Column Value Set
Company Co Segment 1 XX_Company
Cost Centre CC Segment 2 XX_Cost_Centre
Accounts ACCT Segment 3 XX_Accounts

Note: In the value set column you are attaching the value sets created above.
2. Additional information for Company segment. (Button) Open
2.1. Click (Button) open in the above screen to provide some additional company segment
information.
2.2. Enable the Security (Other wise the flexfield security rules will not work)
2.3. Accept the defaults for all other fields
2.4. Repeat the above steps for all the other 3 segments (Button) Open

A set of books consists of Chart of Accounts, Accounting Calendar and Functional Currencies for a company or group of companies. If you need to get reports in multiple currencies then you will have to create a separate set of books for each currency. The Primary set of books will be for functional currency. You can enable budgetary control on your set of books which will create automatic encumbrances transactions in General Ledger, Purchasing and Payables.
Chart of Accounts
Chart of Accounts is used to define accounts structure. Oracle has provided a very flexible feature in Oracle Applications to define Chart of Account that is Accounting Flexfields (AFF).
There are maximum 30 segments available with 25 characters length of each segment. To Create an Accounting Flexfield the following steps need to be performed,
♦ Value Sets
♦ Accounting Flexfield
♦ Filling Value Sets with Data
Segments:
We will create the following three segments in our accounting flexfield (AFF),
Segment Qualifier
Company Balancing segment
Cost Center Cost Center segment
Natural Account Natural Account Segment
1. Define Value Sets
To define value sets login as General Ledger,
General Ledger : Setup > Financials > Flexfields >Validation > Sets
1.1. Company
Field Name Value
Value Set Name XX_Company
Description XX_Company
Security Type Non-Hierarchical Security
List Type List of values
Format Type Char
Maximum Size 2
Uppercase only Yes
Validation type Independent


1.2. Cost Center/ Department
Field Name Value
Value Set Name XX_Cost Centre
Description XX_Cost Centre
Security Type Non-Hierarchical Security
List Type List of values
Format Type Char
Maximum Size 3
Uppercase only Yes
Validation type Independent

1.3. Accounts
Field Name Value
Value Set Name XX_Accounts
Description XX_Accounts
Security Type Non-Hierarchical Security
List Type List of values
Format Type Char
Maximum Size 4
Uppercase only Yes
Validation type Independent


Accounting Flexfield
1. Defining the flexfield
1.1. Open the Key Flexfield segments window.
General Ledger : Setup > Financials > Flexfields > Key > Segments
1.2. Use the (Icon) Find in the Tool bar or use the Menu Bar View > Find to select the Accounting flexfield structure
Field Name Value
Application General Ledger
Title Accounting Flexfield
1.3. Position your cursor in the Structure Code field and select the green+ icon to insert a new record.
1.4. Enter the following information:
Code Title Description View Name
XX_AFF XX AFF XX_Accounting Flexfiled XX_AFF_VIEW
Note: Use only Characters, Numerals and underscore while entering a view name.


Note: You can select Segment Separator from the LOV. Here we have selected Period(.).
1.5. Save the work and click (Button) Segments to define the segments.
1.6. Enter the following information.
Name Window prompt Column Value Set
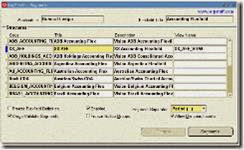
Company Co Segment 1 XX_Company
Cost Centre CC Segment 2 XX_Cost_Centre
Accounts ACCT Segment 3 XX_Accounts


Note: In the value set column you are attaching the value sets created above.
2. Additional information for Company segment. (Button) Open
2.1. Click (Button) open in the above screen to provide some additional company segment
information.
2.2. Enable the Security (Other wise the flexfield security rules will not work)
2.3. Accept the defaults for all other fields
2.4. Repeat the above steps for all the other 3 segments (Button) Open


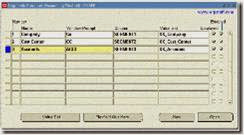
3. Flexfield Qualifiers
3.1. To add the Flexfield Qualifiers, save the segment and then select the (Button) Flexfield
Qualifiers to check the Enabled box on the corresponding qualifier.
Company Cost Center Account
Flexfield Qualifier Balancing Cost center Natural Account

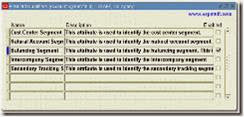
Note: Repeat the above step for Cost Center and Account.
3.2. Close the segment Summary windows.
3.3. Enable the following options in the Key Flexfield Segment window
Allow Dynamic Inserts Yes
Cross Validation Rules Yes

3.4. Freeze the flexfield definition by selecting the Freeze flexfield definition Check Box on
the key flexfield segments windows and select ok to the warning message.
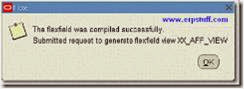
3.5. Select (Button) Compile and select the Ok button to the warning message. Select the
'OK' button for all the three messages.

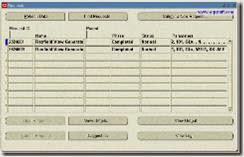
3.6. View the requests status in the requests screen by clicking the menu View > Requests >Find (Button).

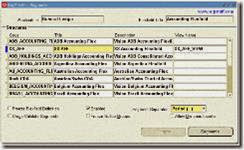
Filling Value Sets
After creating value sets now we will populate those value sets with data.
1. Open the segment Values window.
General Ledger : Setup > Financials > Flexfields > Key > Values
2. Select key flexfield in the Find Values by region
3. Select the following information from the list of values and select the find button.


4. In the segment values window, Title and structure will default in
5. Verify in the Independent Segment field, that the company segment appears. If not, use
the up and down arrows to move between the segments until you locate the company segment.
3.1. To add the Flexfield Qualifiers, save the segment and then select the (Button) Flexfield
Qualifiers to check the Enabled box on the corresponding qualifier.
Company Cost Center Account
Flexfield Qualifier Balancing Cost center Natural Account


Note: Repeat the above step for Cost Center and Account.
3.2. Close the segment Summary windows.
3.3. Enable the following options in the Key Flexfield Segment window
Allow Dynamic Inserts Yes
Cross Validation Rules Yes


3.4. Freeze the flexfield definition by selecting the Freeze flexfield definition Check Box on
the key flexfield segments windows and select ok to the warning message.
3.5. Select (Button) Compile and select the Ok button to the warning message. Select the
'OK' button for all the three messages.


3.6. View the requests status in the requests screen by clicking the menu View > Requests >Find (Button).


Filling Value Sets
After creating value sets now we will populate those value sets with data.
1. Open the segment Values window.
General Ledger : Setup > Financials > Flexfields > Key > Values
2. Select key flexfield in the Find Values by region
3. Select the following information from the list of values and select the find button.


4. In the segment values window, Title and structure will default in
5. Verify in the Independent Segment field, that the company segment appears. If not, use
the up and down arrows to move between the segments until you locate the company segment.
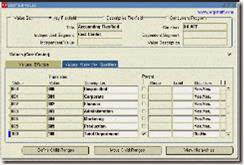
1. Company Segment Values
1.1. In the values, Effective tab, enter following information for the company segment.
Ensure you tab through all fields.
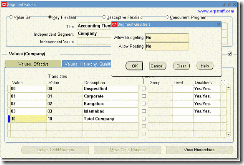
Note: Make sure that you have given the appropriate qualifiers and Define Child Ranges
button will only be active when you will mark the value as Parent by checking check box.
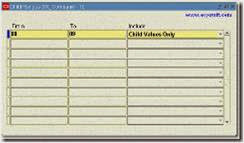
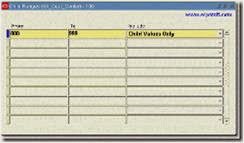
1.2. To define parent child hierarchies, in the segment values window, place your cursor in the respective parent segment value (10) 1.3. Select (Button) Define Child ranges Enter the following information

Keep Curser on Parent Value and Click on Define Child Ranges Button

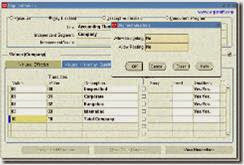
2. Cost Center Segment Values
2.1. Place the cursor in the Independent segment field and down arrow to Cost Center.
2.2. Enter the following information for the Cost Center segment.

Note: Make sure that you have given the appropriate qualifiers
2.3. To define parent child hierarchies, in the segment values window, place your cursor in the respective parent segment value (100)
2.4. Select (Button) Define Child ranges
2.5. Enter the following information

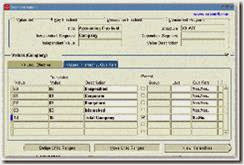
3. Account Segment Values
3.1. Place the cursor in the Independent segment field and down arrow to Account.
3.2. Enter the following values for the Account segment.
1.1. In the values, Effective tab, enter following information for the company segment.
Ensure you tab through all fields.


Note: Make sure that you have given the appropriate qualifiers and Define Child Ranges
button will only be active when you will mark the value as Parent by checking check box.
1.2. To define parent child hierarchies, in the segment values window, place your cursor in the respective parent segment value (10) 1.3. Select (Button) Define Child ranges Enter the following information


Keep Curser on Parent Value and Click on Define Child Ranges Button


2. Cost Center Segment Values
2.1. Place the cursor in the Independent segment field and down arrow to Cost Center.
2.2. Enter the following information for the Cost Center segment.


Note: Make sure that you have given the appropriate qualifiers
2.3. To define parent child hierarchies, in the segment values window, place your cursor in the respective parent segment value (100)
2.4. Select (Button) Define Child ranges
2.5. Enter the following information


3. Account Segment Values
3.1. Place the cursor in the Independent segment field and down arrow to Account.
3.2. Enter the following values for the Account segment.
| Value | Description | Parent | Budget/Post | Account Type |
| 0 | Unspecified | No | Yes, Yes | Expense |
| 1000 | Total Liabilities | Yes | No, No | Liability |
| 1001 | Capital Account | Yes,Yes | Ownership | |
| 1002 | Retained Earnings | Yes, Yes | Ownership | |
| 1003 | Sundry creditors | Yes, Yes | Liability | |
| 1004 | Rent payable | Yes, Yes | Liability | |
| 1005 | Salary and wages payable | Yes, Yes | Liability | |
| 1006 | Provision for depreciation | Yes, Yes | Liability | |
| 1007 | Provision for bad debts | Yes, Yes | Liability | |
| 1008 | Accrued Expenses | Yes, Yes | Liability | |
| 1009 | Future dated payment | Yes, Yes | Liability | |
| 1010 | Cost of removal – Clearing | Yes, Yes | Liability | |
| 1011 | Intercompany Payables | Yes, Yes | Liability | |
| 1012 | Deferred Depreciation Reserve | Yes, Yes | Liability | |
| 1013 | Payables Suppliers | Yes, Yes | Liability | |
| 1014 | Tax Payable | Yes, Yes | Liability | |
| 1015 | Unearned Revenue | Yes, Yes | Liability | |
| 2000 | Total Assets | Yes | No, No | Asset |
| 2001 | Sundry debtors | Yes, Yes | Asset | |
| 2002 | Cash | Yes, Yes | Asset | |
| 2003 | Building | Yes, Yes | Asset | |
| 2004 | Vehicle | Yes, Yes | Asset | |
| 2005 | Computers | Yes, Yes | Asset | |
| 2006 | Machinery | Yes, Yes | Asset | |
| 2007 | Cash Clearing Account | Yes, Yes | Asset | |
| 2008 | Proceeds of Sale – Clearing | Yes, Yes | Asset | |
| 2009 | Intercompany Receivables | Yes, Yes | Asset | |
| 2010 | Depreciation Adjustments | Yes, Yes | Asset | |
| 2011 | Asset Clearing Account | Yes, Yes | Asset | |
| 2012 | Prepayments | Yes, Yes | Asset | |
| 2013 | Receivable Factoring/Remittance | Yes, Yes | Asset | |
| 2014 | Other Receivables | Yes, Yes | Asset | |
| 2015 | Autoaccounting Clearing | Yes, Yes | Asset | |
| 3000 | Total Revenue | Yes | No, No | Revenue |
| 3001 | Sales – Training | Yes, Yes | Revenue | |
| 3002 | Discount Received | Yes, Yes | Revenue | |
| 3003 | Realized Gain Account | Yes, Yes | Revenue | |
| 4000 | Total Expenses | Yes | No, No | Expense |
| 4001 | Sales Expense | Yes, Yes | Expense | |
| 4002 | Rent Expense | Yes, Yes | Expense |


3.3. To define parent child hierarchies, in the segment values window, place your cursor in the respective parent segment value.
3.4. Select (Button) Define Child ranges
3.5. Enter the following information for all the 4 parent values
Reconciliation Flag: GL Entry reconciliation is a set of windows and reports that let you selectively cross-reference transactions in General Ledger.
Control Accounts: A Control account is used for control of segment value usage ie, a segment value qualified with control value is available for entry from sub ledgers only and not available for GL module. Therefore you cannot use the segment value qualified with control value directly from GL.
4.8. Switch to Oracle Applications form and place the cursor in the value field.


4.10. Select Load all cell, command Group and Window Name if any one is yet not selected orblank.
4.11. Here is the data transferring with progress bar.


4.12. All the records imported as shown below.


4.13. Save the data.
Accounting Calendar
You can define multiple calendars and assign a different calendar to each set of books. For example, you can use a monthly calendar for one set of books, and quarterly calendar for another. Now to define Accounting Calendar you need to follow the following steps,
♦ Period Type Definition
♦ Defining Calendar
1. Define Period Types
1.1. Open the Period Types window.
General Ledger : Setup > Financials > Calendars > Types.


2. Defining an Accounting Calendar
2.1. Open the Accounting Calendar window.
General Ledger : Setup > Financials > Calendars > Accounting
2.2. Define an accounting calendar with the following information:
Enter a name and description to your accounting calendar – XX_Calendar
Enter the following information for your thirteen period calendars.


2.3. On saving the following window will appear.


2.4. Select Current in the Decision Box.
2.5. Navigate to the request window
General Ledger: View > Request (Button) Find (Button) Output


Functional Currencies
You can define multiple currencies to enter transactions in different currencies
1. Define Currency
1.1. Open the Defining / Enabling currencies window
General Ledger : Setup > Currencies > Define
1.2. Use the (Icon) Find in the Tool bar or use the Menu Bar: View > Find to select the Currency which you wish to use.


Note: Scroll to right and make sure that the Enabled check box is enabled for the respective currency


No comments:
Post a Comment