
<![if !supportLists]>1. <![endif]>Personalization
OA Personalization Framework allows you to personalize your user interface (UI) of Oracle Self-Service Web Applications without modifying any underlying code.
Following are some common types of personalizations you can accomplish with OA Personalization Framework:
<![if !supportLists]>– <![endif]>Change the prompt for a field or other text on a page
<![if !supportLists]>– <![endif]>Hide or show a field on a page
<![if !supportLists]>– <![endif]>Make the fields mandatory and non mandatory
<![if !supportLists]>– <![endif]>Reorder fields or items on a page
<![if !supportLists]>– <![endif]>Restrict data that a user can access
<![if !supportLists]>– <![endif]>Add new buttons, links, text items, images, etc. (Creation of Items)
<![if !supportLists]>2. <![endif]>Profile Options:
S. No
|
Profile Option
|
Level
|
Purpose
|
1
|
Disable Self-service Personal
|
Site Level or
Application Level
|
Disables all the personalization’s made
|
2
|
Personalize Self Service Defn
|
User or Site
|
Global Personalization button on every page will appear to do the necessary personalization
|
3
|
FND: Personalization Region Link Enabled
|
User or Site
|
Personalization link appears at every region on the self service page
|
<![if !supportLists]>3. <![endif]>Personalization Levels
There are different Levels available at which the Personalizations can be made are
- Function – Custom/Seeded
- Site
- Organization and
- Responsibility Level
Function Level:
You can create personalizations for a region at the Function level, such that the personalizations are visible only when you display the region by selecting a specific function. For Example, suppose you have an updatable region and you want that region to be updatable when accessed from FunctionA in the menu, but to be read-only when accessed from FunctionB in the menu. To accomplish this, you create a Function level personalization that makes all the fields read-only for FunctionB. You can have only one set of personalizations per region per function.
Site Level:
A site refers to an installation of Oracle Self-Service Web Applications. Personalizations that you make at the site level affect all users of the current installation.
Organization Level:
Depending on the context you choose, an Organization can be a plant, a unit, a department, a division within a company or even a complete company (BG). Personalizations that you make at the Organization level affect all users of that Organization.
Responsibility Level:
When you make personalizations at the responsibility level for a specific responsibility, the changes are effective only for the users of that responsibility.
<![if !supportLists]>4. <![endif]>Personalization Icons
<![if !supportLists]> <![endif]>Launches a focused version of the Page Hierarchy Personalization page, for the selected region.
 <![endif]>Launches a focused version of the Page Hierarchy Personalization page, for the selected region.
<![if !supportLists]> <![endif]>To Create a New Item
 <![endif]>To Create a New Item
  To delete the Items
  Choose the Context levels to where exactly the personalizations have to be made
 You can either Activate, Inactivate, or Delete existing personalizations at the required levels
<![if !supportLists]>5. <![endif]>Personalization Features/Properties:
<![if !supportLists]>5.1 <![endif]>Rendered:
We can either enable or disable a field using Rendered option
Select the value from the poplist which generally displays Inherit, true, false and SPEL.

For Example: To disable Alias field click on Personalize Name
<![if !vml]> <![endif]>
 <![endif]>
Select the Pen icon and disable the field in Self Service Page
Select the Value from the Poplist.
The poplist generally displays the choices Inherit, true, false, and SPEL,
And also select the levels where you want to personalize the field
<![if !vml]> <![endif]>
 <![endif]>
Once you click on Apply, it takes you to the main personalization page
So now click on Return to Application

Alias field is no more visible in this region.
<![if !supportLists]>5.2 <![endif]>Hiding a Region
<![if !vml]> <![endif]>
 <![endif]>
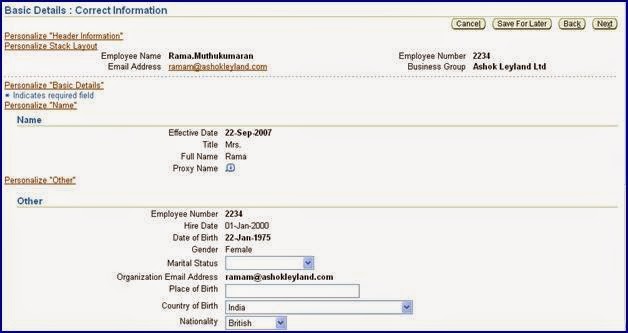
To hide the region select the region you want to hide
For Eg: to hide OTHER
Click on Personalize “Other”
<![if !vml]> <![endif]>
 <![endif]>
Click on Personalize “Default Single Column Basic Details”

The region is hided.

<![if !supportLists]>5.3 <![endif]>Required
Similarly to make the field mandatory or non mandatory select the values from the Poplist

You will find a * which indicates mandatory and the field to be entered
<![if !vml]> <![endif]>
 <![endif]>
<![if !supportLists]>5.4 <![endif]>Read Only
To make to non updatable select read only

<![if !vml]> <![endif]>
 <![endif]>
<![if !supportLists]>5.5 <![endif]>Prompt
To change the prompt

<![if !vml]> <![endif]>
 <![endif]>
<![if !supportLists]>5.6 <![endif]>Maximum Length
Example: To set the Maximum Length of Proxy Name, click on personalize page

The Maximum Length of Proxy Name is 30 characters.
Gave the value 2 characters at the function level
<![if !vml]> <![endif]>
 <![endif]>
So the user can enter only 2 characters.
<![if !supportLists]>5.7 <![endif]>Tip Message:
To add additional instructional text for users in the form of tips.

Select Application Developer Responsibility -> Application -> Messages -> Add a New Message

Select Tip Type as longMessage from the Poplist
Select the Message Name which we have created in the Message form through Application Developer Responsibility

Apply
<![if !vml]> <![endif]>
 <![endif]>

<![if !supportLists]>5.8 <![endif]>Initial Value
To specify a default value. Incase if it is a free field you can directly give the default value.
Note: This does not work in all cases if you want to default a value for a free field
Prerequisite:
Set the Profile Option FND:OA:Enable Defaults to Yes
To default a value from a List of Values
For Example: To default the Title as “Mr”

Query the Lookup
Select the code from the of Mr.

Go to Personalization page
<![if !vml]> <![endif]><![if !vml]>
 <![endif]>
 <![endif]><![if !vml]>
 <![endif]>
Select the Add Blank Value as False
And in Initial Value paste the code of Mr.
Apply
<![if !vml]> <![endif]>
 <![endif]>
The value is defaulted.
<![if !supportLists]>5.9 <![endif]>Enabling DFF
Select a particular region and search for the flex

Click on Personalize Page
Search for the required flex
<![if !vml]> <![endif]>
 <![endif]>
<![if !vml]> <![endif]>
 <![endif]>
Change the value for the Rendered to True at the required Level and click on apply and return to application.
<![if !vml]> <![endif]>
 <![endif]>
Now you can see the segments in the DFF displayed:
If you want enable only some segments in DFF then go to
Personalize Page-> Search for the Required Flex-> Click on the Pencil -> In the Segment List Enter the Code of the structure and the required segments in that structure of the DFF
Example: For Further Contact R'ship Information in the segment list we need to enter IN|Guardian Name|Guardian Birth Date
Descriptive Flex Field:

<![if !vml]> <![endif]>
 <![endif]>
Click on apply and return to application: Now you can see only two segments of DFF displayed :
<![if !vml]> <![endif]>
 <![endif]>
If you want to display segments only in Read only mode then go to Personalize Page-> Search for the Required Flex-> Click on the Pencil -> In the Segment list for the required segment add “($RO$)”
Example: IN|Guardian Name($RO$)|Guardian Birth Date

Click on apply button and return to application:
Now the Guardian Name will be in read only Mode
<![if !vml]> <![endif]>
 <![endif]>
<![if !supportLists]>6. <![endif]>Creation of Items
<![if !supportLists]>6.1 <![endif]>Create Button
A button item style creates a push button, which allows the user to trigger some action in response to a click. The button fires an "onclick" event when it is activated

Enter Component Id: Button
Enter URL : javascript:void window.open("http://www.oracle.com")
(in order to display this in a new page)
Apply
Apply
<![if !vml]> <![endif]>
 <![endif]>
Click on the Button and it opens the url

<![if !supportLists]>6.2 <![endif]>Message Check Box
The Message Check Box item style is a combination of the checkBox and inlineMessage controls.

Enter Component Id : Message Check Box
Prompt : Message Check Box
Initial Value : Y
Apply
<![if !vml]> <![endif]>
 <![endif]>
<![if !supportLists]>6.3 <![endif]>Separator
The separator item style creates a horizontal separator. A dotted line appears on the screen.
Enter Component Id : Separator
Apply


<![if !supportLists]>6.4 <![endif]>Creating Flex
If we want to create any Flex in the web page first we need to see whether that DFF exists in that Web page or not:
To Check the DFF in the Web pages click on About this page hyperlink which will on the left down corner of the webpage:
<![if !vml]> <![endif]>
 <![endif]>
Check for the available flex fields in the Flex field Reference
<![if !vml]> <![endif]>
 <![endif]>
Copy the item name of the required flex and go the page definition and click on the Expand ALL
<![if !vml]> <![endif]>
 <![endif]>
<![if !vml]> <![endif]>
 <![endif]>
Search for the VO for the required flex field. Search (CTRL TAB+ F TAB) and paste the copied item name and click on the find next
<![if !vml]> <![endif]>
 <![endif]>
Copy the VO Against the required flex item:
Click on Return to page Hyperlink which is on left corner of the page :
Click on the Personalize page at required level :
<![if !vml]> <![endif]>
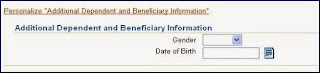
 <![endif]>
Click on Create item :
Select the level as function Level
And item style as Flex

Enter the Value for ID : Flex1
In the Appl Short Name field : PER (For Human Resources)
In the Name field : Enter the DFF Name
In the Prompt Field : Enter the Prompt Name for Flex item
In Read only Field : Select False from LOV
In the Rendered field : Select True from LOV
In the View Instance : Copy the VO copied against the flex item

Click on Apply .In the personalization structure you can find the flex created .
<![if !vml]> <![endif]>
 <![endif]>
Click on Return to application Hyperlink:
You can see the segment displayed on the webpage:
<![if !vml]> <![endif]>
 <![endif]>
<![if !supportLists]>6.5 <![endif]>URL include
The urlInclude item style allows you to includes HTML content loaded from an external source under the parent region.
Enter Component Id : Urlinclude
Source URI : Enter the url
Apply


<![if !supportLists]>6.6 <![endif]>Create Static Styled Text
Text that is for display only and not for editing purposes
Enter Component Id : SST
Prompt : This is for your information
Message Name : FULL Name
Apply

<![if !vml]> <![endif]>
 <![endif]>
This includes the prompt and the message name
<![if !supportLists]>6.7 <![endif]>Create Link
Enter Component Id : Link
Destination URL : Give the url
Apply
The link item style creates an HTML link tag.

<![if !vml]> <![endif]>
 <![endif]>
When you click on the Link, it takes you to the tag

<![if !supportLists]>6.8 <![endif]>Create Message Styled Text
A text field that can be updated and have a default value.
Enter Component Id : MessStyledText
Destination URL : This is your personal information
Apply

<![if !vml]> <![endif]>
 <![endif]>
<![if !supportLists]>6.9 <![endif]>Message Text Input
The Message Text Input item style is a Text Input field.
Enter Component Id : Hobbies
Prompt : Hobbies
Apply

<![if !vml]> <![endif]>
 <![endif]>
Enables a free field to enter the information
<![if !supportLists]>6.10 <![endif]>Create Raw Text
The raw text style allows you to enter HTML tags to display text in bold.
Enter Component Id : Raw Text
Prompt : Please enter your hobbies
Text : Enter your hobbies
Apply

<![if !vml]><![endif]>
<![endif]>
<![if !supportLists]>7 <![endif]>Reorder
You can reorder the items either for a particular region or at the page level at different levels.

<![if !vml]> <![endif]>
 <![endif]>
<![if !supportLists]>8. <![endif]>Functional Administrator Responsibilty Functions:
You can use this responsibility incase if you come across any errors while doing the personalizations. Using this responsibility you can either deactivate or delete personalizations

<![if !vml]> <![endif]>
 <![endif]>
Select the Document Name of the particular page where you are getting an error and go to
Go to Functional Administrator Responsibility -> Select Personalizations Tab
In Application : Select Human Resources from the List of Values
And in the Document Path give the document name of the particular page where you are getting an error
<![if !vml]> <![endif]>
 <![endif]>
Click on Manage Personalizations and it takes you to that particular page where you have done the personalizations

Shows you the levels where you have done the personalizations.
So either delete or deactivate and retest the same.


1 comment:
Hello,
Could you please help me in dIsabling the segments in Self Service page,
for eg, we are using DFF in oracle sshr manager self service page and it has 10 segments and we are using 8 of the segments in SSHR , but now business wants to reduce few more segments.
When it unchecked Dispalyed and Enabled button for that particalar segment, its still showing in the self service page.
Pleae advise.
Guru
Post a Comment