
Introduction:
There are basically two ways to enter data into Oracle: by typing it into a user interface (Java Form or Web Page) or by taking a file and programmatically interfacing the data. Web ADI falls into the second category in that it takes an Excel file and programmatically loads the data into Oracle. If you find it easier to enter data into Excel than Oracle forms, you should look into using Web ADI.
Downloading a Web ADI
The first step in downloading a template is to locate the responsibility and menu that is linked to that template. Some templates can be downloaded from the Desktop Integration menu and others must be downloaded from a specific responsibility. For security, some templates are linked to specific responsibilities. For example, we can download the GL Journals template from the Desktop Integration responsibility but we can’t download the Project Transaction Import template from the same responsibility.
To download a template you will use the following components: integrator, viewer, layout, and content. Based on how the menu is setup, some of these components may default for you.
Integrator
The integrator defines what data you will be uploading to Oracle. Each integrator serves a specific purpose and cannot be used to enter other data.
Viewer
The viewer is the Microsoft program you will use to enter data into the template
Layout
The layout is how the data columns are organized on the template. You have two main sections to a template: a header and lines. The header information applies to all the lines when the data is uploaded to Oracle.
Content
The content is a text file that you can import into your template. You can use this feature if you have an external system that outputs text file and you want to import that into the template.
Pre-requisites for working on Development or use of WEBADIs
1.Check the value for profile option named BNE Allow No Security Rule and set the value to Yes

2. Enable the Macros options for your excel sheet

Select Excel option to set the properties
Click on Trust Centre -> Trust center Settings

Select Macro Settings -> Enable all macros and check the option Trust access to the VBA Project object model
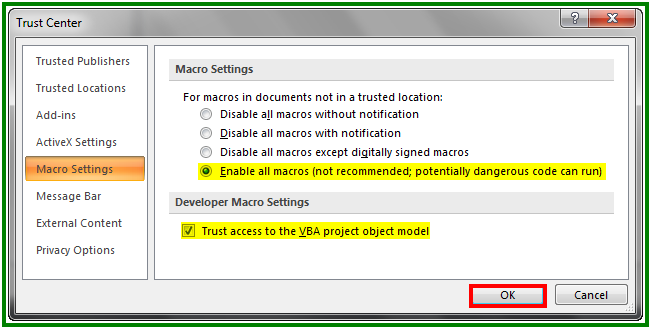
Apply and save your settings
Assign responsibility Oracle WEBADI or Desktop Integrator to do the development of new WEBADIs
Step by Step Procedure for Uploading data through Web ADI
Business requirement :
We need to insert a new supplier details through API in supplier table
Attached sample code for reference
CREATE OR REPLACE PACKAGE APPS.XXAA_ADI_SUPPLIER_CREATION
IS
PROCEDURE SUPPLIER_IMPORT_PROGRAM (
p_vendor_number VARCHAR2,
p_vendor_name VARCHAR2,
p_enabled_flag VARCHAR2,
p_vendor_type_code VARCHAR2,
p_invoice_currency VARCHAR2,
p_payment_currency VARCHAR2,
p_term_id NUMBER,
p_payment_method VARCHAR2
);
END XXAA_ADI_SUPPLIER_CREATION;
/
CREATE OR REPLACE PACKAGE BODY APPS.XXAA_ADI_SUPPLIER_CREATION
AS
PROCEDURE SUPPLIER_IMPORT_PROGRAM (
p_vendor_number VARCHAR2,
p_vendor_name VARCHAR2,
p_enabled_flag VARCHAR2,
p_vendor_type_code VARCHAR2,
p_invoice_currency VARCHAR2,
p_payment_currency VARCHAR2,
p_term_id NUMBER,
p_payment_method VARCHAR2
)
AS
l_vendor_rec ap_vendor_pub_pkg.r_vendor_rec_type;
-- l_vendor_rec l_vendor;
l_return_status VARCHAR (10);
l_msg_count NUMBER;
l_msg_data VARCHAR2 (240);
l_vendor_id NUMBER;
l_party_id NUMBER;
ERROR_EXP EXCEPTION;
ERR_PAYMENT EXCEPTION;
BEGIN
-- FND_GLOBAL.APPS_INITIALIZE(1318,50554,200);
-- DBMS_OUTPUT.ENABLE(1000000);
l_vendor_rec.segment1 := p_vendor_number;
l_vendor_rec.vendor_name := p_vendor_name;
l_vendor_rec.vendor_type_lookup_code := p_vendor_type_code;
l_vendor_rec.enabled_flag := p_enabled_flag;
l_vendor_rec.start_date_active := SYSDATE;
l_vendor_rec.invoice_currency_code := p_invoice_currency;
l_vendor_rec.terms_id := p_term_id;
l_vendor_rec.payment_currency_code := p_payment_currency;
l_vendor_rec.ext_payee_rec.default_pmt_method := p_payment_method;
FND_MSG_PUB.INITIALIZE;
AP_VENDOR_PUB_PKG.CREATE_VENDOR (p_api_version => 1.0,
p_init_msg_list => 'F',
p_commit => 'F',
x_return_status => l_return_status,
x_msg_count => l_msg_count,
x_msg_data => l_msg_data,
p_vendor_rec => l_vendor_rec,
x_vendor_id => l_vendor_id,
x_party_id => l_party_id
);
If p_payment_method NOT IN ('CHECK','CLEARING','EFT','WIRE')
THEN
RAISE ERR_PAYMENT;
END IF;
IF l_return_status = 'E'
THEN
RAISE ERROR_EXP;
END IF;
EXCEPTION
WHEN ERR_PAYMENT
THEN
RAISE_APPLICATION_ERROR ( -20000, 'Please check the Payment Method in the List of values');
WHEN ERROR_EXP
THEN
RAISE_APPLICATION_ERROR (-20001, L_MSG_DATA);
WHEN OTHERS
THEN
RAISE_APPLICATION_ERROR (-20002, SQLERRM);
END;
END XXAA_ADI_SUPPLIER_CREATION;
1. Creating Integrator:
Navigate to ResponsibilityàHRMS Web ADIàCreate Document
In that select Integrator has HR Integrator Setup

Choose the Excel Options has 2003, 2007 etc which is relevant to your desktop

Select the Layout has Integrator Setup for creating new Integrator
Select the Content has NONE

Then Select Create Document

Give Open to open the file
Please wait until your document has been created
Now the document has been created, Click Close button

This is how the excel file looks like for creating integrator in this EXCEL sheet some of the fields are LOV , to see which of the fields double click on the each column List of Values will be displayed
By using WEB ADI we can Upload, Download and Update the records into the system. We should create our custom integrator according to our business requirement. Here we need to upload data so Choose CREATE has Metadata Type.
Similarly enter the below details for other columns
Enter below Details and click on Oracle -> Upload available under toolbar
Filed Name
|
Value
|
Metadata Type
|
CREATE
|
Application Short Name
|
CUSTOM
|
Integrator User Name
|
XXAA Supplier Details
|
View Name
| |
Form Name
|
GENERAL
|
API Package Name
|
XXAA_ADI_SUPPLIER_CREATION
|
API Procedure Name
|
SUPPLIER_IMPORT_PROGRAM
|
Interface User Name
|
XXAA Supplier Details
|
Interface Parameter List Name
|
XXAA_SUPPLIER_DETAILS
|
API Type
|
PROCEDURE
|
Once you enter the details Go to Add-Ins àOracle àUpload
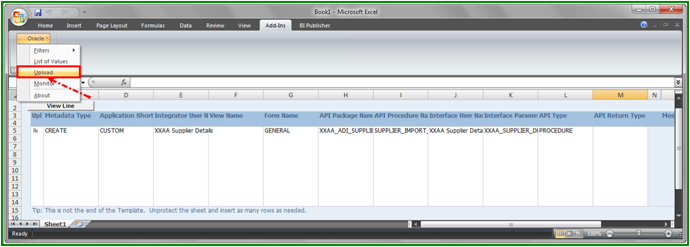


Now you successfully created your Integrator.
4.Define the Layout for the integrator
Navigation -> Desktop Integrator -> Define Layout -> Select your custom integrator name
Click on Create for creating a new layout.

Give any name for the Layout

Now all the available fields will be displayed which has been used in the Procedure parameters
The layout is divided into two important sections-
1. Required fields, where all mandatory parameters need to be aligned as per the requirement.
Instruct parameters can be used to provide some tips to users who are using this WEBADI for uploading data
2. Optional fields are non mandatory fields, we need to select the ones which needs to be available in our custom integrator
Click Next

To define certain important layout features – This functionality is available only to R12 users
· Data Entry Rows – Using this property we can define the default number of rows which the ADI will create when initialized, in 11i we user had to insert the new row in case of access data
· Read Only – Using this feature we can define that which of the columns in our integrator will be available as read only
· Width – Using this option we can define the width of each of the columns which will be available under the custom ADI
· Move Up/Down – we can re-arrange the order of display of column in our integrator

Layout is Successfully Created

Now you WEBADI will be available for use using seeded WEB ADI responsibility
Navigation -> Desktop Integrator-> Create Document -> Search for the custom integrator which you created
Click next and click on create the document which will now download your custom integrator
Navigation -> Desktop Integrator-> Create Document -> Search for the custom integrator which you created

Click next and click on create the document which will now download your custom integrator
Click on Create Document and please wait till the document has been created.

Our document has been created with the needed fields

Once the document has been created, please enter the details for creating new vendor. We can also create exception in the procedure for validating any of the data.
For example

In the above example Payment method should be entered only within the mentioned list , which we described in the procedure. If user enters any of the other values it has been captured and the error message has been notified to user for that particular row
1 Row has been successfully uploaded
We can check the inserted row in the below table
AP_SUPPLIERS or PO_VENDORS(View)
SELECT * FROM PO_VENDORS
WHERE 1=1
AND CREATION_DATE > SYSDATE - 1
AND VENDOR_NAME = 'Test Supplier - 010'
ORDER BY CREATION_DATE DESC
;
Integrator user name can be derived from bne_integrators_vl table with help of following query:
select integrator_code, user_name
from bne_integrators_vl
where 1 = 1
and user_name like 'Supplier%Details'
order by creation_date desc
5. Defining the Form Function for Integrator
1.Define the custom Form Function
Navigation -> Application Developer -> Application -> Function
Function : XXAA_SUPPLIER_DETAILS
User Function Name : XXAA Supplier Details

Type - SSWA servlet function

Parameters
bne:page=BneCreateDoc&bne:viewer=BNE:EXCEL2007&bne:reporting=N&bne:integrator=USER_NAME: XXAA Supplier Details&bne:noreview=Yes

HTML Call : BneApplicationService

Save it.
<![if !supportLists]>6. <![endif]>Assign Function to Custom Menu
Go and add the function into the custom responsibility
Navigation-> Application Developer -> Application -> Menu -> Search for your menu where you want to add this ADI

Now you can navigate to your custom responsibility to see the ADI which you have assigned.

Click next and Create document and your custom integrator is available to user for uploading data


1 comment:
Thanks for putting together a great document.
Post a Comment