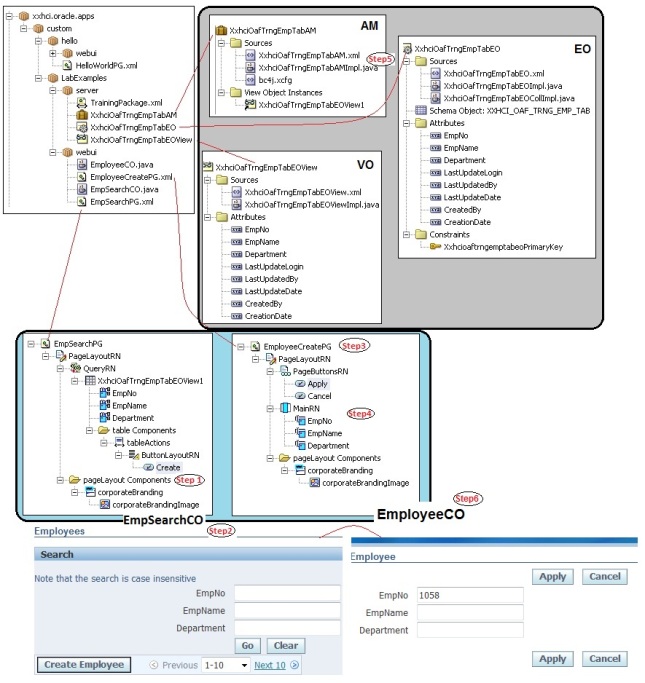
Step1: Build a Create Button
- Select the view EmpSearchPG, right click and select New > TableActions. One region (region1) will be created with region style as ‘FlowLayout’.
- Change the ID of the above newly created region to ButtonLayoutRN.
- Right click ButtonLayoutRN and create a new Item.
- Set the below details for the Item
- ID :Create
- Item Style : submitButton
- Attribute Set: /oracle/apps/fnd/framework/toolbox/attributesets/FwkTbxEmployees/CreateEmployee
- Action Type: fireAction
- Event: create
Step 2: Set a Controller
- Right click PageLayoutRN and select ‘Set New Controller’.
- Give the package name as ‘xxhci.oracle.apps.custom.LabExamples.webui’.
- Give the class name as EmpSearchCO.
if (pageContext.getParameter("event").equalsIgnoreCase("create")) { System.out.println("EmpSearchCO: processing create/update"); pageContext.setForwardURL("OA.jsp?page=/xxhci/oracle/apps/custom/LabExamples/webui/EmployeeCreatePG", null, OAWebBeanConstants.KEEP_MENU_CONTEXT, null, null, true, OAWebBeanConstants.ADD_BREAD_CRUMB_YES, OAWebBeanConstants.IGNORE_MESSAGES); }You might get red lines under java classes which are not imported. Bring the cursor on these red-lined text and click Alt+Enter (JDev automatically tells you to import the class using Alt+Enter when you move cursor over these lines).
Step 3: Build the Create Employee Page (EmployeeCreatePG)
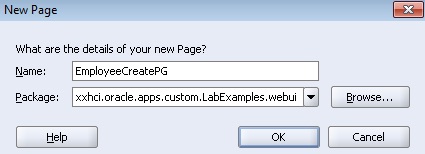
- Right click on Project >New >Web Tier >OA Components à Page.
- Set the Page name as EmployeeCreatePG
- Set the package name as xxhci.oracle.apps.custom.LabExamples.webui
- Select the pageLayout region of EmployeePG and assign the properties as below
ID : PageLayoutRN
AM Definition : xxhci.oracle.apps.custom.LabExamples.server.XxhciOafTrngEmpTabAM
Window Title : Employee Window
Title: Employee
Warn About Change: True
Step 4: Add items to Create Employee Page
- Create a region under PageLayoutRN and assign ID as PageButtonsRN.
- Set the region style as pageButtonBar
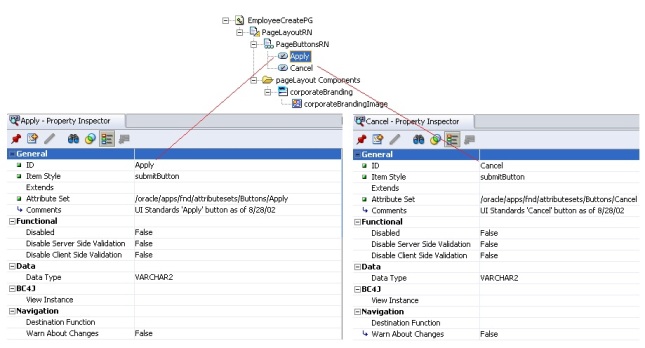
Now we need to create two buttons in this region as APPLY and CANCEL.
For Apply Button:
- Right click on PageButtonsRN > New > Item.
- Set the properties as
ID :Apply
Item Style :submitButton
Attribute Set : /oracle/apps/fnd/attributesets/Buttons/Apply
Additional Text :Click to save the transaction - Action Type: fireAction
- Event: Apply
For Cancel Button:
- Right click on PageButtonsRN > New > Item.
- Set the properties as
ID : Cancel
Item Style : submitButton
Attribute Set :/oracle/apps/fnd/attributesets/Buttons/Cancel
Additional Text : Click to cancel the transaction - Action Type: fireAction
- Event: Cancel
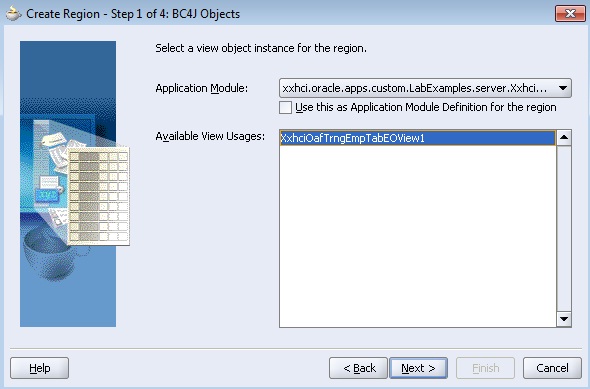
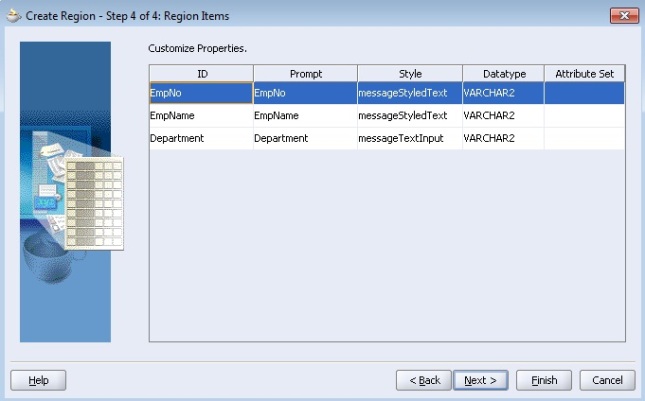
For text items in page: Right click on PageLayoutRN à New à Region using wizard. Enter data as shown in below screenshots
Step 4.1: Select AM and VO instance created during search page
Click on finish for step 5.
Change the Region Style for MainRN to messageComponentLayout. This is done now as above region wizard, doesn’t have support for messageComponentLayout. Click on Yes button when the confirm window pops for change of region style.
Step5: Adding Model Layer Code
Add following code to XxhciOafTrngEmpTabAMImpl.java. Add import statements at the start and rest of the methods with the class definition.
import oracle.jbo.Row; import oracle.apps.fnd.framework.OAViewObject; import oracle.jbo.Transaction; import oracle.jbo.domain.Number; import oracle.jbo.RowSetIterator; // Creates a new employee. public void createEmployee() { OAViewObject vo = (OAViewObject)getXxhciOafTrngEmpTabEOView1(); // Per the coding standards, this is the proper way to initialize a // VO that is used for both inserts and queries. See View Objects // in Detail in the Developer's Guide for additional information. if (!vo.isPreparedForExecution()) { vo.executeQuery(); } Row row = vo.createRow(); vo.insertRow(row); // Required per OA Framework Model Coding Standard M69 row.setNewRowState(Row.STATUS_INITIALIZED); } // end createEmployee() // Executes a rollback including the database and the middle tier. public void rollbackEmployee() { Transaction txn = getTransaction(); // This small optimization ensures that we don't perform a rollback // if we don't have to. if (txn.isDirty()) { txn.rollback(); } } //Commits the transaction. public void apply() { getTransaction().commit(); }
Add the following import statement and modify the create method in XxhciOafTrngEmpTabEOImpl as follows:
Add this as a part of import statements
import oracle.apps.fnd.framework.server.OADBTransaction;
public void create(AttributeList attributeList) { super.create(attributeList); OADBTransaction transaction = getOADBTransaction(); Number employeeId = transaction.getSequenceValue("FWK_TBX_EMPLOYEES_S"); setEmpNo(employeeId.toString()); }
Step6: Add Controller logic for Create Employee Page
Right click on PageLayoutRN of EmployeeCreatePG > Set New Controller.
Give the values as
Package : xxhci.oracle.apps.custom.LabExamples.webui
Class Name : EmployeeCO
Add the below code to the new CO
Import Statements:
import java.io.Serializable; import oracle.apps.fnd.common.MessageToken; import oracle.apps.fnd.framework.OAApplicationModule; import oracle.apps.fnd.framework.OAException; import oracle.apps.fnd.framework.OAViewObject; import oracle.apps.fnd.framework.webui.OADialogPage; import oracle.apps.fnd.framework.webui.OAWebBeanConstants;
processRequest (after super.processRequest):
if (!pageContext.isBackNavigationFired(false)) { OAApplicationModule am = pageContext.getApplicationModule(webBean); am.invokeMethod("createEmployee"); } else { // We got here through some use of the browser "Back" button, so we // want to display a stale data error and disallow access to the OADialogPage dialogPage = new OADialogPage(STATE_LOSS_ERROR); pageContext.redirectToDialogPage(dialogPage); }
processFormRequest (after super.processFormRequest):
OAApplicationModule am = pageContext.getApplicationModule(webBean); // Pressing the "Apply" button means the transaction should be validated // and committed. if (pageContext.getParameter("event").equalsIgnoreCase("Apply")) { OAViewObject vo = (OAViewObject)am.findViewObject("XxhciOafTrngEmpTabEOView1"); String employeeName = (String)vo.getCurrentRow().getAttribute("EmpName"); String employeeNum = (String)vo.getCurrentRow().getAttribute("EmpNo"); am.invokeMethod("apply"); MessageToken[] tokens = { new MessageToken("EMP_NAME", employeeName), new MessageToken("EMP_NUMBER", employeeNum) }; OAException confirmMessage = new OAException("AK", "FWK_TBX_T_EMP_CREATE_CONFIRM", tokens, OAException.CONFIRMATION, null); pageContext.putDialogMessage(confirmMessage); pageContext.forwardImmediately("OA.jsp?page=/xxhci/oracle/apps/custom/labExamples/webui/EmpSearchPG", null, OAWebBeanConstants.KEEP_MENU_CONTEXT, null, null, true, OAWebBeanConstants.ADD_BREAD_CRUMB_NO); } // If Cancel button is pressed, rollback the transaction else if (pageContext.getParameter("event").equalsIgnoreCase("Cancel")) { am.invokeMethod("rollbackEmployee"); pageContext.forwardImmediately("OA.jsp?page=/xxhci/oracle/apps/custom/labExamples/webui/EmpSearchPG", null, OAWebBeanConstants.KEEP_MENU_CONTEXT, null, null, false, OAWebBeanConstants.ADD_BREAD_CRUMB_NO); }
Step 7: Save all and Run the EmpSearchPG to test the page
The Final Output:







 Get Flower Effect
No comments:
Post a Comment